Fall is here! 5 free crochet patterns

Fall has arrived and I thought I’d re-share some of my favorite Fall patterns. All five of these patterns are FREE, so go nuts! Click the photos to get to the patterns.

Crochet: Simple Statement Wreath

The simplest wreath pattern out there.

Crochet: Fall Lace Garland

Ever notice how crochet pineapples kind of resemble leaves? Make a garland in your favorite fall colors!

Crochet: Simple Mask

Perfect for Halloween! These masks are really quick to whip up. Start making a bunch and pass them out at Halloween instead of candy.

Crochet: Bat Bow

Another sweet Halloween pattern. It’s not even October and I want it to be October 31st already.

Crochet: Rube wristwarmers

‘Rube’ is now FREE! Go make your hands cozy!

Pin It

Top 5 patterns/tutorials of 2011

Happy new year, friends! It’s 2012. That’s just wild!

I meant to post this before the year ended, but I just got caught up with other stuff. I’ve enjoyed a long weekend with my family and my son’s 2-week holiday vacation ends tomorrow, so I think it’s time to get back in the habit of posting and sharing.

For now, let’s re-visit the top five tutorials or patterns I posted in 2011*.


Thank you all so much for making 2011 a fantastic year for this blog. I love sharing patterns and DIY ideas with you and I LOVE receiving feedback on it all. Many wishes for wonderful year!

I’m basing this list on what I see in my Google Analytics. This list includes the most visited tutorials posted in 2011. You can view the full list of Goodknits DIY posts here!

Make it: Hanging Card (& photo) Holder

00-title

Are you receiving Christmas cards yet? We got our first a few days ago and it’s been hanging out on my shelf since then. This morning, I decided it needed a new home. I wanted something small, but still cute. ALSO, I wanted something I could hang on to past Christmas. Perhaps something to hang my Instax photos from? Mmmhmmm!

00-mats

Supplies:
random thin tree branch (this one is about 11″ long)
yarn (I used regular worsted weight for stick-wrapping and some fine weight cotton for hanging)
tiny clothespins
cards! and/or photos!
other: scissors, pin or nail to hang the holder from

01

1. Tie a knot and start wrapping up your branch.
2. After about an inch or so, tie on your second color and start wrapping.
3. Wrap the second color around your branch AND the first color’s tail.
4. Keep wrapping, alternating colors (OR keep it solid OR add more colors). When you get to the end, cut off about 2 feet of your last color and tie a knot on the branch.

02

5. Your excess yarn should be able to reach across to the other side of the stick. 2 feet is what I used for my 11″ branch.
6. Tie your yarn around the other end of the branch. Trim any excess.

03

7. Grab your finer weight yarn and cut a piece about 18″ long. Tie a knot an inch from the end. Thread the yarn through the spring of your clothespin.
8. Tie another knot (large enough to not slip through the spring) and thread more pins. Leave about 4-5″ between each pin.
9. When you have about 4″ left, tie your string of pins around the branch.

Make another string of clothespins and tie around your branch as well. Hang and enjoy!

col

Printer-Friendly Mary Janes

flower garden slippers [4]

One of my most popular pages is the one with a tutorial for crocheted Mary Jane slippers. For the most part, folks love the tutorial and are able to crochet multiple pairs very easily. There are still a few emails/comments a week that come to me with questions about starting them or asking for general tips. I try my best to answer them as quickly as possible. I haven’t updated the pattern in a while, but after getting 2 or 3 emails in the same week asking for a printer-friendly version, I finally bit the bullet and whipped one up. It’s a one-page, no photos, black & white version of the pattern. I added a few tips to the bottom for adjusting size and different starting & ending (the slipper closure) methods. If you are a slipper maker, go on and check it out!

Recycle that plastic container!

111.365: recycled food container

Tomorrow is Earth Day, peeps.

A few years ago (ok, two) I crocheted a bunch of cupcake containers for my boys’ birthday party. I used yogurt containers as the base/form. I still collect the plastic containers that have tops and recycle the others. My source for yogurt in plastic containers (with tops) was Target. Their brand, Archer Farms, had the perfect size containers of yogurt (with tops!). Recently, though, they discontinued the use of tops and instead have a foil top. I think it was a good idea; to reduce the amount of plastic in their containers.

However, this means I have more big containers that little ones, now. What to do? Turn them into pretty jars!

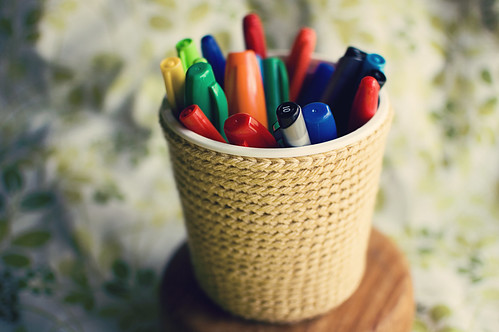
I like to have my writing utencils within reach, so I usually store them in old masons jars or tins. With kiddos, though, I’m constantly asking them to NOT grab out of “my” jar. How rude! The pencils/pens/markers are for everyone! So, I needed an alternative to the glass that can topple over very easily (my Andrew is notorious for spilling his cup of milk at lunch/dinner with the sweep of an elbow).

I crocheted a simple cover for the hideous cottage cheese container and voila! Pretty jar.

Here are my details for a 24 ounce container:
Worsted weight acrylic and 5.5mm (I) hook
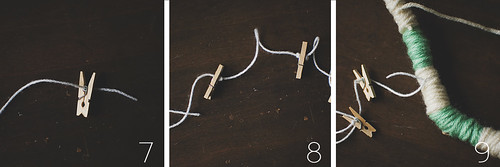
Crochet a chain that fits around the base of the container (mine was 40 stitches). Join to the first chain making sure not to twist the other stitches.
Single crochet all the way around and join to first stitch. [Join at the end of each round.]
Crocheting through the BACK LOOPS ONLY (on every row), crochet 5 more rounds.
On the next round, increase by 4 stitches evenly around. Crochet 2 even rounds. (44 stitches)
Increase by 4 stitches again on the next round, then crochet 2 even rounds. (48 stitches)
Increase by 4 stitches again on the next round, then crochet 3 even rounds. (52 stitches)
Increase by 4 stitches again on the next round, then crochet 3 even rounds. (56 stitches)
Finish off and weave in ends.
You can hot glue the edges to the container, or if it’s a snug fit, just slip it over. Right now, mine is just slipped over, but I may glue it, so I can avoid the boys ripping it off every few days.

after

I think this can be easily adjusted to fit any size container. Start with a chain that fits around and increase if the container increases in diameter, like mine. If it’s more cylindrical, you probably won’t have to increase at all! Just crochet enough rounds to reach the top.

Right now, this one is filled with my Sharpies and other permanent markers. I plan to switch them out with my kids’ colored pencils. Sharpies don’t mesh well with [almost] 3 year olds. I mean…they would IF my couch were a coloring book.

I think recycling is important in this day when almost everything is packaged in plastic. We have a recycling bin that gets picked up every other week. It is usually overflowing by the time 2 weeks passes, with scrap paper, cardboard, soda bottles, soup cans, etc. It’s pretty satisfying to be able to not contribute as much waste.

Happy Earth Day, everyone! We only have one, so let’s take care of it, ok?

p.s. Lowe’s is giving away free trees on Saturday. My backyard only has two trees in the far back, so I’m going to see if we can go and snag one. If not, I’m going to browse their fruit trees. Mama would love a pear tree!