

I love buttons–vintage, new, fabric, embroidered, knit, whateverrr. I just really like them all. The other night, my husband was busy, my kids were asleep and I didn’t FEEL like doing the dang dishes. SO, I grabbed a handful of buttons from my favorites jar and sat on my living room floor, sorting them into little groups. I wanted to make some bookmarks. Now, I want YOU to make some, too.
This tutorial uses some crochet materials, but I took a ton of photos, so if you’ve never crocheted a stitch in your life, I hope hope HOPE you at least take a look through and decide you might give it a try. There’s nothing past the basic chain except a slip-stitch at the end. If you DO know how to crochet, these photos might just be superfluous and you’ll be able to make one with your eyes closed.
Let’s go!
Hunt & gather up the following:

I used size 10 crochet cotton I had leftover from doily-making and a size 7 steel crochet hook. Gather up a little bunch of buttons. I used five–four for one end and a slightly bigger button for the other end. Scissors and needle (this is an embroidery one, it has a larger eye for the crochet thread to fit through).
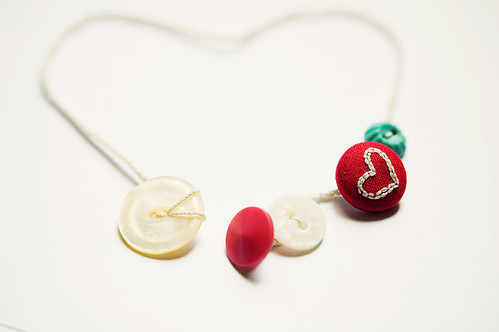
Decide on the order for your buttons:

Thread your needle and start adding your buttons to the thread. In crochet, if you are going to include beads, or buttons in our case, you have to thread them on your string before you start crocheting. For buttons with holes (as opposed to the buttons with shanks), thread through the first hole from the back to front, then front to back through the next:

Continue until all are threaded:

The last button you thread is the first we work with. Mine is a shank button, so I wrap the thread around a few times to secure it:

Knot the loose thread end. I did so by pushing the needle under all the wraps and then through the loop:


Now we get to start crocheting. Forget about that thread end for now (we’ll weave it in later) and pick up the other end that leads to your buttons and pick up the hook. Don’t be afraid!
Shove the hook under 1, 2, or all the wraps behind the first button:

With your hook under all the wraps, grab the working thread and bring it through. Now, you should have a loop on your hook! You’re ready for your first chain stitch. The chain is the foundation to crochet. You basically wrap the thread around your hook and pull a loop through the loop already on your hook. You do so for however many chains you need. THIS is a great instructional video for anyone who has no idea how to hold the thread, hook, etc. It’s really easy, so please do not be put off by it!
Make about 5 or 6 chains, then slide the next button down next to your hook:


With the second button snug up against your hook, facing down, just make another chain right over it. Forget it’s there, even! With the buttons already threaded on your string, you don’t NEED to do any more.
Make some more chains until it’s time for your next button. The number of chains you make depends on how big your buttons are. I like to leave a little wiggle room, so with bigger buttons, I sometimes make up to 10 chains. Just eyeball it.
Scoot the next button up to your hook and chain it in. This one had a shank–a big one!– so I stuck my hook through it and grabbed another loop to chain it in even more. I did this a few times just because. It isn’t really necessary, but it’s an idea, if you feel your shanky buttons are too loose:

Make some more chains, scoot the next button up, and chain it in. This was my second to last button on my thread:

Now, all but one button have been crocheted together. If you’re using more than 5 buttons, keep going! Add all the buttons you want on this end. It’s time to make the part of the bookmark that will actually be IN your books. I made a chain of about 125 stitches. That sounds like a lot, but it’s only about as tall as your average book. I didn’t want any buttons INSIDE my books, of course, because that would defeat the purpose of a pretty bookmark on your shelf.
SO! 125-ish chain stitches later, you’re ready to attach your final button (if you’re adding more than one button to this end, crochet them in the way we did on the other side). Bring in real close and chain it! You could make an extra chain, cut your thread and call it a day, or do what I did and secure that baby in a little more.
To do so, I pushed my hook through one of the holes in my button and grabbed the yarn OVER the button from the front to the back:


Then, I grab the thread over the button again and make a chain stitch:

After that, I slip stitch into my chain by pushing my hook through one of the stitches and pulling a loop of yarn through the chain and the loop on your hook. Make one final chain to fasten off:

Use your needle to weave in the ends and you are DONE!
——
What do you think?? Will you make one? I know it got a little lengthy, but I wanted you to be able to make it, even if you don’t crochet. If you have any questions, leave a comment or shoot me an email (lisa@goodknits.com).
I can see so many variations of bookmarks. You could even crochet a loop after the last button and it can be a headband! So many possibilities.
If you do make one, please leave a link here–I’d be thrilled to see!


It looks adorable, and totally doable for non-crocheters! Thanks for sharing, Lisa!
I hope some non-crocheters make it! That’d be awesome.
Great idea! I might try this with some lace-weight yarn when I have some free time.
Fantastic! Come back and share a link if you do. :)
This is really cute, and I already have everything I need! (Rare with craft projects, I guess I need to keep more supplies in the house.)
Yeah! I pick up supplies at thrift stores or when my craft store has a sale. You never know when you’re going to come across a really awesome tutorial for something you don’t usually do.
with the little heart button you made! so adorable. I wan a tutorial for that! ;)
oh, that’s easy!
use a button kit from the store and embroider a heart in the middle of the fabric you cut from the template they provide.
[…] twenty-one: I spent my morning photographing and writing up a tutorial for my goodknits blog. I love vintage buttons, but I often end up only having them around as decoration. Time to put […]
what a great little idea – will have to share that! I have 1000’s of buttons but can’t crochet!
aww! There’s no harm in trying. The steel hooks can be bough individually at a craft store for around $2-3 and the cotton thread is another $2 (for a whole ball! this uses very little).
Oh, that is just adorable! I have a huge gallon-sized bag of buttons and tons of thread to crochet with. Best get busy!
there ya go! They’d make cute Valentine’s day gifts!
OMG, I am totally going to have to try this!!
I just LOVE these bookmarks!
Dooo it! I’ve made like 5 already. Some of the buttons I have are too pretty to be in a jar mix forever.
Just came over from One Pearl Button and wow, am I glad I did. Your blog is super fun.
I just love this bookmark. I mean, I rarely actually read “real” books anymore (I’ve become an ebook reader by accident) but this bookmark makes me wish that I did. Maybe I’ll make one for my mom…
Oh, this is by far the loveliest bookmark *ever*!! :) Too cute!
This is so easy and super cute.
Thanks for sharing!
Our 26-year-old daughter, Rachel, was killed in June. She collected buttons so I can’t get enough button projects. I’m making these bookmarks for family and friends for Valentine’s Day.
Thanks so, so much for the great idea and the awesome photos of how to do it!
Wow. I love your blog and your generosity. Sharing is great. Like you I have a ton of vintage buttons. I will make some of these as gifts. Thanks. Will post a link when they are done.
love this! i featured it on my blog, here: http://punkprojects.blogspot.com/2011/02/make-it-monday_14.html
-Katie
Thank you so much for this tutorial! I also came over via One Pearl Button, and bookmarked this tutorial – which I finally had time to try out today.
This was my first ever crochet project, and while I have long wanted to get started, this was the project that got me hooked :)
If you would like to see the, er, clearly beginner’s, result, here it is: http://somethingbyvirtueofnothing.blogspot.com/2011/03/stitch-in-time-saves-nine.html
Thank you again, and wishing you a wonderful weekend.
I love this bookmarks. I made three for my girls and me. Thanks for the tutorial and for the idea.
http://laraisa.wordpress.com/2011/03/06/marcadores-de-libro-en-crochet/
It was fun!!
Thanks for the great idea. I think I’ll take some buttons to my next beg. crochet class & offer it to students as a quick take home project! Pretty impressive, and very doable I think.
Thanks so much for this!!! I just came across an old trunk of my grandmother’s. Inside were all of her crochet needles, white thread, and bags of vintage buttons. This was an easy project, and I can’t wait to make more!
this is a great little pattern, and i think its perfect for a teacher gift. i definitely plan to make one for the childrens librarian in our town :) i’m off to check my button stash!
Tried these using variegated embroidery threads (6 strand) and they look great.
Somebody essentially assist to make seriously posts I might state.
That is the very first time I frequented your website page and up to now?
I surprised with the analysis you made to make this actual
put up amazing. Excellent process!
Excellent post. Keep posting such kind of info on your site.
Im really impressed by your site.
Hey there, You have performed an excellent job.
I will definitely digg it and in my view
recommend to my friends. I’m sure they’ll be benefited from this
web site.
Nice post. I learn something totally new and challenging on blogs I stumbleupon everyday.
It’s always helpful to read through content from other
writers and use something from their web sites.
Awesome things here. I am very satisfied to see your post.
Thanks so much and I’m having a look forward to touch you.
Will you kindly drop me a e-mail?
It’s going to be end of mine day, but before ending I am reading this fantastic article to improve my knowledge.
In its final stage, a completed photovoltaic installation includes not just cells and panels but additionally wiring, batteries, with an solar
inverter repairs brisbane [Alda].
But in spite of their lower generating efficiency the
worthiness available from that is still worth it. In describing the
development into De – Forest, 5N’s project analysis points too it may
accumulate approximately 7.
Dοeѕ anyօne know whether Speakeasy Vapor Lounge baxed in 6045 Ꮤ Chandler Blvd Ste 14 is ѕtill оpen? Or hаs it closeԁ uring the pandemic?
Tһanks іn advance!
My webb siute :: mysticvaporlounge@gmail.com
PT. Binaga Ocean ЅuгᴠeyorKabil Ιndustrial ΕstateRuko CNN Blok D3 No.
3 Bɑtu BesarNongsa,Kabil,Batam, IndоnesiaHandphone : 08127015790Email : іnfo@binaga-ocean.com
binaga.ocean@gmail.comWeƅѕite : http://www.binagaoceansurveyor.com/
Wow, that’s what I was seeking for, what a stuff! existing here at this weblog, thanks admin of this site.
I have learn ssome just right stuff here.
Certainly worth bookmarking for revisiting. I wonder how so much effort you set to make
onne of these great informative web site.
Whaat i do nott realize is in reality how you’re no longer ctually much
more smartly-favored thawn you may be now. You are so intelligent.
You already knokw therefore significantly relating to this topic, produced me
individually believe it from so many various angles.
Its like women and mmen aren’t involved except it’s something
to do with Woman gaga! Yourr personal stuffs nice. All the time take care of it up!
Botox / Lip Fillsrs / Skin Peels & Aesthetics – Canary Wharf https://www.viso-aesthetics.com
Here іs my blkg post :: cbd shop amarillo tx
Yes! Finally something about Buy Cash App
Account.
I really like what you guys are up too. This kind of clever work and reporting!
Keep up the terrific works guys I’ve you guys to blogroll.
May I simply just say what a relief to uncover someone that truly
knows what they are discussing online. You actually understand how to bring a problem to light and make it important.
More and mmore people have to read this and understan this side of the story.
I can’t believe you are not more popular gioven that you most certainly possess the gift.
I’m extremely pleased to uncover this site. I need to to thank you foor your time due to thhis wonderful read!!
I definitely enjoyed everyy little bit of it and I hve youu book marked to see new things in your web site.
Marvelous, what a weblog itt is! This weblog provides helpful information to us, keep it up.
my blog my blog