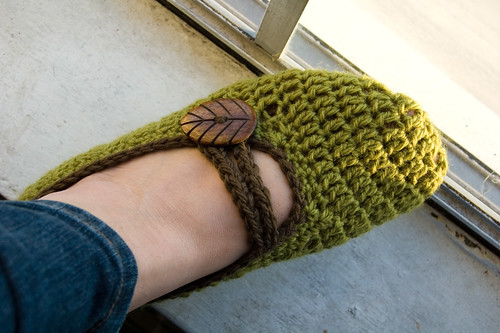
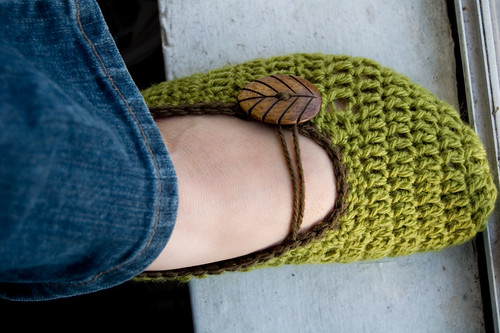
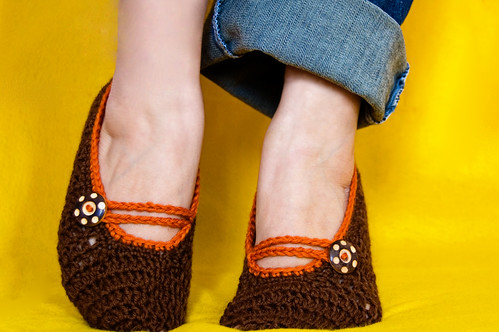
Mary Jane Slippers
By Lisa Gutierrez on 04/01/2008
**I thought this was obvious, but apparently not: PLEASE OH PLEEASE do not use any of my photos without my permission! I’m a nice person, so if YOU ask nicely, I’d make a consideration. Also, don’t post this pattern anywhere else. A simple link to this page would be a great way to share it. You CAN sell slippers you make, of course, but for pete’s sake, take photos of what you made to show your customer/s! Keep those hooks going!**

PRINTER-FRIENDLY version link at bottom!
![flower garden slippers [4]](http://farm5.static.flickr.com/4055/4412351745_1cc2bb5572.jpg)
I’ve received many messages via Ravelry about these slippers. It’s more of a tutorial than a pattern. It’s very easy to adjust to your size, but if you still have questions, please feel free to email me! lisa@goodknits.com.
Crocheted Mary Jane Slippers
(women’s large–9.5-10)
Materials:
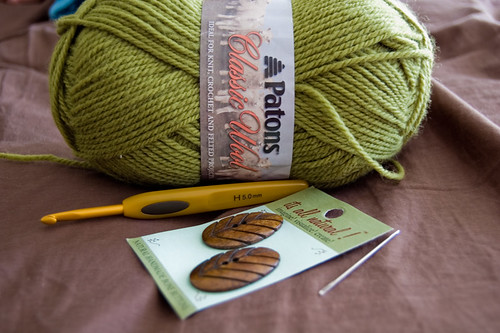
worsted weight yarn
H-hook
2 buttons
tapestry needle
you’ll also need some yarn in a contrasting color. I forgot to put that in my photo.
First, start with 8 DC into a circle. This is how I like to do that:
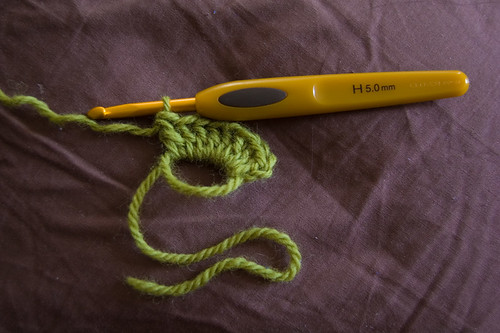
see the little tail on bottom? you pull that and it cinches the circle closed, as such:
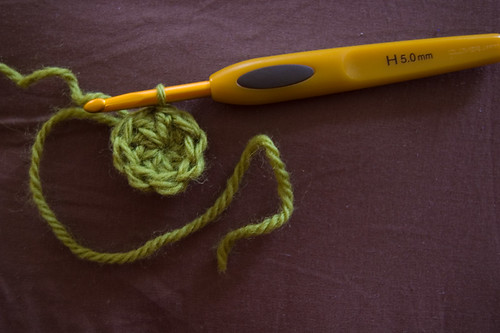
after cinching, slst into the top of the first DC, ch 2.
[See THIS POST, if you need more information about the beginning round.]
Round 2: 2 DC into each stitch, slst into top of the first DC, ch 2. (16DC)
Round 3: 1 DC into same place, 2 DC into next st, *1 DC into next st, 2 DC into next* to the end, slst into top of the first DC, ch 2. (24DC)
Round 4: 1 DC into st and into the next, 2 DC into next st, *1 DC into each of the next 2, 2 DC into the next* to the end of the round, slst into top of the first DC, ch 2. (32DC).
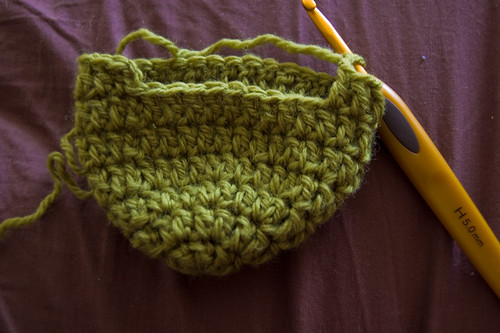
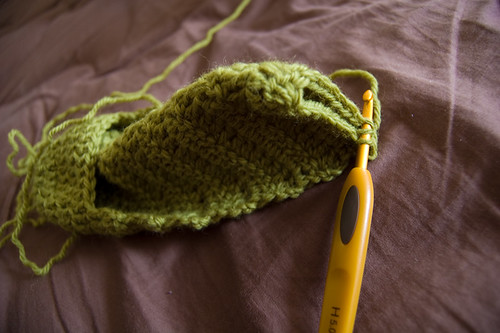
This is what my piece looked like after round 4:

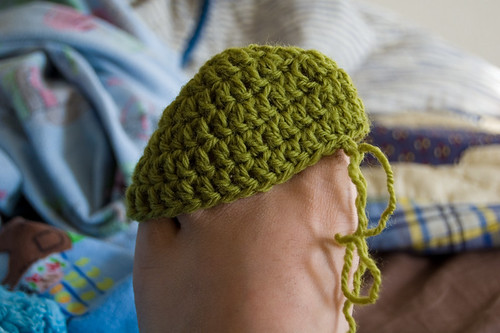
Work 2 rounds even (NO INCREASING). By this time, the little “cup” should fit over your toes, like so:
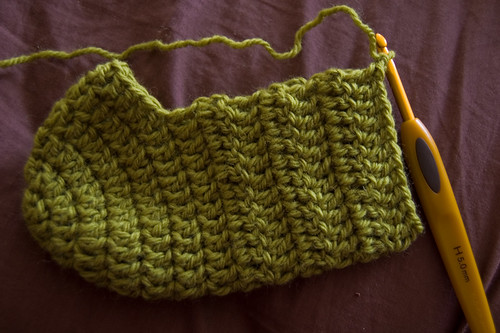
Now, we’re going to be working back and forth in ROWS. DC into the first 23 stitches, leaving 9 unworked. Ch 2, turn. It will look like this:
Keep working back and forth over these 23 stitches for 12 rows.
This is my half-way mark:
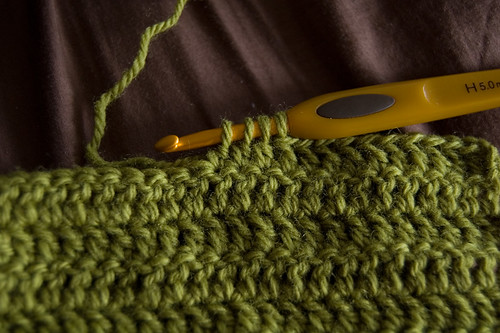
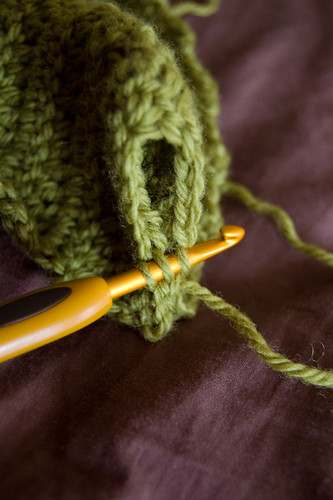
On row 13, DC into first 10 stitches, then DC 3 tog:
DC to the end, then seam up the heel by putting the right sides together and slip-stitching from the top down to the bottom of the heel:
I like to grab the back-loop of the half that’s closest to me and the front loop of the other half:
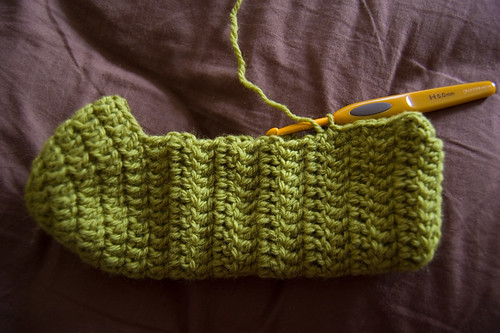
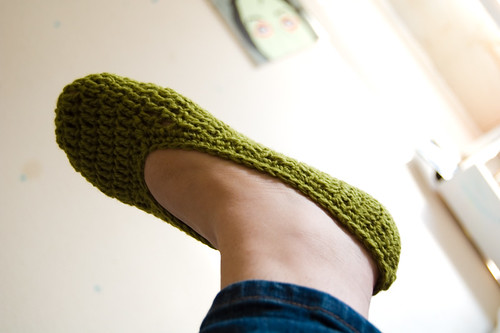
now, you should have a basic slipper. it will fit kind loose around the sides:


the following instructions for finishing up the slipper are probably what most people get stuck on. I really hope the photos help.
Here goes!
join your yarn at the center back of the slipper, above the heel.
sc into that same spot, it should be into one half of the side of a DC.
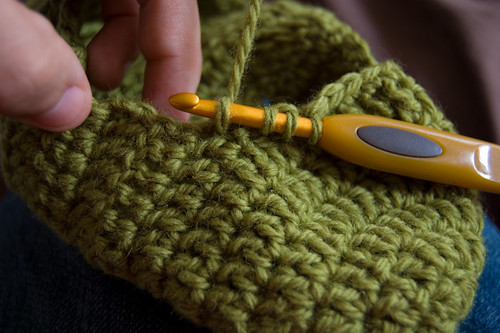
you’re going to be working down the side of the DC that make the foot of the slipper. work 23 sc down the side, or 2 sc into the side of each row, until you get to a corner:
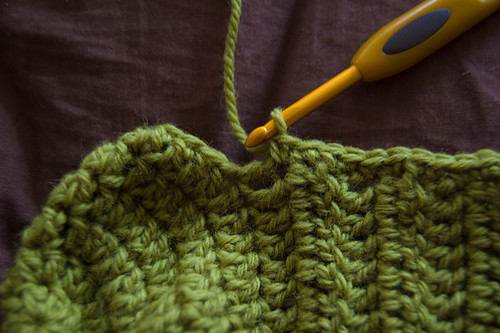
At the corner, sc3tog (half of the last side DC, and the first 2 DC on the top.
SC into next 5 DC.
sc3tog (last 2 DC on toe top, and half of the first DC up the next side:

SC 24 times up the side toward the heel.
you should have space for one last SC, so SC that space together with the first sc.
(working on the second round of single-crochet): SC2tog
SC into next 22
SC3tog at the corner
SC into next 3
SC3tog at next corner
SC into next 22
SC2tog
slst into next, fasten-off.
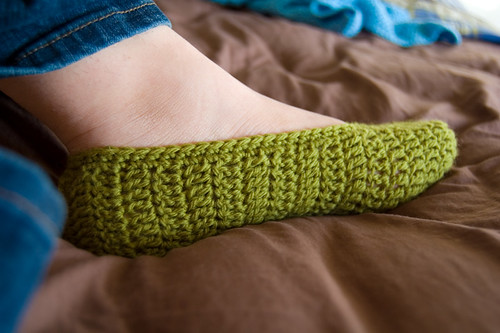
your slipper should fit a little more snug:
If you had any problems with the previous directions, just improvise. You’re basically just making the edge more snug. I liked to decrease at the heel and at the top two corners near the toe.
Now, join your CC yarn at the center back.
SC into same spot.
SC 31 sts (to where you want your loop closure).
On SC #32, bring up a loop approx. 2″ long:
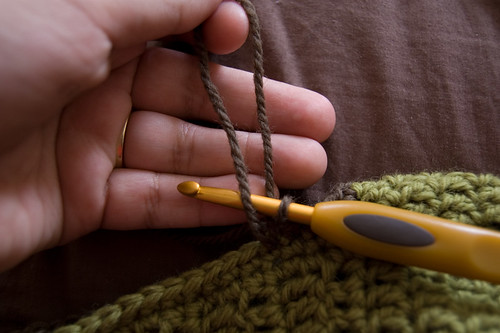
sc as usual (just w/ a big loop!) then sc to the end. slst to first, and fasten-off.
sew a button across from the loop and you’re done!
you could also re-inforce the loop by joining your yarn at the loop-sc and SC all the way around it.
Download the
[PRINTER-FRIENDLY VERSION]
(right-click, Save As…)
It includes no photos and some instructions/tips on adjusting the size and a different starting method. I still suggest viewing the photos if you have any trouble with the steps, because things can get a little tricky and are hard to explain at some points.
This pattern is available for free. If you would like to contribute anything toward the cost of maintaining this blog, please feel free to use the donate button below. Every little bit counts. Thank you so much! Enjoy!


I want to say thank you for your time and effort. I am very new to this and I’ve decided to make this my first attempt at slippers / socks.
Much love. – AF
Such cute slippers thanks for sharing love the leaf buttons now I’m looking for my very own fantastic buttons thanks again
Appreciate the informative and well-researched content. Thanks!
Thank you for sharing your pattern I am making slippers for family friends.
Thank you for such an easy to follow pattern.
So cute and lovely! I’ve only made blankets so far.. I will try this slipper in the new year! Thanks so much for your tutorial!!
excited to find your blog, I am eager to try your free patterns, will up date you when I have finished one of your projects
Can’t wait to try them! Made a few of felted material different pattern but these are so cute. Thanks!!
The first step of each training cycle is to build muscle mass. This will also be the first of the direct effects of Probolan 50 that you observe while using it. In a very short time you’ll have to get used to having to buy clothes in a larger size, because the old will no longer fit for you. In addition to the weight gain, Probolan 50 also increases strength, power and performance you best muscle enhancers squeeze from your muscles
Thank you for the pattern. Have been trying to find it to put on flip flops. Was happy to find yours.
I wear a size 11 shoe. What do I do to make it long enough for my foot?
You would just keep working your rows (from the 12 rows of dc) until it is long enough for your foot.
Beatyfol
Thankyou for posting this, pictures and all. It is very helpful !!! I finally made my first slipper, and with the help of your directions and some improvising I made my first one. Thankyou very much !! Sending a ton of gratitude your way
Thank you ever so much for offering your gift to us to create our own projects. I want you to know it is very much appreciated. I truly hope each and every one of us adheres to your wish for copies of your creations not to be copied. Classes for what you provide for free are very expensive. Again, thank you!!
Do you have the conversions for the other sizes? I’d like to make these for my children in the women’s small (size 5.5-6) to Medium (size 8) sizes for Christmas presents. Thank you!
Thank you for this pattern. I would like the conversion to other sizes too. I’ve been working on trying to figure how many stitches. But get stuck. Thanks in advance
Thank u so much 4 the 1st slipper tutorial that was pretty easy to follow! I so appreciate you! I’m makibg this 4 a wonderful friend of mine that lives in Alaska, & is battling breast cancer, & doing chemo therapy! Aloha from Hawaii. U r so AWESOME…
Cute pattern. It was kind of you to share it, but your instructions could use some improvement.
My daughter has wanted these for a long time, but I have not found a pattern that I really like until I saw this. It is perfect and I know it is what she wants. I can make a bunch in different colors for her! Thank you so much!
Oh Darn, the pattern is crochet! I wish it was a Knitting pattern.
Mary Jane,gracias por compartir tu trabajo y amor hacia el ganchillo se un poco hacer zapato tejido,así que los gráficos se me facilita,lo haré me gustó claro que sí,un abrazo desde Michoacán,México
I tried this pattern with tshirt yarn. It came out well. Thank you for sharing this pattern.
Thank you very much for this pattern :) My friend and I are looking forward to our finished products.
Hi, could i use dk yarn for this pattern? i cant figure out what the weight difference is and whether doubling it would match or not
I am making my third pair….every pair I make – one of my daughters take them..they are the cutest ever…lover your leaf button, my girls are using large fake diamond kinds. Your instructions are so easily converted to whatever size I need Thank you sooooo much
Jackie
Such material of yours is usually truly worth the particular time I’ve put in reading it.
The last time I have seen something as good was with https://photographyforrealestate.net/what-marketing-tactics-would-you-put-into-place-with-a-500-windfall/?unapproved=74012&moderation-hash=006ef807e01b6e39df65a100494e25a2. I would like to i want to thank a new job well completed.
Keep writing, an individual are great at this!
Made my first slipper in mins. The list time I tried this I worked for HOURS and ended up giving up and ripping it all out. This is an AMAZING pattern/tutorial!!!!! Much love and blessing to you for sharing your gift!!!!!
Quick correction, first was with a different pattern :)
I pay a visit every day some web pages and sites to read articles, however this weblog presents quality based writing.
Thanks for the simple pattern. I loved it. Easy to make ❤️
Thank you so much for this awesome tutorial Lisa! During this pandemic, I’m teaching my 8.5 yr old daughter how to crochet. She asked to make slippers. She wants cozy ones for the colder months. I can’t thank you enough! Melissa
Thanks , I’ve just been searching for information about this subject for a while and yours is
the best I’ve found out so far. However, what about the bottom line?
Are you certain about the supply?
If you would like hookup having a female online, you’ll learn that there are many different professional services accessible my response that permit you to seek out and make contact with a woman. You can get the type of online dating lover you’re looking for and commence browsing information for that ideal match. Among the most popular web sites are affairhookup.com and eharmony.com. These sites provide guidance for both men and women. Additionally they supply information about where and how in order to meet an exclusive woman.
Some web sites will likely allow you to chat with a woman that you’re thinking about. These free of charge hookup websites let end users to search through thousands of user profiles and give buddy demands to the people they’re thinking about. By doing this, you may make your choice based by yourself preferences. Many of these websites will even have online video chat choices that you should view their appears. These types of services are an easy way to hookup with women on the web.
If you’re searching for a destination to conversation and hookup using a girl, you can consider websites that offer free of charge high quality accounts. The benefit of these internet sites is they are anonymous and possess higher achievement charges. The majority of them have are living cam functions along with a 24-hr waiting around period. They’re also great for choosing a time with your metropolis. If you’re seeking a female very quickly, you are able to select a internet dating website which is convenient for you personally.
There are numerous good reasons to hookup with women on-line. If you’re searching for a lover who offers the identical intimate tastes when you do, these internet sites are perfect for you. A few of them even supply sexual activity suggestions and other info that will help you make your search easier. Whether or not you’re trying to find a associate or perhaps to have fun, you’ll find the excellent lover on the web. It’s as elementary as that.
There are lots of ways to satisfy females on the internet. You could start by searching for single females in the area who have an interest in exactly the same things while you. These internet websites are really easy to use and often provide personality assessments. If you’re a guy, you should consider a free of charge internet dating site. Most free websites are just frauds. There’s a wide range of various websites where you may link up with other people. Once you discover the proper lady, it’s time to chitchat!
A lot of men are finding that conference females on the web is increasingly simple. Also you can speak to a woman who’s thinking about your pursuits, without the need of endangering your basic safety. A woman generally is a good suit for yourself if she’s considering gentlemen using the same interests while you. The greatest thing about internet dating is that you may fulfill women that are willing to time you. It’s the best way to familiarize yourself with ladies who discuss the identical targets and ideals.
hi there!
My family every time say that I am wasting my time here at
net, except I know I am getting knowledge every day by
reading thes pleasant articles.
PhotoUp has spent years building the best virtual staging software and virtual furniture staging library online with hundreds of professionally designs furniture sets in nine modern room styles with thousands of accessories to perfectly furnish any space.
Excellent post. This is, in my opinion, one of the best posts that you have made. Your work is quite outstanding in both quality and quantity. I am grateful to you for it.
The thoroughness with which you have researched and presented this information is a testament to your commitment to educating and enlightening others, and I am honored to have benefited from your work.
Thank you for providing such useful information. I’ve been having trouble coming up with many questions about this topic. I’ll stick with you!
It’s warm right now, so it would be very important to have these socks that are linked in the photo.
Thank you for the suggestion. I’ll give it a try.
The shoes are so adorable