Restyle: lamp shade

restyle: lamp shade

From ordinary black lamp shade to lovely needlepoint-inspired shade. I found a set of 4 hankies that had this faux-cross-stitch all over, at Goodwill last week. I made a rice pack using half of one and used a whole one for this.

While I was doing my own embroidery by this very lamp, I thought about how BLAH the black lamp shade was. I thought about the fabrics I had in my closet and nothing really struck me with inspiration, until I reached this one.

I ripped all the fabric off and was left with a white plastic covered frame. It was still slightly sticky from the original fabric, so I smoothed it out and used double-sided tape at the seam. I hot-glued quilt-binding along the edges to finish it off.

145.365: soft light

Can we talk about how sweet this glow is?

diptych: lamp light

I’m so in love!

The Cafe Curtains

I put up a curtain rod over one of the windows in my breakfast room, about 9 months ago. It took me that long to make curtains. That’s about how long it takes to make a baby! After putting it up, I had to decide on a fabric. I chose one and then hated it. Fast forward a few months and I win a Waverly Fabric giveaway on sfgirlbybay!

143.365: the cafe curtains

When I received the fabric, I was in awe. My creative mind kind of just froze and the box sat next to my knitting basket since then. I would sneak peeks and wonder if I should make a pillow, an apron, or perhaps some sort of magical quilt. It wasn’t until a few days ago, when I was standing in this room thinking about how I “wished I had made those curtains before the birthday party” (this Saturday), that I realized this fabric would be PERFECT!

cafe3
View from the kitchen.

I sewed them up, yesterday evening. The boys went to Grandma’s for a day of fun in the sun (and crawfish. ick) and I stayed behind to clean their room (it was HORRIBLE but now is LOVELY). I made 2 simple rectangles out of one yard of this print and hung them up with a rod and clips from Ikea. They came out the perfect cafe-style length.

cafe2
I think I might pick up some bamboo valances for the top and get rid of the blinds.

Boy, oh, boy. This is some beautiful fabric. I am in love with this room, now. I just need to score the perfect chairs and I’d be all set! Next up in my sewing queue: a valance for my kitchen to replace the ugly dingy one that came with the house. Can you guess what fabric I’ll be using for that??

It starts with a Wave and ends with an -erly. :)

Decoration: ruffled streamers

the birthday house

One of the party decorations I knew I HAD to make for my boys party were these ruffled streamers I saw on MADE.

I was a little nervous, because my sewing skills leave something to be desired. I hesitantly bought 5 different colored pack of crepe streamer at Hobby Lobby and tried it out.

diptych: the ruffled streamers

EASY PEASY. Like, seriously. I think it’s the perfect project for someone like me who has had problems getting the right tension when sewing. You want the paper to ruffle! I kept my tension at about 6 and everything came out perfectly! My machine was a little hot and bothered by the end of it, though.

The best part, though? The boys like them. AND they make a fantastic backdrop. I took some photos of Andrew on his birthday, yesterday. The streamers will stay up until after Nathan’s birthday on June 2.

140.365: the birthday JOY

Recycle that plastic container!

111.365: recycled food container

Tomorrow is Earth Day, peeps.

A few years ago (ok, two) I crocheted a bunch of cupcake containers for my boys’ birthday party. I used yogurt containers as the base/form. I still collect the plastic containers that have tops and recycle the others. My source for yogurt in plastic containers (with tops) was Target. Their brand, Archer Farms, had the perfect size containers of yogurt (with tops!). Recently, though, they discontinued the use of tops and instead have a foil top. I think it was a good idea; to reduce the amount of plastic in their containers.

However, this means I have more big containers that little ones, now. What to do? Turn them into pretty jars!

I like to have my writing utencils within reach, so I usually store them in old masons jars or tins. With kiddos, though, I’m constantly asking them to NOT grab out of “my” jar. How rude! The pencils/pens/markers are for everyone! So, I needed an alternative to the glass that can topple over very easily (my Andrew is notorious for spilling his cup of milk at lunch/dinner with the sweep of an elbow).

I crocheted a simple cover for the hideous cottage cheese container and voila! Pretty jar.

Here are my details for a 24 ounce container:
Worsted weight acrylic and 5.5mm (I) hook
Crochet a chain that fits around the base of the container (mine was 40 stitches). Join to the first chain making sure not to twist the other stitches.
Single crochet all the way around and join to first stitch. [Join at the end of each round.]
Crocheting through the BACK LOOPS ONLY (on every row), crochet 5 more rounds.
On the next round, increase by 4 stitches evenly around. Crochet 2 even rounds. (44 stitches)
Increase by 4 stitches again on the next round, then crochet 2 even rounds. (48 stitches)
Increase by 4 stitches again on the next round, then crochet 3 even rounds. (52 stitches)
Increase by 4 stitches again on the next round, then crochet 3 even rounds. (56 stitches)
Finish off and weave in ends.
You can hot glue the edges to the container, or if it’s a snug fit, just slip it over. Right now, mine is just slipped over, but I may glue it, so I can avoid the boys ripping it off every few days.

after

I think this can be easily adjusted to fit any size container. Start with a chain that fits around and increase if the container increases in diameter, like mine. If it’s more cylindrical, you probably won’t have to increase at all! Just crochet enough rounds to reach the top.

Right now, this one is filled with my Sharpies and other permanent markers. I plan to switch them out with my kids’ colored pencils. Sharpies don’t mesh well with [almost] 3 year olds. I mean…they would IF my couch were a coloring book.

I think recycling is important in this day when almost everything is packaged in plastic. We have a recycling bin that gets picked up every other week. It is usually overflowing by the time 2 weeks passes, with scrap paper, cardboard, soda bottles, soup cans, etc. It’s pretty satisfying to be able to not contribute as much waste.

Happy Earth Day, everyone! We only have one, so let’s take care of it, ok?

p.s. Lowe’s is giving away free trees on Saturday. My backyard only has two trees in the far back, so I’m going to see if we can go and snag one. If not, I’m going to browse their fruit trees. Mama would love a pear tree!

D.I.Y. Button Bookmark

diy button bookmark

I love buttons–vintage, new, fabric, embroidered, knit, whateverrr. I just really like them all. The other night, my husband was busy, my kids were asleep and I didn’t FEEL like doing the dang dishes. SO, I grabbed a handful of buttons from my favorites jar and sat on my living room floor, sorting them into little groups. I wanted to make some bookmarks. Now, I want YOU to make some, too.

This tutorial uses some crochet materials, but I took a ton of photos, so if you’ve never crocheted a stitch in your life, I hope hope HOPE you at least take a look through and decide you might give it a try. There’s nothing past the basic chain except a slip-stitch at the end. If you DO know how to crochet, these photos might just be superfluous and you’ll be able to make one with your eyes closed.

Let’s go!

Hunt & gather up the following:
supplies

I used size 10 crochet cotton I had leftover from doily-making and a size 7 steel crochet hook. Gather up a little bunch of buttons. I used five–four for one end and a slightly bigger button for the other end. Scissors and needle (this is an embroidery one, it has a larger eye for the crochet thread to fit through).

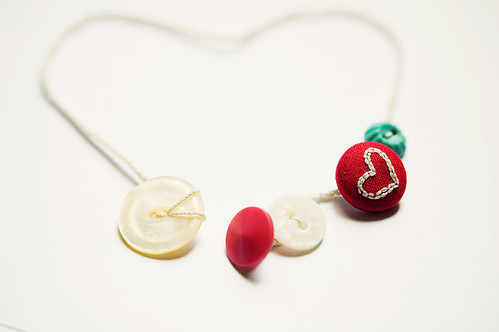
Decide on the order for your buttons:
button order

Thread your needle and start adding your buttons to the thread. In crochet, if you are going to include beads, or buttons in our case, you have to thread them on your string before you start crocheting. For buttons with holes (as opposed to the buttons with shanks), thread through the first hole from the back to front, then front to back through the next:
threading buttons

Continue until all are threaded:
threaded

The last button you thread is the first we work with. Mine is a shank button, so I wrap the thread around a few times to secure it:
first

Knot the loose thread end. I did so by pushing the needle under all the wraps and then through the loop:
under wraps
through loop

Now we get to start crocheting. Forget about that thread end for now (we’ll weave it in later) and pick up the other end that leads to your buttons and pick up the hook. Don’t be afraid!

Shove the hook under 1, 2, or all the wraps behind the first button:
start

With your hook under all the wraps, grab the working thread and bring it through. Now, you should have a loop on your hook! You’re ready for your first chain stitch. The chain is the foundation to crochet. You basically wrap the thread around your hook and pull a loop through the loop already on your hook. You do so for however many chains you need. THIS is a great instructional video for anyone who has no idea how to hold the thread, hook, etc. It’s really easy, so please do not be put off by it!

Make about 5 or 6 chains, then slide the next button down next to your hook:
chains
second button

With the second button snug up against your hook, facing down, just make another chain right over it. Forget it’s there, even! With the buttons already threaded on your string, you don’t NEED to do any more.

Make some more chains until it’s time for your next button. The number of chains you make depends on how big your buttons are. I like to leave a little wiggle room, so with bigger buttons, I sometimes make up to 10 chains. Just eyeball it.

Scoot the next button up to your hook and chain it in. This one had a shank–a big one!– so I stuck my hook through it and grabbed another loop to chain it in even more. I did this a few times just because. It isn’t really necessary, but it’s an idea, if you feel your shanky buttons are too loose:
11

Make some more chains, scoot the next button up, and chain it in. This was my second to last button on my thread:
12

Now, all but one button have been crocheted together. If you’re using more than 5 buttons, keep going! Add all the buttons you want on this end. It’s time to make the part of the bookmark that will actually be IN your books. I made a chain of about 125 stitches. That sounds like a lot, but it’s only about as tall as your average book. I didn’t want any buttons INSIDE my books, of course, because that would defeat the purpose of a pretty bookmark on your shelf.

SO! 125-ish chain stitches later, you’re ready to attach your final button (if you’re adding more than one button to this end, crochet them in the way we did on the other side). Bring in real close and chain it! You could make an extra chain, cut your thread and call it a day, or do what I did and secure that baby in a little more.

To do so, I pushed my hook through one of the holes in my button and grabbed the yarn OVER the button from the front to the back:
13
14b
secure

Then, I grab the thread over the button again and make a chain stitch:
yarn grab

After that, I slip stitch into my chain by pushing my hook through one of the stitches and pulling a loop of yarn through the chain and the loop on your hook. Make one final chain to fasten off:
17

Use your needle to weave in the ends and you are DONE!

bookmark2

——
What do you think?? Will you make one? I know it got a little lengthy, but I wanted you to be able to make it, even if you don’t crochet. If you have any questions, leave a comment or shoot me an email (lisa@goodknits.com).

I can see so many variations of bookmarks. You could even crochet a loop after the last button and it can be a headband! So many possibilities.

If you do make one, please leave a link here–I’d be thrilled to see!