Print it: Christmas Gift tags

One of my favorite things about the holidays is gift wrapping. I like to add personal touches and combine colors and textures. I thought that since a lot of folks put up their Christmas trees and are probably beginning to put presents under them, I would offer these printable gift tags to you.

I have never offered any printables, so if you use them, do come back and tell me how you like them!

all

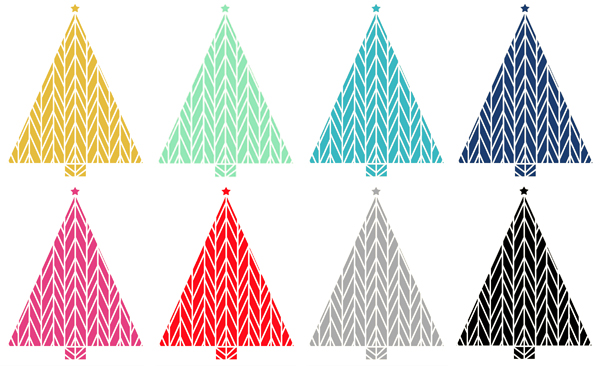
The tags are available in 8 different shades. You can download each individual color using the links below, or click [HERE] to download them ALL in one single PDF. Each page has 9 tags on them. They’re pretty large files, so right-click and “Save as…”

{GOLD}
{MINT}
{TEAL}
{NAVY}
{PINK}
{RED}
{GRAY}
{BLACK}

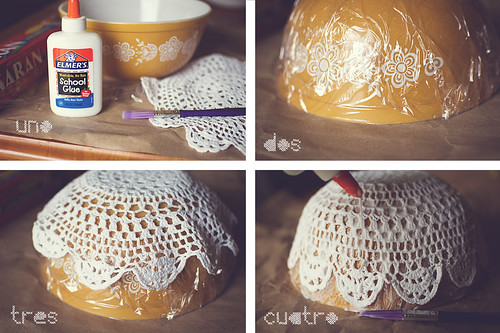
I’m a fan of layers, so after cutting them out, I layered a paper doily over a piece of kraft paper and put the tag on top. A small piece of double-sided tape between the layers is all that’s needed. I left enough space on top of each tag for you to be able to use a standard hole-punch for threading ribbon or lace. I used some lace trim I had. I think it looks pretty lovely on a white box tied up with gold tinsel ribbon.

365
--0

I free-handed this Christmas tree a ton of times to get it perfect for my Christmas card. THEN, I got the idea to use Photoshop the design and use it as a gift tag. I’ll share my Christmas card soon! Hint: It involves gold speedball paint and my sons looking adorable in blazers…

lino love

**These tags are free for personal use only!**

Christmas: layered doily tree skirt

tree-diptych

I was sitting in my knitting chair (tell me you have a designated knitting spot!) thinking about how I should make a tiny tree skirt for my tiny tabletop tree. I sighed when I realized that December was pretty much already here and I’d have to settle with a quick felt skirt. Nothing against felt, I just don’t have any of the GOOD stuff around and would have to use craft store felt, which is just plastic-y and gross.

I decided to forget about it and arrange one of my new shelves full of yarn. Upon combing through a few bags (tell me you sometimes store your yarn in plastic bags), I found a little stash of doilies. LIGHT!BULB!ON!

I took the base off my tree and threaded the metal tube through a few of the doilies and voila! A pretty lace tree skirt. No sewing, no gluing, no cutting, no nothing. It took me less than a minute to put together.

tree3

365-doilytreeskirt

tree4

tree5

tree6

I like the messy mound of doily snow. I think it’s perfect for this tree full of little doily ornaments

doily-ornaments

little doily ornament

Now I need a bunch of tiny presents to put under it. I already ordered my husband’s gift off Etsy. It will be the first. I’m finally finishing up my toddler’s socks and I’ll wrap those up for the tree, too. I need the perfect little gift for my 6 year old, though. Hmmmm. He’s already getting a ton of random crap (I know, I know), so I need something meaningful.

Patch up your woollies!

patchingwool

Please tell me I am not the only one who has passed up wool sweaters, hats, etc. at the thrift store because of tiny little moth-eaten holes. I have done it on a few occasions and now I completely regret it. Last year, I found this big comfy grandpa-ish cardigan at one of my favorite thrift spots. It had the tiniest little hole, but it felt so warm I HAD to buy it. Fast forward to me bringing it out of the closet this year and finding at least 4 other tiny holes.

Booooo! After wearing it a few times and always fidgeting with the small hole near my wrist, I decided I needed to mend my poor sweater. the gauge was too small for me to actually darn any holes, so I found an alternative: FELT it! If you’ve never done any needle felting, don’t worry. This was my first time too! The supplies are very inexpensive (under $10 including shipping, inexpensive) and it’s SO quick!

supplies-

Supplies:
Felting needle [I purchased mine from hi-fiber kits for $1 a piece]
Small amount of wool roving [I also purchased some from hi-fiber kits and they sent me a little bonus in two diff colors! woo!]
Little piece of foam [THIS came with my needles! Perfect!]
your woolly sweater

Put the piece of foam under the hole and place your bit of wool over it. Stab it with the needle to felt it into place. Yes, STAB! Stab it with the needle to attach it. I was surprised at how gratifying this was. You can make those tiny patches into cute hearts following the steps below:

steps

1. Grab a sliver of wool and stab the center bit right under your hole. You only need to stab a tiny bit to attach it.
2. Shape half of the heart and stab it into place.
3. Shape the other half. Stab, stab, stab all over to secure it completely.

Done. Peel off your foam and wear your adorable patchy sweater with pride.

04

This patch was made by felting a rectangular piece and then shaping a heart over the top.

Have fun and relieve some stress by stabbing your holey sweaters. You could also grab a bigger piece of wool and felt some elbow patches on them! How cute would heart elbow patches be?

Make it: Winter Hat Ornaments

Another November sponsor is here with a SUPER adorable DIY! My son is on Thanksgiving break and I think we’ll be making a few of these this week!
——————————

Hello, Goodknits readers!

I’m Kate from, Otillie’s Closet and I’m thrilled to be posting on one of my favorite knitting blogs. Lisa is such an inspiration by balancing an active knitting and crochet life all while keeping track of her two adorable boys. Because of that, I thought her readers (you!) might enjoy a fun holiday DIY that involves yarn and is kid-friendly. I remember making these as a kid and in fact I still have a few hidden away in a box that I put on my tree every year. These simple Winter Hat Ornaments are perfect to make while digesting your Thanksgiving turkey.


You might have even made these as a kid as well! In case you don’t quite remember this tutorial is for you! Let’s get started by gathering a few supplies…


1. Scissors
2. Toilet paper or paper towel tube
3. Sharpie
4. Measuring tape or ruler
5. Scraps of yarn! Grab any size and any colors you have in your stash.


Flatten your paper tube. Don’t worry about bending it.


Measure sections that are 3/4 of an inch wide. Use your sharpie to mark and then cut.


With a regular toilet paper tube I got five rings.


Cut yarn strands roughly 14 inches long. Don’t worry about being too exact! Fold each piece in half and cut as many as you possibly can.


Slip the loop from one strand of yarn through a paper tube. Loop it around the two ends and pull tight.


Keep going all the way around the tube. Make sure you have enough strands to cover the paper but don’t squash the yarn too closely together.


Now squish all those strands through the tube….you’ve just formed the brim of the hat!


Using one of your spare strands of yarn tie a double knot about an inch from the brim. I also used this strand to tie a little loop which I will use to hang the ornaments.


Trim the loose strands to form a puffball. Make it as fluffy or as short as you want!


And there you have it! Pretty cute, right? It’s pretty fun to get creative with different colors and fibers. I used two worsted weight yarns and one bulky. Little fingers might have more success with bulky yarn.


I hope you have fun with these little guys…they are kind of addicting to make! Thanks to Lisa for letting me do this post – it made me feel like a kid again. If you make any of your own stop on by my blog and let me know!
——————————

Aren’t these the cutest??! I want to grab my whole jar of scraps and start making a bunch. I may have to pass this DIY on to my kiddo’s teach for them to make before Christmas vacation. Go visit Kate’s blog and tell her how awesome she is!

Pin It

The August Break 26 (fun with a doily)

The August 26

I’ve wanted to make one of these for a while. I didn’t have any starch or fabric stiffener on hand, so I used a bottle of Elmer’s. It worked pretty nicely.

diy

Those are the general steps I took. A few hours after #4, I applied some more glue. I suppose one could pour the glue in a bowl and dip the doily in it beforehand to completely saturate it without re-applying later.

365

doilybowl1

doilybowl2