By Lisa Gutierrez on 02/18/2010 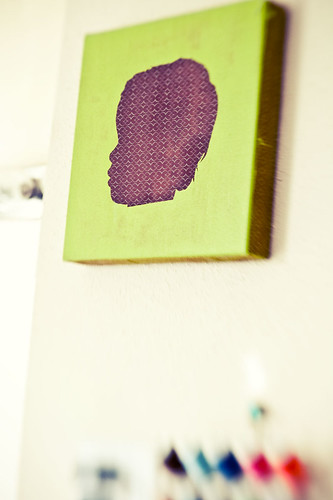 I’m really diggin’ the Lensbaby.
This is a fabric silhouette I made of Nathan’s cute little head, right before Andy was born. I’ve been thinking I need to make one of Andrew soon. I really want an orange one to go with my lime one. Perhaps facing the opposite direction. I’m just torn on whether I should do it soon or wait a year until Andrew is the same age Nate was when I made his. That would be cute, no? Their 3-year old heads forever silhouetted and lovingly placed on my wall. I just know I WILL make one. Maybe I’ll prep a canvas with fabric soon. That way, when the time comes and I finally get the profile photo I love, I’ll just need to stencil it and paint.
In other news, here’s a scary number: 14697. that’s how many images I’ve snapped in the past 14 months (I got my camera Christmas ’08). I had a dream my shutter died. It was more like a nightmare.
By Lisa Gutierrez on 02/08/2010 Valentine’s Day is less than a week away! Yeah, I know, it’s a faux-holiday invented by major corporate scum to steal all our money! And blah blah blah. It’s also one of the few times a year I get to play with pink! I think I’ve said this before, but being a mom to boys means I don’t often see pink. You could say that’s my fault for following gender rules, but really, my son loves pink! He just doesn’t choose it as often as he chooses red or orange. It’s ok with me, because I do love me some orange. I just get a little tired of passing over pink, is all.
Anyway…This weekend, my sister chipped in and helped me with the single party favor I had my heart [!] set on making for Nate’s pre-k class. Heart crayons. Though stripping them of their paper and breaking them into small enough pieces was an absolute [and literal! my thumb still hurts] pain, they came out lovely.
![heart crayons [1]](http://farm5.staticflickr.com/4060/4341112706_57f451019c_z.jpg?zz=1)
Most how-to’s on the subject of heart crayons show an aluminum pan filled with crayon bits. Well, I went out and bought an aluminum pan, made a batch, but could NOT get them out! It was awful. So, I went out again and found a silicone pan and these lovely hearts were easily achieved.
![heart crayons [3]](http://farm5.static.flickr.com/4050/4341111314_efda9ebc4c_m.jpg) ![heart crayons [4]](http://farm5.static.flickr.com/4019/4340366197_4c7e3623f9_m.jpg)
I actually didn’t have enough crayon scraps (and I wasted a lot in the aluminum pan), so I bought 2 boxes of 64 Rose Art crayons ($2 each) for these. We split them up by color group and filled the slots accordingly. The aluminum pan fiasco taught me that contrasting colors didn’t go too well together in this project. I tried my best to keep them all within the same color group. I love the marbled–spin-art-ish–look!
![heart crayons [2]](http://farm3.staticflickr.com/2685/4340367527_2dc29810a9_z.jpg?zz=1)
I made a cheesy little tag with the line “you color my world” on it. Valentine’s Day party is this Friday!
ETA (some years later)
I’ve been emailed a few times to post some actual instructions. It’s super easy if you have the right tools! I bought THIS PAN from amazon because I couldn’t find it at my local stores. from amazon because I couldn’t find it at my local stores.
Separate your crayons by color groups: reds/pinks, purples, blues, greens, oranges/yellows. To get the paper off easily, cut a slit down the length of the crayon with a knife. Break them into ~1/3″ – 1/2″ pieces and place like colors into pans. You get a better result if you mix lighter shades of a certain group with darker shades. I also like to add a piece or of contrasting color. Go wild! It makes a great sorting game. My kiddo liked it and then when I let him break the crayons? pssssh. Dream come true!
Bake between 225F and 250F for about 10 minutes. Take a look at them after 10 and if they are completely melted, gently take them out, and let them cool for at least 10 minutes. If there are still some chunks after 10 minutes, let them go for another minute or two. Keep an eye on them!
Have fun!
Pin It
By Lisa Gutierrez on 01/25/2010
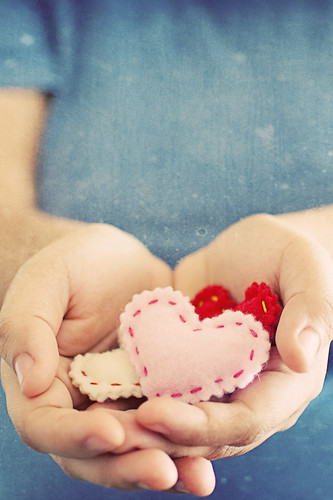
little heart pins made with guidance from the purl bee. check out the tutorial.
My initial plans were to make a few as little Valentine’s day favors. Well, I started and then couldn’t stop making them! Andrew was napping and before I knew it, I had finished my first sheet of red felt (it made 6) and so I started with pink, then white, and then I made another batch of red. What I’m trying to say is…I have about 24 little heart pins sitting in my cool Regaline bowl, now. I made them throughout the weekend. During naps, late-night movies, when my kids left on a lunch with grandma, etc. I’m all out of felt, now!
see more photos on flickr.
By Lisa Gutierrez on 01/08/2010
By Lisa Gutierrez on 12/14/2009 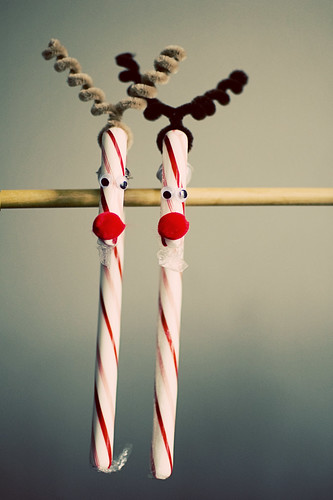 On Saturday evening, Nathan I put together two dozen candy-cane Rudolphs. I remember my mom making these when I was little, so I thought it’d be a cute little party favor for his class. On Saturday evening, Nathan I put together two dozen candy-cane Rudolphs. I remember my mom making these when I was little, so I thought it’d be a cute little party favor for his class.
His teacher bought stockings and asked for stocking stuffers, so I bought some stickers, pencils, erasers, and we put these together. I think I might buy some individually-wrapped fruit leather, as well. Other parents will be contributing as well, so these kids are going to get a stocking stuffed with goodies a whole week before Christmas!
I’m so excited about his first school party! Being in the AM class at his school means this is going to be a breakfast party. He goes in at 7:50 and I’ll be joining him a little after. Party ends at 9:25 (early dismissal)!
It will also be the last day of his first semester of school. I’m so proud of him! He got a report card a few weeks ago and he had met all of the goals that the district (school? teacher? someone?) set for pre-kindergarteners. He knows his ABC’s (what they look like, and the sounds they make), many different shapes & colors, can count, and is “very nice and extremely helpful” amongst other awesome things. So, while he is the one person in the world who knows how to push the exact buttons to make me spontaneously combust in sheer rage, he also makes me laugh the hardest and my heart beat the fastest. School has been a wonderful step in his life. He’s made friends and is starting to become more and more independent. I can’t believe he turns FIVE in 6 short months! That’s half a decade, man! I should start planning a big birthday party. It’s not too early, is it?
Anywho, these candy cane reindeer are supremely easy to make. I didn’t take any photos during the process, but here are some pithy directions, including a materials list.
Materials:
candy canes
pipe cleaners
jiggly eyes
pom poms
little bells
glue
Directions:
1. Thread bells onto pipe cleaner and shift to center. Twist pipe cleaner once, to secure bell in center.
2. Attach to candy cane at the top of the arch and twist a few times to secure.
3. Wrap antlers around a pencil or knitting needle to make a coil. Remove pencil and shape antlers.
4. Attach pom pom noses and eyes and let dry.
5. there is no 5. you are DONE.
super easy, no? Nathan helped by attaching all the bells and pulling them to the centers (I had already bent all the pipe cleaners in half). He also would pull out the knitting needle after I coiled the antlers.
|
Disclosure You may find affiliate links and banners throughout my blog. I earn a small commission from purchases made through these links. It helps pay for keeping this blog running! All reviews and products are items I have personally used and loved. |

![rudolph candy cane [3]](http://farm3.static.flickr.com/2520/4185708776_ec457d813c.jpg)
![rudolph candy cane [4]](http://farm3.static.flickr.com/2587/4184948597_1035792577.jpg)