Patch up your woollies!

patchingwool

Please tell me I am not the only one who has passed up wool sweaters, hats, etc. at the thrift store because of tiny little moth-eaten holes. I have done it on a few occasions and now I completely regret it. Last year, I found this big comfy grandpa-ish cardigan at one of my favorite thrift spots. It had the tiniest little hole, but it felt so warm I HAD to buy it. Fast forward to me bringing it out of the closet this year and finding at least 4 other tiny holes.

Booooo! After wearing it a few times and always fidgeting with the small hole near my wrist, I decided I needed to mend my poor sweater. the gauge was too small for me to actually darn any holes, so I found an alternative: FELT it! If you’ve never done any needle felting, don’t worry. This was my first time too! The supplies are very inexpensive (under $10 including shipping, inexpensive) and it’s SO quick!
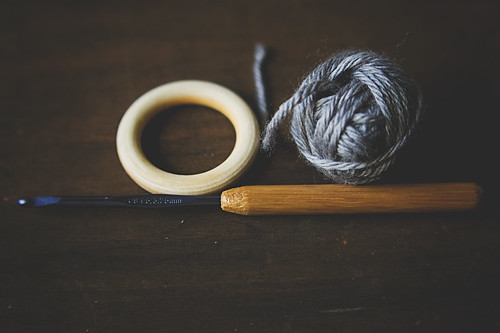
supplies-

Supplies:
Felting needle [I purchased mine from hi-fiber kits for $1 a piece]
Small amount of wool roving [I also purchased some from hi-fiber kits and they sent me a little bonus in two diff colors! woo!]
Little piece of foam [THIS came with my needles! Perfect!]
your woolly sweater

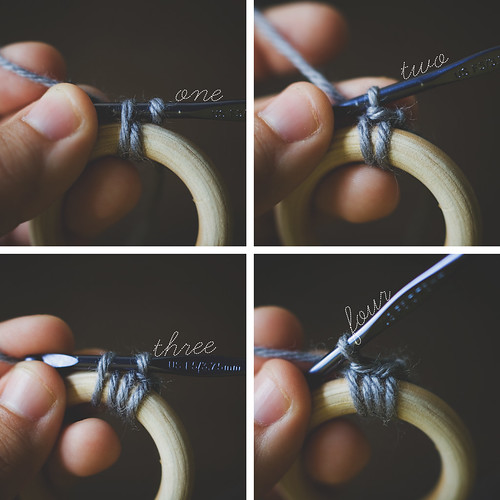
Put the piece of foam under the hole and place your bit of wool over it. Stab it with the needle to felt it into place. Yes, STAB! Stab it with the needle to attach it. I was surprised at how gratifying this was. You can make those tiny patches into cute hearts following the steps below:

steps

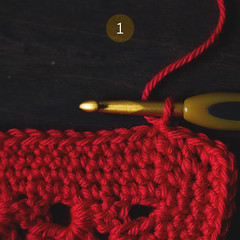
1. Grab a sliver of wool and stab the center bit right under your hole. You only need to stab a tiny bit to attach it.
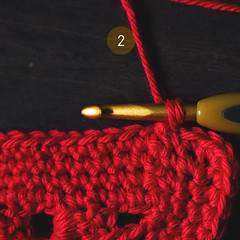
2. Shape half of the heart and stab it into place.
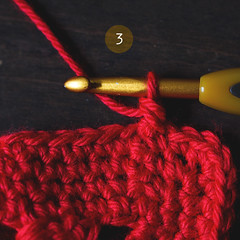
3. Shape the other half. Stab, stab, stab all over to secure it completely.

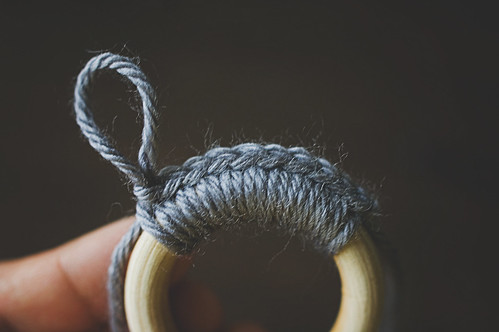
Done. Peel off your foam and wear your adorable patchy sweater with pride.

04

This patch was made by felting a rectangular piece and then shaping a heart over the top.

Have fun and relieve some stress by stabbing your holey sweaters. You could also grab a bigger piece of wool and felt some elbow patches on them! How cute would heart elbow patches be?

Crochet: Holly Berry Pin

My sponsors are totally BRINGING IT, this month! I am oh so grateful for them. November sponsor, Sarah of Sarahndipities is here with a wonderful crochet tutorial! I can just picture these all over hats and on presents. Give them away at your Christmas parties!
———————

Hi! I’m Sarah from Sarahndipities! I’ve loved being a sponsor of Good Knits! I’m guest posting today with a little pattern I wrote up for the Christmas season! It works up super fast and was fun to make! Here’s my little Holly Berry Pin!

Materials needed:
Small amount of medium weight red and green yarn (I used Caron Simply Soft in Cypress and Autumn Red)
Crochet Hook size F (3.75mm)
Yarn needle
Scissors

If you want to make it into a pin you’ll also need a bit of felt for backing and a pin back.

For the Leaves:

Ch 20 (make sure you leave a three or four inch beginning tail).

Row 1: Sl sl in 2nd ch from hook. Sc in next. Dc, ch 1, dc in next. Sc in next. Sl st in next. Sc in next. Dc, ch 1, dc in next. Sc in next. Sl st in next 3 sts. Sc in next. Dc, ch 1, dc in next. Sc in next. Sl st in next. Sc in next. Dc, ch 1, dc in next. Sc in next. Sl st in last ch.  Ch 1, turn.

Row 2: Working along opposite side of ch: Sl sl in next. Sc in next. Dc, ch 1, dc in next. Sc in next. Sl st in next. Sc in next. Dc, ch 1, dc in next. Sc in next. Sl st in next 3 sts. Sc in next. Dc, ch 1, dc in next. Sc in next. Sl st in next. Sc in next. Dc, ch 1, dc in next. Sc in next. Sl st in last ch.  Pull up long tail, fasten off.

Sew the long tails down the center of the leaves using a simple running stitch.  Overlap the leaves nd stitch them together:


Fasten off, and weave in ends.

For the Berries:

Ch 2.

Row 1:  Sc in in 2nd ch from hook 5 times.  Do not join.

Row 2:  Continuing in a round, work 2 sc in each sc from previous row. (10 sc)

Row 3:  Sk next sc. Sc in next sc.* Rep around, fasten off, leaving a three or four inch tail. (5 sc)

Turn the berries right side out and tuck in the beginning tail.  Make as many berries as you desire.

To turn your holly into a pin, hot glue a small circle of felt and a pin to the back!

You can use your little pin to embellish a scarf, jacket, hat, or gift!

Isn’t it so cute?


I’m working on getting the pattern for the hat shown above finished up, so look for it in the next couple of weeks!

You can find my other FREE PATTERNS by visiting my blog, [HERE].  And you can see the patterns I have for sale by visiting my Etsy Shop, [HERE]!

Hope you all have a Holly Jolly Christmas!

——————

Oh man, how wonderful was that?! Thank you SO much, Sarah! Everyone be sure to visit her blog for tons of inspiration and her shop for BEAUTIFUL crochet wares! You can pick up more than a few Christmas gifts there. :)

Make it: Winter Hat Ornaments

Another November sponsor is here with a SUPER adorable DIY! My son is on Thanksgiving break and I think we’ll be making a few of these this week!
——————————

Hello, Goodknits readers!

I’m Kate from, Otillie’s Closet and I’m thrilled to be posting on one of my favorite knitting blogs. Lisa is such an inspiration by balancing an active knitting and crochet life all while keeping track of her two adorable boys. Because of that, I thought her readers (you!) might enjoy a fun holiday DIY that involves yarn and is kid-friendly. I remember making these as a kid and in fact I still have a few hidden away in a box that I put on my tree every year. These simple Winter Hat Ornaments are perfect to make while digesting your Thanksgiving turkey.


You might have even made these as a kid as well! In case you don’t quite remember this tutorial is for you! Let’s get started by gathering a few supplies…


1. Scissors
2. Toilet paper or paper towel tube
3. Sharpie
4. Measuring tape or ruler
5. Scraps of yarn! Grab any size and any colors you have in your stash.


Flatten your paper tube. Don’t worry about bending it.


Measure sections that are 3/4 of an inch wide. Use your sharpie to mark and then cut.


With a regular toilet paper tube I got five rings.


Cut yarn strands roughly 14 inches long. Don’t worry about being too exact! Fold each piece in half and cut as many as you possibly can.


Slip the loop from one strand of yarn through a paper tube. Loop it around the two ends and pull tight.


Keep going all the way around the tube. Make sure you have enough strands to cover the paper but don’t squash the yarn too closely together.


Now squish all those strands through the tube….you’ve just formed the brim of the hat!


Using one of your spare strands of yarn tie a double knot about an inch from the brim. I also used this strand to tie a little loop which I will use to hang the ornaments.


Trim the loose strands to form a puffball. Make it as fluffy or as short as you want!


And there you have it! Pretty cute, right? It’s pretty fun to get creative with different colors and fibers. I used two worsted weight yarns and one bulky. Little fingers might have more success with bulky yarn.


I hope you have fun with these little guys…they are kind of addicting to make! Thanks to Lisa for letting me do this post – it made me feel like a kid again. If you make any of your own stop on by my blog and let me know!
——————————

Aren’t these the cutest??! I want to grab my whole jar of scraps and start making a bunch. I may have to pass this DIY on to my kiddo’s teach for them to make before Christmas vacation. Go visit Kate’s blog and tell her how awesome she is!

Pin It

Crochet: Simple Statement Ornaments

Simple Statement Ornaments

You knew these were coming, right? It’s just about mid-November, so that means it is perfectly acceptable to start making ornaments for your tree or to gift to family. These are quick and easy and if you liked the Simple Statement Wreath but didn’t think you had a place for one in your house, these would be a nice substitute.

Let’s get started!

Simple Statement Ornaments materials

Materials
2″ cabone ring (I used wooden ones by Boye)
3.75mm (F) hook
small amount (approx. 10 yards) of worsted weight yarn

Simple Statement Ornaments steps

one: start with a slip-knot around your hook and grab a loop from front to back through the ring (two loops on hook)
two: yarn-over and pull through both loops on hook
three: grab another loop from front to back through the ring (two loops on hook)
four: yarn-over and pull through both loops on hook

5

repeat steps three & four until you have 45 stitches around your ring. If you are going with a larger or smaller ring, make sure you end with a multiple of THREE.

Slip-stitch to first stitch, then begin border rounds.
Border Round 1: Ch 1 and SC into same stitch, ch 4, *skip 2 stitches, sc into next stitch, ch 4; repeat from * until 2 stitches remain. Ch 2, DC into first SC. (15 loops if you began with 45 stitches around the ring)

Border Round 2: Ch 5, SC into first ch-4 loop, ch 5, *sc into next ch-4 loop, ch 5; repeat from * around, ending with a slip stitch into top of DC of last round. (15 loops)

Fasten off, weave in ends.

tr1

tr2

Use those regular wire ornament hooks to hang them from your tree. Or string them up like a garland. Or make a mobile. Or blow your own mind by making a wreath out of them! A bold statement wreath out of simple statement ornaments based on the simple statement wreath. That’s just wild. I’ll stop, now. I’m sure you can come up with more on your own. Have fun!

316.365: ornament and bokeh

Pin It

Crochet: Get Crabby!

the crab stitch

My favorite border/edge is the Crab stitch (AKA reverse single crochet). It’s super easy and provides a nice neat border for your projects. I’m currently using it on Big Red. Yep, that’s right. I am on the border! After 4 rows of single crochet, I am crabbing it up.

0102
0304

1. How my work looks after my last round of single crochet + 1 ch.
2. Insert hook in stitch immediately to the RIGHT and pull yarn through (2 loops on hook).
3. Pull yarn through both loops.
4. Repeat 2-3.

After a few stitches, you should have a beautiful border going. I’ll be working on my edging this evening. I started it and then realized I should share it for the folks who are looking for a nice, simple border for their work. I’ll share photos of the finished blanket tomorrow. It’s sososo lovely! I am head over heels for RED.

05

What is/are your favorite border(s)/edging(s)??

Pin It