By Lisa Gutierrez on 01/28/2014 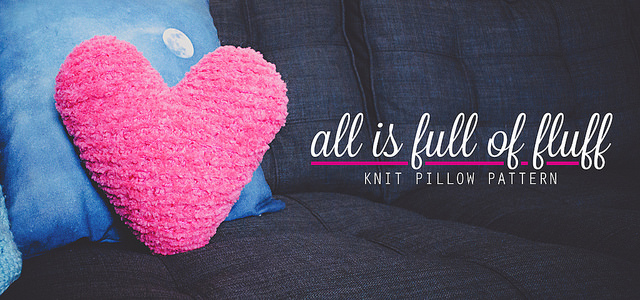
Pillows are my jam, right now! With Valentine’s Day just around the corner, a heart pillow was naturally on the top of my list. I wanted something fun and most definitely pink. This is the first time I’ve used a fur yarn and I kind of LOVE it.
Materials
2 skeins Lion Brand Luxe Fur in pink and 1 skein of worsted weight acrylic. I’m not 100% sure of the brand–I just looked for a hot pink in my scraps that blended well with my fur yarn. I would guess it was about 100 yards.
9 mm (US 13) needles
yarn needle for sewing/weaving in ends
poly-fil stuffing
Abbreviations
CO: cast on
K: knit
Kfb: knit in front and back loop of stitch
K2tog: knit two together
SSK: slip slip knit (slip each of the next two stitches separately, then put them back on the left needle and K them together)
Pattern
Make 2
Bottom of heart
With BOTH yarns, CO 2
Row 1: Kfb across, turn. (4)
Row 2-3: K, turn. (4)
Row 4: Kfb, K 2, Kfb, turn. (6)
Row 5-6: K, turn. (6)
Row 7: Kfb, K 4, Kfb, turn. (8)
Row 8-9: K, turn. (8)
Row 10: Kfb, K 6, Kfb, turn. (10)
Row 11-12: K, turn. (10)
Row 13: Kfb, K 8, Kfb, turn. (12)
Row 14-15: K, turn. (12)
Repeat the process of increasing in the first and last stitches and knitting two even rows between the increase rows until you have 24 stitches on your needle. Knit 3 rows and then move on to the lobe directions.
Lobe
Row 1: K 10, K2tog, turn. (11 stitches, leave 12 un-worked on other needle)
Row 2-3: K, turn. (11)
Row 4: SSK, K 9, turn. (10)
Row 5: SSK, K 8, turn. (9)
Row 6: K, turn. (9)
Row 7: K 7, K2tog, turn. (8)
Row 8: K 6, SSK, turn. (7)
Row 9: K, turn. (7)
Row 10: SSK, K 3, K2tog, turn. (5)
Row 11: K, turn. (5)
Row 12: SSK, K 1, K2tog, turn. (3)
Bind off 3 stitches.
Attach yarns at outside edge of remaining 12 stitches, arranging them on opposite needle. Repeat Rows 1-12 for second lobe. When you turn after Round 12, the wrong side will be facing. Bind off all stitches. Weave in ends on this wrong side.
After making two hearts, arrange them with wrong sides together and whip stitch them together with the worsted weight yarn only. Leave a 2-inch gap for stuffing. I stuffed mine almost until it was a little too stiff. From my experience, over-stuffing is better because it will get compacted with use. Sew the gap shut once you are satisfied with the amount of fluff.

I’m not sure if this pillow will be out all year, but for now, it’s sitting pretty on my couch, which I am still loving. I want to make a million pillows for it but at the same time I just want to stare at the bare couch all the time. Maybe I should just knit a pillow for every season/holiday so I can have a nice selection from which to choose!
 Pin It
By Lisa Gutierrez on 01/14/2014 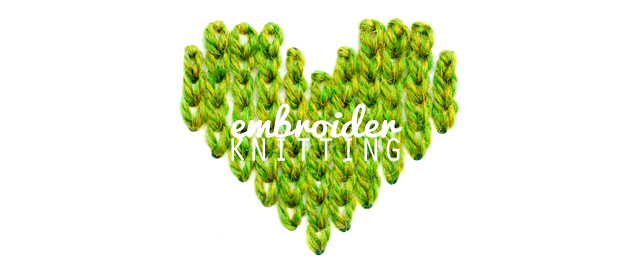
I wanted a design for the front of a knitting notebook and after doodling a few different ideas, I came up with this sweet heart. The embroidered chain stitch resembles knitting when they’re put right next to each other, so it was the obvious choice for a knitting notebook. Here are some instructions for making your own little heart!
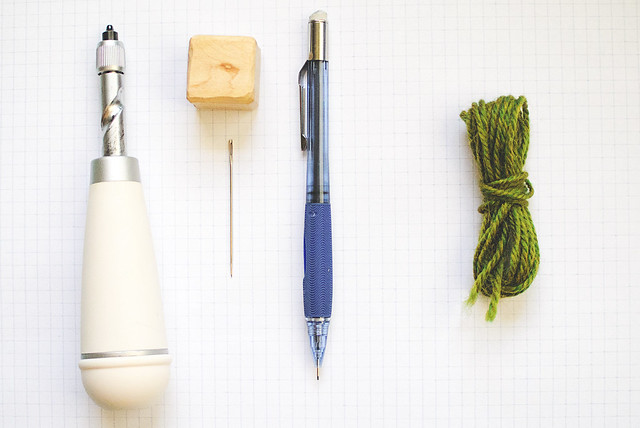
Materials
-a tool to make small holes in paper; I use this Martha Stewart Screw Punch (affiliate link), but you could use a sharp needle + something to “hammer” it or an awl (affiliate link), but you could use a sharp needle + something to “hammer” it or an awl
-pencil
-about 3 yards of worsted weight yarn
-yarn needle that will fit through the holes you make
-graph paper (the paper I used is 5 squares per inch)
-card stock or whatever you want to embroider your design on
The Design
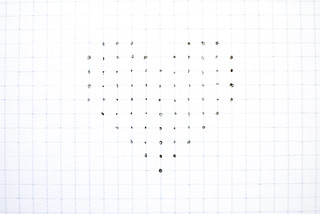 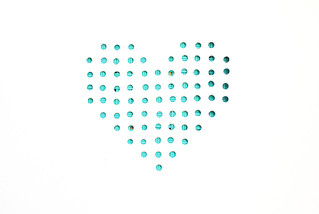
I used graph paper to plot out my design evenly. Place the graph paper with your design on the card stock where you want to place your stitches. Use the screw punch or awl to punch holes (you’ll want to put a self-healing cutting mat, or other board you don’t care about indenting, under your paper). The holes will aid you in keeping the chain stitches straight. If you are already an embroidery master, you can probably freehand them!
On the other hand, if you have never embroidered the chain stitch, I have outlined the steps below:
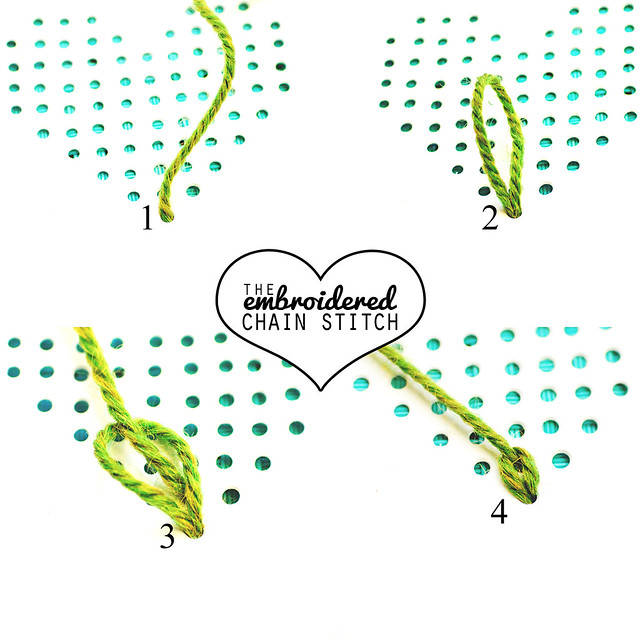
1. Bring about half of the yarn through the bottom center hole from back to front.
2. Go back through from front to back in the same space, but do not pull the yarn all the way through.
3. Come back up through the next hole up AND through the first loop you made.
4. Pull the yarn all the way through, tightening the first loop/stitch.
Repeat steps 2-4 for the embroidered chain stitch. I got into a habit of making two loops and using the second loop to tighten the first, like this:

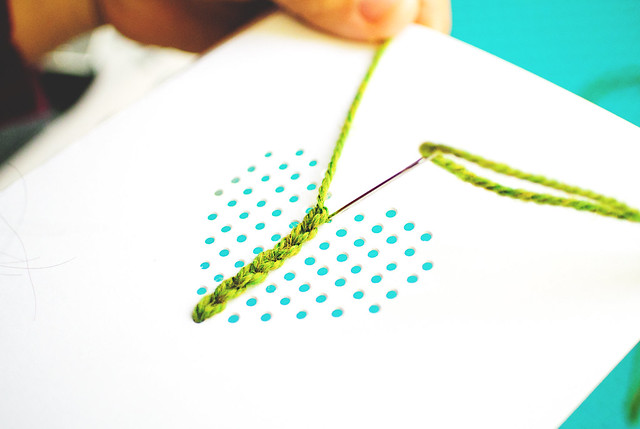
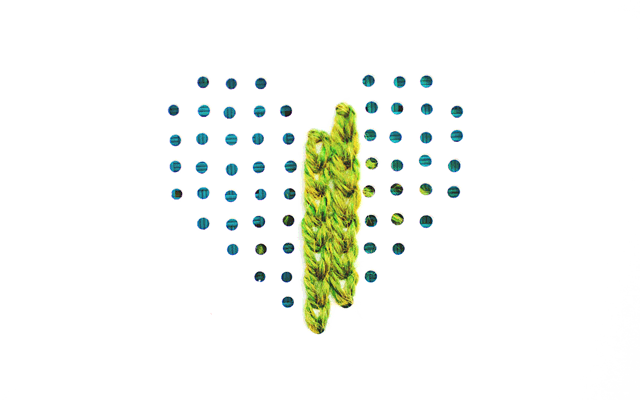
At the end of the column (and the rest of the columns), finish the stitch by going down into the same hole, over the last loop, instead of through it, like this:
To make the next column, weave the yarn through the back of the stitches toward the bottom:
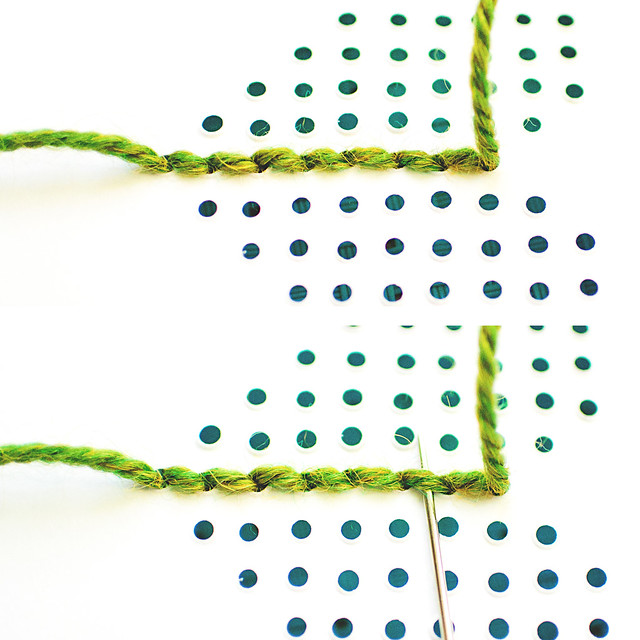
Work the next column and continue until all columns on this half of the heart are complete.
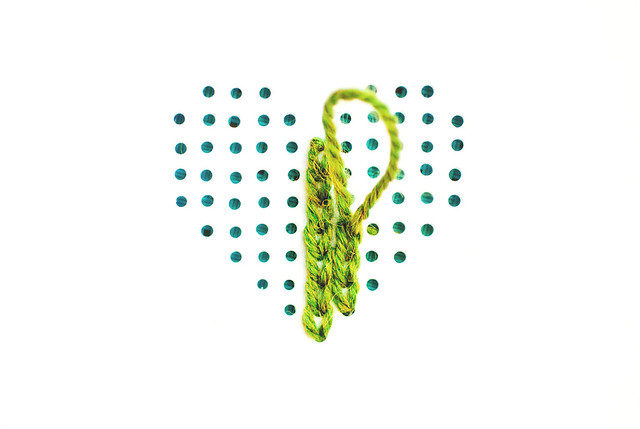
Weave in this end of the yarn through the back of the stitches:

Use the other half of the yarn to work the second half of the heart. Weave in your yarn when you’re done and that’s it!
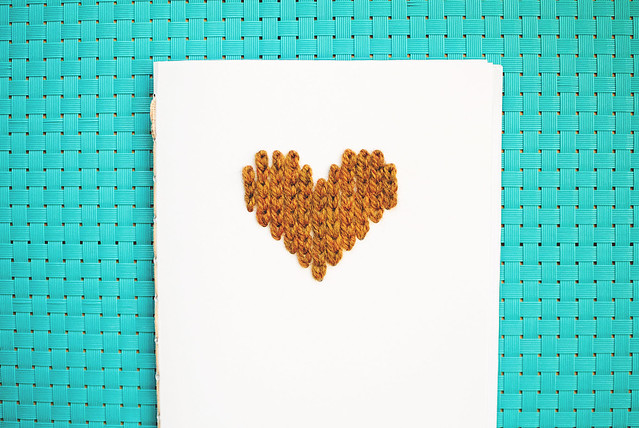
Here is my [handmade] notebook:
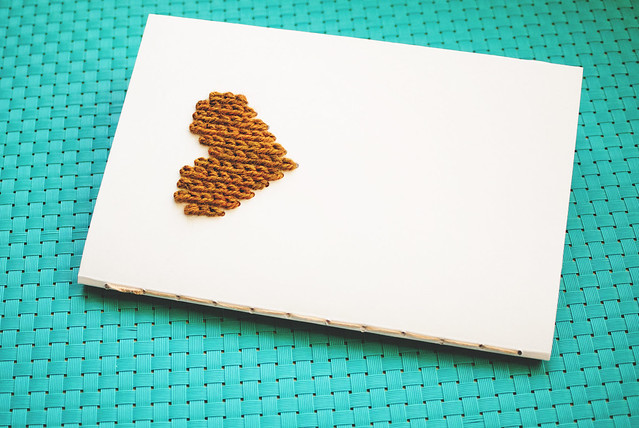
I filled it with knitter’s graph paper and stitched it up by hand. That screw punch I linked above REALLY comes in handy for projects like this!
You could use this tutorial to make a lovely Valentine’s Day card! You can make other designs, as well, just be sure to have at least two dots per column when you are plotting it out on graph paper. I want to do a set of scissors! If I can come up with a few designs, I’ll make another post to share!
 Pin It
By Lisa Gutierrez on 10/14/2013 
Pattern: basic beanie with plaid technique from Webs (see here)
Yarn: Berroco Ultra Alpaca Light (1 skein MC: oceanic mix partial skeins in two CC: turquoise mix, mahogany mix)
Needle: 3.25mm (US 3) 16″ circular & 3.5mm (US 4) 16″ circular + DPNs
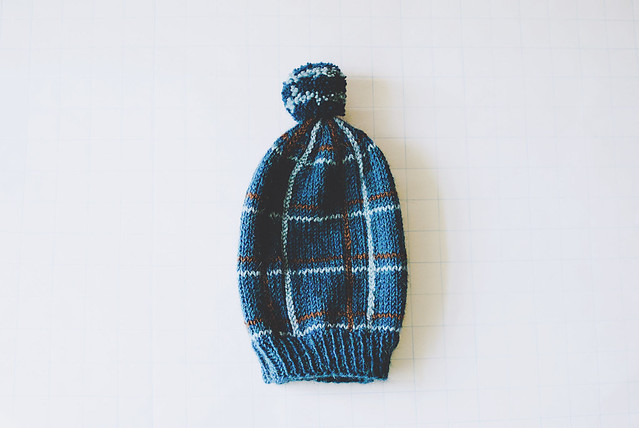
I was just in a hat knitting mood, last week. I was cleaning my bedroom and found the envelope with my my leftover skeins of Ultra Alpaca Light from Andrew’s sweater, so I figured I should make him a matching hat. I was leaning toward some sort of colorwork, but when I found this plaid technique, I knew that was it.
It was super easy! Especially because I already know how to crochet. The vertical lines are made with surface crochet, so it’s basically just a chain through the purl stitches.
If you want to make a beanie with this yarn (fits sizes 5-8, but I can put it on MY head pretty comfortably), here are my details:
With smaller needle and your MC, CO 110 stitches, place marker, and join to work in the round.
Work a [K1, P1] twisted rib (knit through the back loops) for 10 rounds.
Switch to larger needle and work an increase round of [K 11, m1] around. (120 st)
For all rounds until you get to the crown decreases, you will work this pattern:
[K 10, P 1, K 3, P 1] around.
The color pattern is: 4 rounds MC, then [1 round CC-1, 2 rounds MC, 1 round CC-2, 10 rounds MC] repeated from [ to ].
Work to about 6.5″, ending at the start of the 8th row of a chunk of MC.
Maintaining the color pattern only, work the crown as follows-
Round 1 (MC): *SSK, K 6, K2tog, P 1, K 3, P 1; Rep from * around. (104)
Round 2 (MC) and 3 (CC-1): K the knit stitches, P the purls.
Round 4 (MC): *SSK, K 4, K2tog, P1, K 3, P 1; Rep from * around. (88)
Round 5 (MC) and 6 (CC-2): K the knit stitches, P the purls.
The rest of the rounds are in the MC only.
Round 7: *SSK, K 2, K2tog, P 1, K 3, P 1; Rep from * around. (72)
Round 8: K the knit stitches, P the purls.
Round 9: *K 4, P 1, K3tog; Rep from * around. (56)
Round 10: K the knit stitches, P the purls.
Round 11: *SSK, K2tog, P 1, K 1; Rep from * around. (40)
Round 12: K the knit stitches, P the purls.
Round 13: K2tog around. (20)
Round 14: K2tog around. (10)
Cut yarn, leaving 12″ tail- thread through remaining stitches, and cinch shut. Weave in ends.
I cut each CC after the CC rounds instead of letting them travel up. You use a crochet hook to slip-stitch in the little valleys left by the purl stitches. I have CC-2 on the left of CC-1, but you could do the opposite. I had to use a 5mm (US-8 H) hook to get the right tension. The smaller hook resulted in chains that were too tight and bunched up a bit.
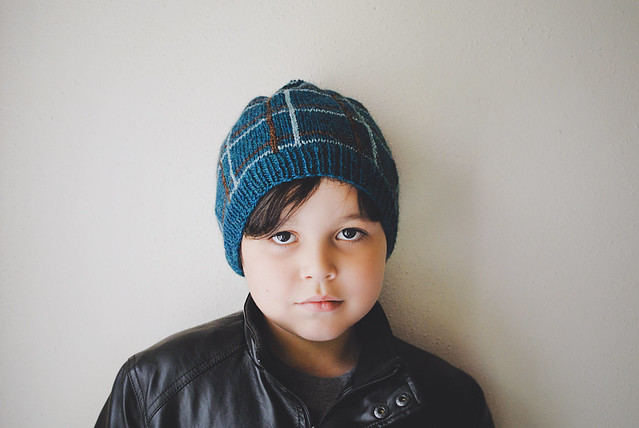

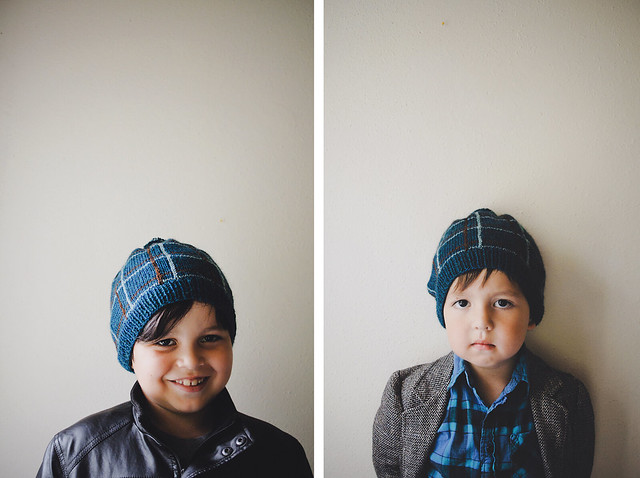
It fits my 8 year old like a regular beanie and it’s a little slouchy on my 5 year old. If I were making it for an adult, I’d work an extra repeat of the color pattern just to make it a bit taller to cover the ears. This one is just about 7.5-8″ un-stretched.
Have you every knit plaid? Don’t be intimidated by the crochet part! The slip-stitch is the simplest of the crochet stitches and the only thing utilized in surface crochet. You put your hook through the fabric where you want the stitch to be and then just pull a loop of yarn through. Keep it on your hook. Using your hand on the back of the fabric with your yarn around your finger (ala continental knitting) to keep your tension even, just put the hook back through the fabric at your next spot and pull another loop through the fabric and through the loop on your hook. Repeat that process until you’ve gone through all the stitches! With the sport weight yarn, I had to stretch the fabric to see where I had to slip stitch next, but it wasn’t a big deal and I finished it pretty quickly.
If you’ve tried it, let me know! Show me your projects!
Pin It
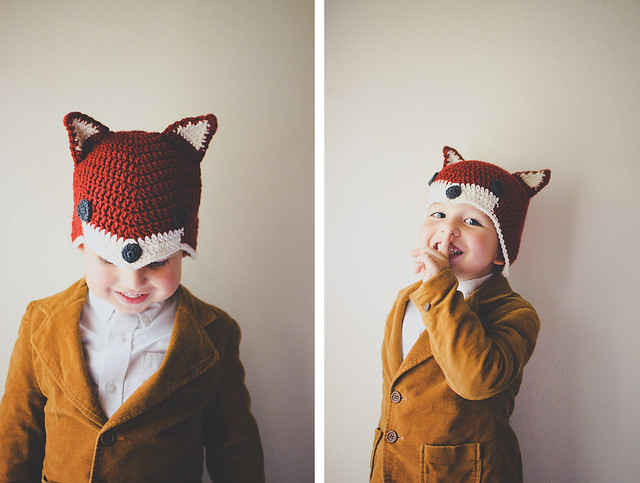
By Lisa Gutierrez on 10/01/2013 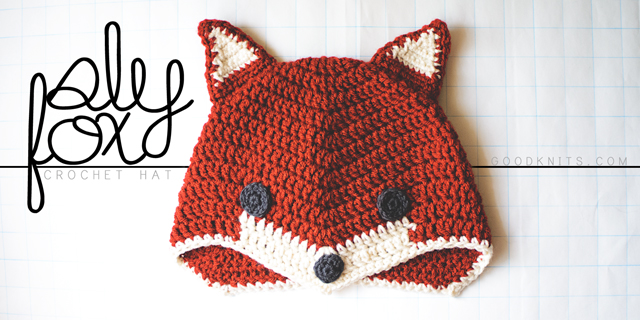
October is here! I love October because it means that MAYBE cool weather is on its way to Houston. Probably not, but a girl can dream, right? October also means it’s costume time! Last year, I composed two sweet costumes for my boys’ book character parade ( see here) at school.
Combine cool weather and costumes and you get…animal hat! Specifically, a sly little fox hat.

It features some interesting shaping to create the point at the front and long sides to cover the ears. It is definitely inspired by Ganomy, which, if you’ve been reading long, is my favorite knit hat pattern. This crochet hat is worked from the top down, though, and, like I said, has a point at the front. Instead of two sets of increases and decreases, there eventually are three. I hope you guys like it! I’ll put some notes at the END with suggestions for changing the size. Please read through before asking questions! Have fun!
Materials
1 skein Vanna’s Choice in brick or other worsted weight yarn in a foxy color
Small amount of white and dark gray yarn in same weight
5 mm (US H) crochet hook
4 mm (US G) crochet hook
yarn needle
NOTES
Abbreviations (U.S. terminology)
Ch: chain
DC: double crochet
slst: slip stitch
sp: space
rep: repeat
DC2tog: DC 2 together
SC: single crochet
SC2tog: SC 2 together
Gauge
About 3.5 DC and 1.5 rounds per inch with larger hook.
Each beginning ch-3 counts as 1 stitch.
Pattern
HAT
With large hook, Ch 3, 11 DC into a magic circle. Cinch circle shut. Slst into top of beginning (beg) ch-3. (12)
Round 2: Ch 3, 1 DC in same sp, 2 DC in each st, slst to top of beg ch-3. (24)
Round 3: Ch 3, 2 DC in next st, *1 DC in next st, 2 DC in next st; Rep from * around, slst to top of beg ch-3. (36)
Round 4: Ch 3, 1 DC in next st, 2 DC in next st, *1 DC in next 2 sts, 2 DC in next st; Rep from * around, slst to top of beg ch-3. (48)
Round 5: Ch 3, DC in next 7 sts, [3 DC in next st, DC in next 15 sts] twice, 3 DC in next st, DC in last 7 sts, slst to top of beg ch-3. (54)
Round 6: Ch 3, DC in next 8 sts, [3 DC in next st, DC in next 17 sts] twice, 3 DC in next st, DC in last 8 sts, slst to top of beg ch-3. (60)
Round 7: Ch 3, DC in next 9 sts, [3 DC in next st, DC in next 19 sts] twice, 3 DC in next st, DC in last 9 sts, slst to top of beg ch-3. (66)
Round 8: Ch 3, DC in next 10 sts, [3 DC in next st, DC in next 21 sts] twice, 3 DC in next st, DC in last 10 sts, slst to top of beg ch-3. (72)
Round 9: Ch 3, DC2tog, DC in next 9 sts, [3 DC in next st, DC in next 9 sts, DC2tog, DC in next st, DC2tog, DC in next 9 sts] twice, 3 DC in next st, DC in next 9 sts, DC2tog, slst to top of beg ch-3. (72)
Rounds 10-11: Repeat Round 9. (72)
Round 12-13: Repeat Round 9, but switch to white after the third decrease and work with that yarn, carrying the MC, to the stitch before the next decrease. You will have to attach the new color every round. Finish the round in the main color, attach white at the end.
Round 14: SC around in white, making [1 SC, ch 2, 1 SC] in the center DC of the increases of the previous round, slst to first SC. Fasten off. Weave in ends.
————————–
Ears
Note: the ears are made up of two pieces each– a solid piece in the MC of the hat and a piece that is white + the MC.
Make 2 solid pieces for the back of the ears
Ch 10
Row 1: SC in second chain from hook and each of the rest. Ch 1, turn. (9)
Row 2: SC2tog, SC 5, SC2tog. Ch 1, turn. (7)
Row 3: SC in each st. Ch 1, turn. (7)
Row 4: SC2tog, SC 3, SC2tog. Ch 1, turn. (5)
Row 5: SC in each st. Ch 1, turn. (5)
Row 6: SC2tog, SC in next st, SC2tog. Ch 1, turn. (3)
Row 7: SC in each st. Ch 1, turn. (3)
Row 8: SC2tog, SC in next st. Ch 1, turn. (2)
Row 9: SC2tog. (1)
Ch 1, SC 9 down the side of the triangle. At bottom corner, ch 3, then turn triangle clockwise to work across the beginning chain, SC 9 to next corner, Ch 3, then SC 9 back to top of the triangle. SC in the sc2tog stitch from last row, ch 3, SC in same st, slst to first of the SC you made down the side of the triangle. Fasten off.
Make 2 pieces for the front of the ears.
Work pattern as above, but switch to white for Rows 2-9. Switch back to main color after last SC2tog and work border in MC. Leave a long tail at the end of these pieces.
Stitch a front and back together, then sew in place on your hat.
————————–
Eyes & Nose
With smaller hook, make 6 SC into a magic loop. Cinch loop shut. Slst to first SC.
Round 2: Ch 1, 2 SC into same space and each stitch, slst to first SC. Fasten off, leaving a 12-18″ tail for attaching. (12)
For Eyes only
Slst into each st.
Sew eyes and nose in place with tail yarn.


Notes on size
As-is, the pattern fits a child size heads. My son is 5, but his head is about the same size as his 8 year old brother. For a larger hat, I increased my hook to a 5.5 mm (US I) and added some more repeats of Round 9 before making the last 3 rounds. It would be possible to make some more complicated increases, but I can’t give any specific advice on that. Try working the pattern through once, so you can see where the increases are placed and then work it again, adding an increase round after Round 4 (increase to 60) and then some round(s) after 8 (remember–Rounds 5-8 are increasing stitch count by 6 DC each round). The last 5 rounds are the same, so you would just need to figure out where to put the decreases that balance out the increases. Good luck!


[Download the printer-friendly version.]
Sly Fox Hat Pattern is ©2013 Lisa Gutierrez | goodknits.com
For personal use only.
Pin It
By Lisa Gutierrez on 09/23/2013 Fall has arrived and I thought I’d re-share some of my favorite Fall patterns. All five of these patterns are FREE, so go nuts! Click the photos to get to the patterns.
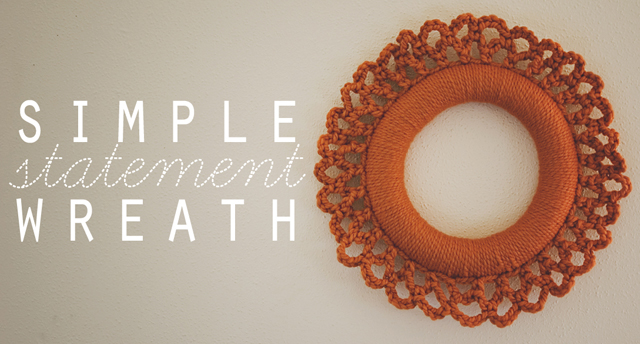
The simplest wreath pattern out there.
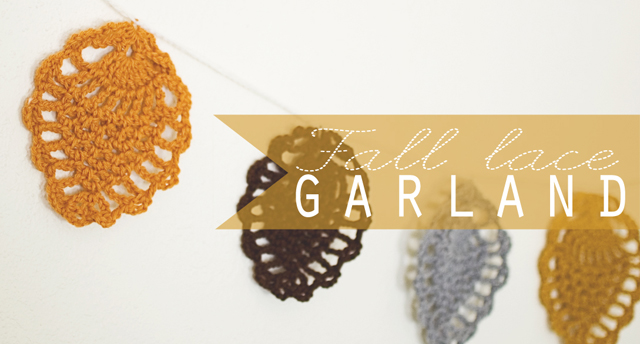
Ever notice how crochet pineapples kind of resemble leaves? Make a garland in your favorite fall colors!
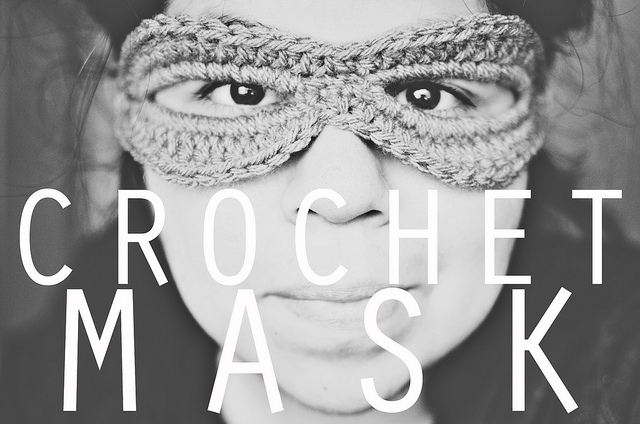
Perfect for Halloween! These masks are really quick to whip up. Start making a bunch and pass them out at Halloween instead of candy.
Another sweet Halloween pattern. It’s not even October and I want it to be October 31st already.
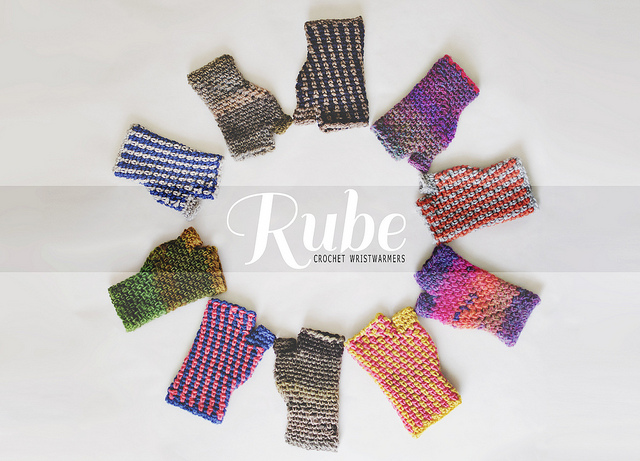
‘Rube’ is now FREE! Go make your hands cozy!
Pin It
|
Disclosure You may find affiliate links and banners throughout my blog. I earn a small commission from purchases made through these links. It helps pay for keeping this blog running! All reviews and products are items I have personally used and loved. |


