By Lisa Gutierrez on 02/07/2012 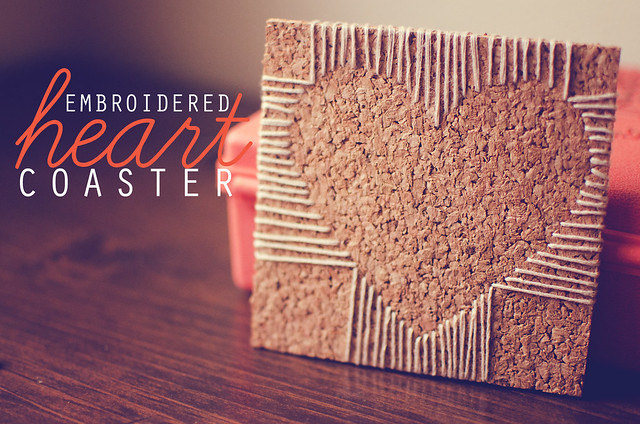
I made heart shaped coasters, but you could switch out the shape with whatever you like. You could give THESE away as Valentines! They’re fairly quick to complete and easy peasy.
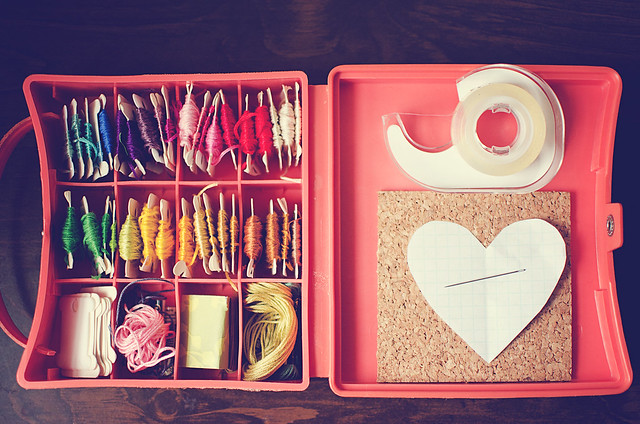
Materials
embroidery floss
a needle
double-sided tape
4″ x 4″ cork coaster (I bought 12″ x 12″ tiles and cut them up. 9 per tile!) and cut them up. 9 per tile!)
heart shape to fit your tile
not shown:
ruler, pencil

1. Adhere your heart to your coaster with a small piece of tape. Mark the “corners” of the heart by placing a ruler across the tile diagonally and making small marks on the edges.
2. Working with a LONG piece of floss (leave the non-working tail connected to the rest of your floss), insert the needle at the bottom tip of the heart, from front to back.
3. Bring the floss back over and insert about 1/8″ from first spot. Continue bringing the floss to the front and stitching at evenly-spaced (as even as you can muster) intervals along the edge of your heart.

4. When you get to a corner, stitch in the spot, then come up along the adjacent edge and stitch into the same space.
5. Continue stitching along this side until you get to the next corner. Stitch into that space, bring the floss back over along the adjacent edge and stitch into the same spot. Continue stitching until you run out of floss. If you get back to the beginning, stitch into the first spot, then knot the ends together and weave them under the stitches on the back. You’re done!
If you run out of floss, follow steps 6-7:
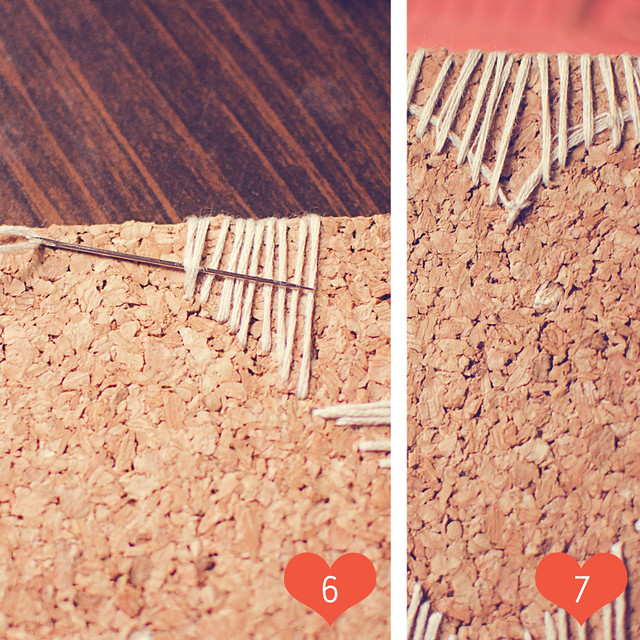
6. Cut a long piece of floss from your non-working end and re-thread your needle with it. ON THE BACK of the coaster, bring the now working thread through the first two or so stitches, then start embroidering up the side, the same way you did the first half of the coaster.
7. When you get to your original thread, knot the ends together and weave them under the stitches on the back. Now, you’re done!
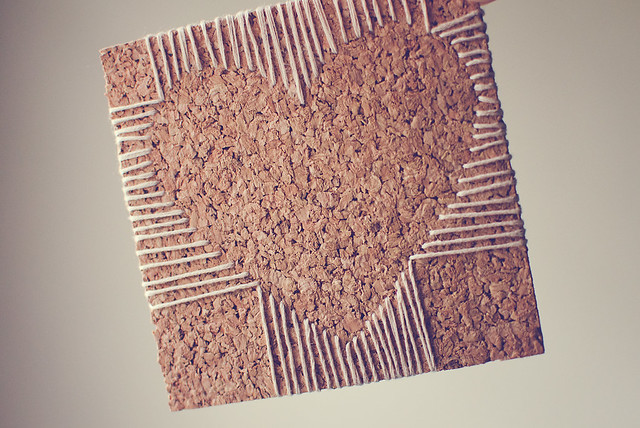
Like I said above, use them as coasters or little pieces of art! You could use this same method to embroider on cardstock to make a lovely Valentine’s Day card. I’m going to make some for my boys!
Pin It
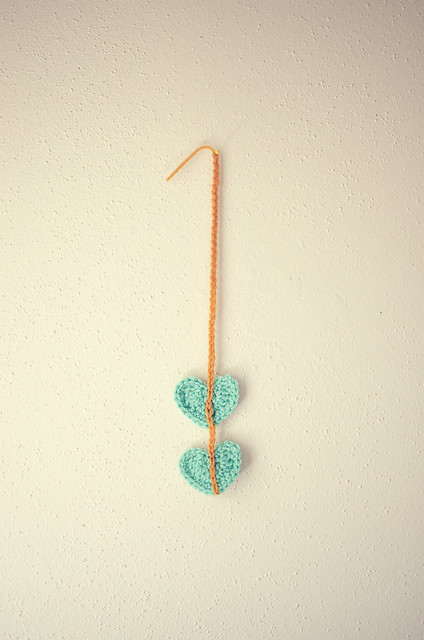
By Lisa Gutierrez on 01/18/2012 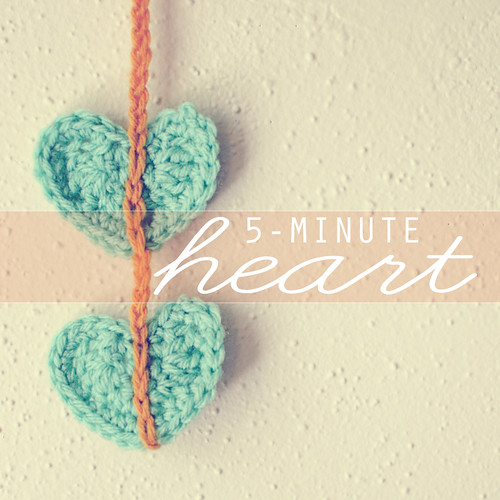
Valentine’s Day is a few weeks away, so why not start adorning your house (self, bags, books, etc) with hearts? This is a super quick 3 row pattern that you can probably complete in under 5 minutes. String them up garland-style, or add a safety pin to the back and have yourself a brooch. I chain stitched some together to make a vertical garland. Love!
Materials
worsted weight yarn
5mm (H) hook
Abbreviations (U.S. terms)
Ch- chain
SC- single crochet
DC – double crochet
slst- slip stitch
sk- skip
st- stitch
Pattern
Ch 4
Row 1: 1 SC in second ch from hook, 3 SC in next ch, 1 SC in last ch. Ch 3, turn.
Row 2: 3 DC in first st, 1 SC in next st, 3 SC in next st, 1 SC in next st, 4 DC in last st. Ch 1, DO NOT TURN.
Edge: 2 SC in first half of the side of last DC, 1 SC in next half, SC the first and last ch of the beginning chain together, 1 SC in the first ch of beg ch-3 of Row 2, 2 SC in next ch, 2 SC in last ch, 2 SC in first DC, 1 SC in each of the next 4 stitches, 3 SC in the “corner stitch”, 1 SC in each of the next 4 stitches, 2 SC in last DC. Slst to top of first SC. Fasten off.
The edge can seem a little confusing, so I made this video–
Crochet Heart Edge from Lisa Gutierrez on Vimeo.
This is the very first time I’ve made a crochet video. To be completely honest…I LOVED IT. It was awkward at first and pretty difficult to get focus, but I think I might make more for future projects. I found the music on Vimeo and it’s called “Instrumental salad” by Marlo Eggplant (www.myspace.com/marloeggplantmusic).
I used Windows Movie Maker to create this video. Any tips for newbies? I didn’t realize there were black edges on the sides until after. I expected the bars on top, but not the sides. I’ll have to figure out what those are next time.
Let me know what you think about goodknits videos!

 Pin It
By Lisa Gutierrez on 11/30/2011 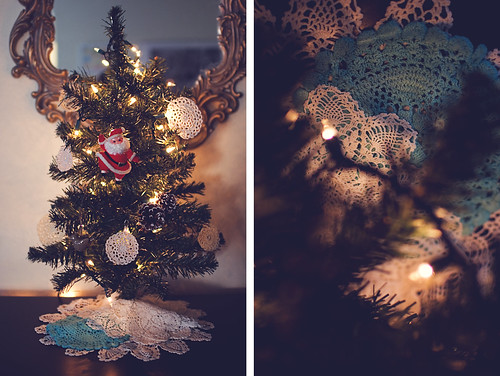
I was sitting in my knitting chair (tell me you have a designated knitting spot!) thinking about how I should make a tiny tree skirt for my tiny tabletop tree. I sighed when I realized that December was pretty much already here and I’d have to settle with a quick felt skirt. Nothing against felt, I just don’t have any of the GOOD stuff around and would have to use craft store felt, which is just plastic-y and gross.
I decided to forget about it and arrange one of my new shelves full of yarn. Upon combing through a few bags (tell me you sometimes store your yarn in plastic bags), I found a little stash of doilies. LIGHT!BULB!ON!
I took the base off my tree and threaded the metal tube through a few of the doilies and voila! A pretty lace tree skirt. No sewing, no gluing, no cutting, no nothing. It took me less than a minute to put together.

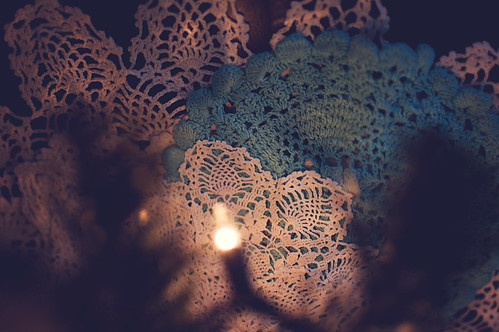
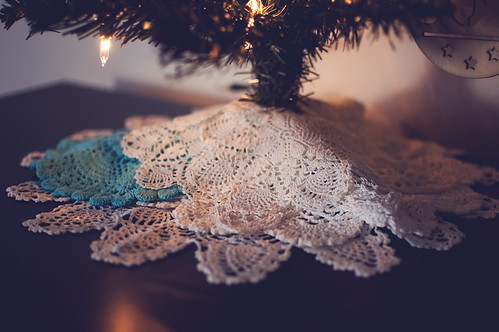

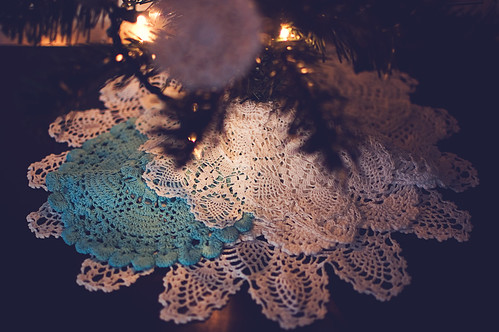
I like the messy mound of doily snow. I think it’s perfect for this tree full of little doily ornaments…


Now I need a bunch of tiny presents to put under it. I already ordered my husband’s gift off Etsy. It will be the first. I’m finally finishing up my toddler’s socks and I’ll wrap those up for the tree, too. I need the perfect little gift for my 6 year old, though. Hmmmm. He’s already getting a ton of random crap (I know, I know), so I need something meaningful.
By Lisa Gutierrez on 11/28/2011 
Please tell me I am not the only one who has passed up wool sweaters, hats, etc. at the thrift store because of tiny little moth-eaten holes. I have done it on a few occasions and now I completely regret it. Last year, I found this big comfy grandpa-ish cardigan at one of my favorite thrift spots. It had the tiniest little hole, but it felt so warm I HAD to buy it. Fast forward to me bringing it out of the closet this year and finding at least 4 other tiny holes.
Booooo! After wearing it a few times and always fidgeting with the small hole near my wrist, I decided I needed to mend my poor sweater. the gauge was too small for me to actually darn any holes, so I found an alternative: FELT it! If you’ve never done any needle felting, don’t worry. This was my first time too! The supplies are very inexpensive (under $10 including shipping, inexpensive) and it’s SO quick!

Supplies:
Felting needle [I purchased mine from hi-fiber kits for $1 a piece]
Small amount of wool roving [I also purchased some from hi-fiber kits and they sent me a little bonus in two diff colors! woo!]
Little piece of foam [THIS came with my needles! Perfect!]
your woolly sweater
Put the piece of foam under the hole and place your bit of wool over it. Stab it with the needle to felt it into place. Yes, STAB! Stab it with the needle to attach it. I was surprised at how gratifying this was. You can make those tiny patches into cute hearts following the steps below:

1. Grab a sliver of wool and stab the center bit right under your hole. You only need to stab a tiny bit to attach it.
2. Shape half of the heart and stab it into place.
3. Shape the other half. Stab, stab, stab all over to secure it completely.
Done. Peel off your foam and wear your adorable patchy sweater with pride.

This patch was made by felting a rectangular piece and then shaping a heart over the top.
Have fun and relieve some stress by stabbing your holey sweaters. You could also grab a bigger piece of wool and felt some elbow patches on them! How cute would heart elbow patches be?
By Lisa Gutierrez on 11/20/2011 Another November sponsor is here with a SUPER adorable DIY! My son is on Thanksgiving break and I think we’ll be making a few of these this week!
——————————
Hello, Goodknits readers!
I’m Kate from, Otillie’s Closet and I’m thrilled to be posting on one of my favorite knitting blogs. Lisa is such an inspiration by balancing an active knitting and crochet life all while keeping track of her two adorable boys. Because of that, I thought her readers (you!) might enjoy a fun holiday DIY that involves yarn and is kid-friendly. I remember making these as a kid and in fact I still have a few hidden away in a box that I put on my tree every year. These simple Winter Hat Ornaments are perfect to make while digesting your Thanksgiving turkey.

You might have even made these as a kid as well! In case you don’t quite remember this tutorial is for you! Let’s get started by gathering a few supplies…

1. Scissors
2. Toilet paper or paper towel tube
3. Sharpie
4. Measuring tape or ruler
5. Scraps of yarn! Grab any size and any colors you have in your stash.

Flatten your paper tube. Don’t worry about bending it.

Measure sections that are 3/4 of an inch wide. Use your sharpie to mark and then cut.

With a regular toilet paper tube I got five rings.

Cut yarn strands roughly 14 inches long. Don’t worry about being too exact! Fold each piece in half and cut as many as you possibly can.

Slip the loop from one strand of yarn through a paper tube. Loop it around the two ends and pull tight.

Keep going all the way around the tube. Make sure you have enough strands to cover the paper but don’t squash the yarn too closely together.


Now squish all those strands through the tube….you’ve just formed the brim of the hat!

Using one of your spare strands of yarn tie a double knot about an inch from the brim. I also used this strand to tie a little loop which I will use to hang the ornaments.

Trim the loose strands to form a puffball. Make it as fluffy or as short as you want!

And there you have it! Pretty cute, right? It’s pretty fun to get creative with different colors and fibers. I used two worsted weight yarns and one bulky. Little fingers might have more success with bulky yarn.


I hope you have fun with these little guys…they are kind of addicting to make! Thanks to Lisa for letting me do this post – it made me feel like a kid again. If you make any of your own stop on by my blog and let me know!
——————————

Aren’t these the cutest??! I want to grab my whole jar of scraps and start making a bunch. I may have to pass this DIY on to my kiddo’s teach for them to make before Christmas vacation. Go visit Kate’s blog and tell her how awesome she is!
Pin It
|
Disclosure You may find affiliate links and banners throughout my blog. I earn a small commission from purchases made through these links. It helps pay for keeping this blog running! All reviews and products are items I have personally used and loved. |


