Christmas: layered doily tree skirt

tree-diptych

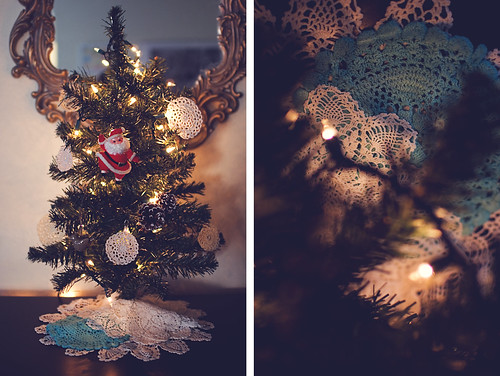
I was sitting in my knitting chair (tell me you have a designated knitting spot!) thinking about how I should make a tiny tree skirt for my tiny tabletop tree. I sighed when I realized that December was pretty much already here and I’d have to settle with a quick felt skirt. Nothing against felt, I just don’t have any of the GOOD stuff around and would have to use craft store felt, which is just plastic-y and gross.

I decided to forget about it and arrange one of my new shelves full of yarn. Upon combing through a few bags (tell me you sometimes store your yarn in plastic bags), I found a little stash of doilies. LIGHT!BULB!ON!

I took the base off my tree and threaded the metal tube through a few of the doilies and voila! A pretty lace tree skirt. No sewing, no gluing, no cutting, no nothing. It took me less than a minute to put together.

tree3

365-doilytreeskirt

tree4

tree5

tree6

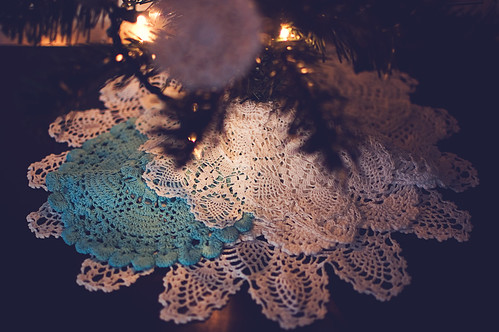
I like the messy mound of doily snow. I think it’s perfect for this tree full of little doily ornaments

doily-ornaments

little doily ornament

Now I need a bunch of tiny presents to put under it. I already ordered my husband’s gift off Etsy. It will be the first. I’m finally finishing up my toddler’s socks and I’ll wrap those up for the tree, too. I need the perfect little gift for my 6 year old, though. Hmmmm. He’s already getting a ton of random crap (I know, I know), so I need something meaningful.

Make it: Winter Hat Ornaments

Another November sponsor is here with a SUPER adorable DIY! My son is on Thanksgiving break and I think we’ll be making a few of these this week!
——————————

Hello, Goodknits readers!

I’m Kate from, Otillie’s Closet and I’m thrilled to be posting on one of my favorite knitting blogs. Lisa is such an inspiration by balancing an active knitting and crochet life all while keeping track of her two adorable boys. Because of that, I thought her readers (you!) might enjoy a fun holiday DIY that involves yarn and is kid-friendly. I remember making these as a kid and in fact I still have a few hidden away in a box that I put on my tree every year. These simple Winter Hat Ornaments are perfect to make while digesting your Thanksgiving turkey.


You might have even made these as a kid as well! In case you don’t quite remember this tutorial is for you! Let’s get started by gathering a few supplies…


1. Scissors
2. Toilet paper or paper towel tube
3. Sharpie
4. Measuring tape or ruler
5. Scraps of yarn! Grab any size and any colors you have in your stash.


Flatten your paper tube. Don’t worry about bending it.


Measure sections that are 3/4 of an inch wide. Use your sharpie to mark and then cut.


With a regular toilet paper tube I got five rings.


Cut yarn strands roughly 14 inches long. Don’t worry about being too exact! Fold each piece in half and cut as many as you possibly can.


Slip the loop from one strand of yarn through a paper tube. Loop it around the two ends and pull tight.


Keep going all the way around the tube. Make sure you have enough strands to cover the paper but don’t squash the yarn too closely together.


Now squish all those strands through the tube….you’ve just formed the brim of the hat!


Using one of your spare strands of yarn tie a double knot about an inch from the brim. I also used this strand to tie a little loop which I will use to hang the ornaments.


Trim the loose strands to form a puffball. Make it as fluffy or as short as you want!


And there you have it! Pretty cute, right? It’s pretty fun to get creative with different colors and fibers. I used two worsted weight yarns and one bulky. Little fingers might have more success with bulky yarn.


I hope you have fun with these little guys…they are kind of addicting to make! Thanks to Lisa for letting me do this post – it made me feel like a kid again. If you make any of your own stop on by my blog and let me know!
——————————

Aren’t these the cutest??! I want to grab my whole jar of scraps and start making a bunch. I may have to pass this DIY on to my kiddo’s teach for them to make before Christmas vacation. Go visit Kate’s blog and tell her how awesome she is!

Pin It

Crochet: Simple Statement Ornaments

Simple Statement Ornaments

You knew these were coming, right? It’s just about mid-November, so that means it is perfectly acceptable to start making ornaments for your tree or to gift to family. These are quick and easy and if you liked the Simple Statement Wreath but didn’t think you had a place for one in your house, these would be a nice substitute.

Let’s get started!

Simple Statement Ornaments materials

Materials
2″ cabone ring (I used wooden ones by Boye)
3.75mm (F) hook
small amount (approx. 10 yards) of worsted weight yarn

Simple Statement Ornaments steps

one: start with a slip-knot around your hook and grab a loop from front to back through the ring (two loops on hook)
two: yarn-over and pull through both loops on hook
three: grab another loop from front to back through the ring (two loops on hook)
four: yarn-over and pull through both loops on hook

5

repeat steps three & four until you have 45 stitches around your ring. If you are going with a larger or smaller ring, make sure you end with a multiple of THREE.

Slip-stitch to first stitch, then begin border rounds.
Border Round 1: Ch 1 and SC into same stitch, ch 4, *skip 2 stitches, sc into next stitch, ch 4; repeat from * until 2 stitches remain. Ch 2, DC into first SC. (15 loops if you began with 45 stitches around the ring)

Border Round 2: Ch 5, SC into first ch-4 loop, ch 5, *sc into next ch-4 loop, ch 5; repeat from * around, ending with a slip stitch into top of DC of last round. (15 loops)

Fasten off, weave in ends.

tr1

tr2

Use those regular wire ornament hooks to hang them from your tree. Or string them up like a garland. Or make a mobile. Or blow your own mind by making a wreath out of them! A bold statement wreath out of simple statement ornaments based on the simple statement wreath. That’s just wild. I’ll stop, now. I’m sure you can come up with more on your own. Have fun!

316.365: ornament and bokeh

Pin It

Feliz Navidad!

hello, from santa!

I hope Santa brought you all that you asked for and more! May you be enveloped in warmth and joy, this most awesome day.

wrap.it.up

knitting & giving

I hope everyone is still sane. I’m wrapping up my gift-wrapping, this evening. All that’s left to be done is clean-up and baking. I’ll do most of that tonight, tomorrow morning, and tomorrow night. The afternoon/evening is reserved for the first of FOUR Christmas celebrations with family. We’re pretty blessed.