
October is here! I love October because it means that MAYBE cool weather is on its way to Houston. Probably not, but a girl can dream, right? October also means it’s costume time! Last year, I composed two sweet costumes for my boys’ book character parade (see here) at school.
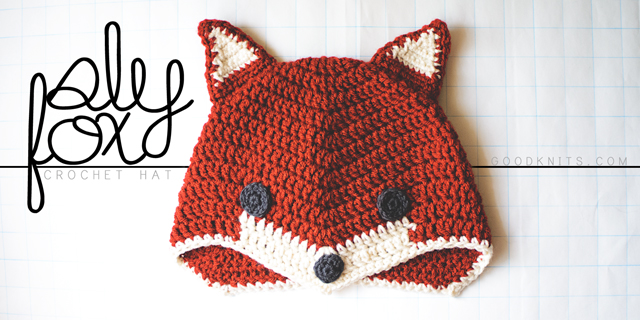
Combine cool weather and costumes and you get…animal hat! Specifically, a sly little fox hat.
It features some interesting shaping to create the point at the front and long sides to cover the ears. It is definitely inspired by Ganomy, which, if you’ve been reading long, is my favorite knit hat pattern. This crochet hat is worked from the top down, though, and, like I said, has a point at the front. Instead of two sets of increases and decreases, there eventually are three. I hope you guys like it! I’ll put some notes at the END with suggestions for changing the size. Please read through before asking questions! Have fun!
Materials
1 skein Vanna’s Choice in brick or other worsted weight yarn in a foxy color
Small amount of white and dark gray yarn in same weight
5 mm (US H) crochet hook
4 mm (US G) crochet hook
yarn needle
NOTES
Abbreviations (U.S. terminology)
Ch: chain
DC: double crochet
slst: slip stitch
sp: space
rep: repeat
DC2tog: DC 2 together
SC: single crochet
SC2tog: SC 2 together
Gauge
About 3.5 DC and 1.5 rounds per inch with larger hook.
Each beginning ch-3 counts as 1 stitch.
Pattern
HAT
With large hook, Ch 3, 11 DC into a magic circle. Cinch circle shut. Slst into top of beginning (beg) ch-3. (12)
Round 2: Ch 3, 1 DC in same sp, 2 DC in each st, slst to top of beg ch-3. (24)
Round 3: Ch 3, 2 DC in next st, *1 DC in next st, 2 DC in next st; Rep from * around, slst to top of beg ch-3. (36)
Round 4: Ch 3, 1 DC in next st, 2 DC in next st, *1 DC in next 2 sts, 2 DC in next st; Rep from * around, slst to top of beg ch-3. (48)
Round 5: Ch 3, DC in next 7 sts, [3 DC in next st, DC in next 15 sts] twice, 3 DC in next st, DC in last 7 sts, slst to top of beg ch-3. (54)
Round 6: Ch 3, DC in next 8 sts, [3 DC in next st, DC in next 17 sts] twice, 3 DC in next st, DC in last 8 sts, slst to top of beg ch-3. (60)
Round 7: Ch 3, DC in next 9 sts, [3 DC in next st, DC in next 19 sts] twice, 3 DC in next st, DC in last 9 sts, slst to top of beg ch-3. (66)
Round 8: Ch 3, DC in next 10 sts, [3 DC in next st, DC in next 21 sts] twice, 3 DC in next st, DC in last 10 sts, slst to top of beg ch-3. (72)
Round 9: Ch 3, DC2tog, DC in next 9 sts, [3 DC in next st, DC in next 9 sts, DC2tog, DC in next st, DC2tog, DC in next 9 sts] twice, 3 DC in next st, DC in next 9 sts, DC2tog, slst to top of beg ch-3. (72)
Rounds 10-11: Repeat Round 9. (72)
Round 12-13: Repeat Round 9, but switch to white after the third decrease and work with that yarn, carrying the MC, to the stitch before the next decrease. You will have to attach the new color every round. Finish the round in the main color, attach white at the end.
Round 14: SC around in white, making [1 SC, ch 2, 1 SC] in the center DC of the increases of the previous round, slst to first SC. Fasten off. Weave in ends.
————————–
Ears
Note: the ears are made up of two pieces each– a solid piece in the MC of the hat and a piece that is white + the MC.
Make 2 solid pieces for the back of the ears
Ch 10
Row 1: SC in second chain from hook and each of the rest. Ch 1, turn. (9)
Row 2: SC2tog, SC 5, SC2tog. Ch 1, turn. (7)
Row 3: SC in each st. Ch 1, turn. (7)
Row 4: SC2tog, SC 3, SC2tog. Ch 1, turn. (5)
Row 5: SC in each st. Ch 1, turn. (5)
Row 6: SC2tog, SC in next st, SC2tog. Ch 1, turn. (3)
Row 7: SC in each st. Ch 1, turn. (3)
Row 8: SC2tog, SC in next st. Ch 1, turn. (2)
Row 9: SC2tog. (1)
Ch 1, SC 9 down the side of the triangle. At bottom corner, ch 3, then turn triangle clockwise to work across the beginning chain, SC 9 to next corner, Ch 3, then SC 9 back to top of the triangle. SC in the sc2tog stitch from last row, ch 3, SC in same st, slst to first of the SC you made down the side of the triangle. Fasten off.
Make 2 pieces for the front of the ears.
Work pattern as above, but switch to white for Rows 2-9. Switch back to main color after last SC2tog and work border in MC. Leave a long tail at the end of these pieces.
Stitch a front and back together, then sew in place on your hat.
————————–
Eyes & Nose
With smaller hook, make 6 SC into a magic loop. Cinch loop shut. Slst to first SC.
Round 2: Ch 1, 2 SC into same space and each stitch, slst to first SC. Fasten off, leaving a 12-18″ tail for attaching. (12)
For Eyes only
Slst into each st.
Sew eyes and nose in place with tail yarn.


Notes on size
As-is, the pattern fits a child size heads. My son is 5, but his head is about the same size as his 8 year old brother. For a larger hat, I increased my hook to a 5.5 mm (US I) and added some more repeats of Round 9 before making the last 3 rounds. It would be possible to make some more complicated increases, but I can’t give any specific advice on that. Try working the pattern through once, so you can see where the increases are placed and then work it again, adding an increase round after Round 4 (increase to 60) and then some round(s) after 8 (remember–Rounds 5-8 are increasing stitch count by 6 DC each round). The last 5 rounds are the same, so you would just need to figure out where to put the decreases that balance out the increases. Good luck!

[Download the printer-friendly version.]
Sly Fox Hat Pattern is ©2013 Lisa Gutierrez | goodknits.com
For personal use only.


Thank you so much for this! My daughter loves foxes, so she’ll love it to pieces She also has a giant head, so it’s totally made for her… :)
What a brilliant fox hat, it’s the best one I’ve ever seen! Thank you for sharing the pattern, I’m on a hat craze at the moment so it’s perfect timing.
I love this! Any recommendations for making it adult size? I would like to make one for me :)
Hi Evan!
I went ahead and worked the hat to fit myself and I had to increase hook size (to the 5.5mm–I) and then I worked 2 extra repeats of round 9 before rounds 10-11 (which are Round 9 with color work). It fits past my ears, now. It might be a little long, so try it on as you work those last rounds to see if maybe you don’t need to make as many. I didn’t make the face or ears, but I think they’d be alright if you worked them as-is.
Good luck and let me know how it goes!
Sorry i missed that above haha. Thank you! I will let you know!
I made the original pattern and it fit me, I’m a grandma
Love the hat, thank you for sharing. I’m agreeing with Jill, I’m also on a hat craze.
do have this in a knit pattern?
love the hat; don’t crochet.
I do not, but there is this baby hat pattern that has similar shaping: http://www.ravelry.com/patterns/library/norwegian-sweet-baby-cap—djevellue You will have to make some adjustments to get a bigger size! You also might want to change the crown decreases to be more round than pointy.
I love all the Little House books more than anything. :)
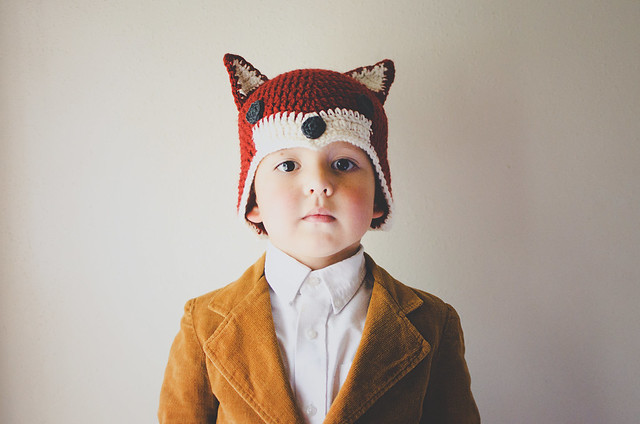
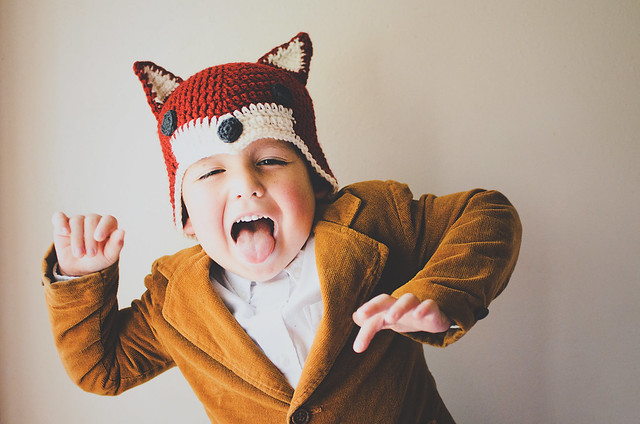
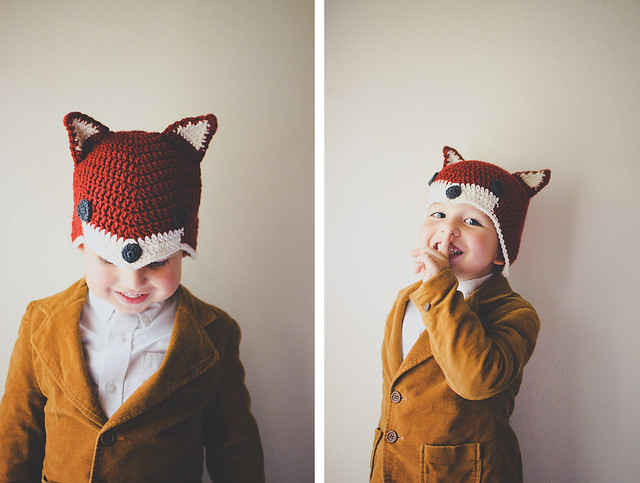
This is such a cute hat thank you for sharing it. The pictures of your little boy are adorable.
Love this! Soooo cute! Thanks for sharing :)
I have crocheted quite a bit, but what is a magic circle?
A magic circle is a way to tighten the beginning so there is not a hole in the top of the hat. I do it by leaving a tail of about 6 inches, making a slip knot loop, chaining 4 and slip stitch into the first chain made so that you have a small circle. As you work your first row in the center of the ring, be sure to hold the tail of the yarn across the chain so that it is caught in your work for the first row. After that row is complete, you can gently pull on the tail and it will draw up the circle and close it.
Thanks! :) Lovely model, perfect little fox he is :)
What a cute hat! Thank you! :)
___
Lee Ann
Crochet…Gotta Love It! Blog
YouTube Channel
I love this…seriously. This is one of the cutest crochet patterns I have ever seen. I am FBing this!!!
My friend made this hat for my granddaughter and it is so adorable. I may make these for children in the crisis center. I’m sure they would love them.
Splendid!! Cannot wait to make this one.
Hi! I finally finished the hat! It came out great and I love it! here is a picture of me in the hat.
http://deafdachshunds.tumblr.com/post/63438001721/another-picture-of-me-and-my-hat
Thank you.
Hey! It looks really great!
I’m making this right now for my nephew; I know he’ll love it! It occurred to me as well, considering Halloween and all, that if you made this hat in all black it would make a really effective Spock wig! :D
Any tips on reducing the size to fit a 2 year old?
Hi!
Aside from decreasing hook and/or yarn size, my [untested] suggestion would be to stop increasing after Round 7 (66 stitches) and then go to round 9, but change EVERY “DC in next 9 sts” to “DC in next 8 sts.” Round 9 has increases and decreases that even itself out. They’re placed in certain spots in the round, so change the 9 to 8 to make sure they’re in the same general position as the original pattern. Good luck! Let me know how it goes, please!
If that is still looking too big, you can stop at Round 6 (60 stitches) and change that Round 9 to “DC in next 7 sts.”
AND, you may need to make less Rounds after your new Round 9. Just go until it looks to be the right height for him. It should fit over his ears.
I’d also like suggestions on reducing the size. My 2 year old boy is called Fox – this would be perfect!!!
I JUST replied above! :)
I’m having trouble with Round 9 of the hat. When I count up all the stitches for R9 I am getting 77 not 72. Has there been a correction for this part?
No worries. I got it sorted out. It was late and I was tired so I put it down and picked it back up this morning and it was smooth sailing. :)
That’s wonderful to hear! I saw your message via my phone and was going to reply on my computer, but then it had to install updates and restarted on me! One thing led to another and I forgot. So sorry, but I’m glad you got it sorted out!
Hello! Do you have this for sale by any chance? I was a complete fail at trying to do it!haha
Hi there!
I don’t have a listing for this hat, but I could make one. It would be $28 + $4 shipping in the US. Outside the US, you will have to send me the country/postal code, so I can look up shipping rates. Let me know via email (lisa @goodknits.com) if this is OK! Also, do you want these colors or something more orange?
I’m so excited about this, my three year old just became obsessed with what does the Fox say and although I’m losing my mind having to watch it all the time he is going to love this!
Thank you so much for sharing your pattern. I made one for my two year old grandson. Used a 4.5mm hook and it fit perfectly. He put it on and hasn’t taken it off since.
Was your increase line right down the middle?? Mine came out crooked : /
Hi I was wondering what you’d do for a 7 month size? Any suggestions??
Hi there!
I made some suggestions above for reducing size:
Aside from decreasing hook and/or yarn size, my [untested] suggestion would be to stop increasing after Round 7 (66 stitches) and then go to round 9, but change EVERY “DC in next 9 sts” to “DC in next 8 sts.” Round 9 has increases and decreases that even itself out. They’re placed in certain spots in the round, so change the 9 to 8 to make sure they’re in the same general position as the original pattern. If that is still looking too big, you can stop at Round 6 (60 stitches) and change that Round 9 to “DC in next 7 sts.” AND, you may need to make less Rounds after your new Round 9. Just go until it looks to be the right height for him. It should fit over his ears.
I hope these tips help!
Ok so I love this hat and I just finished one using the pattern you so generously provided. I thought I followed it to a T but my seam were the increase is down the middle is not straight down the middle. It wraps around at an angle kind of. Not sure how I can post a picture so you can see what I’m talking about. Have any ideas of what I could have done wrong??
Something must have gone wrong in one of your rows! All increases are made in the center stitch of the increase of the previous round.
this is lovely, thank you so much for sharing. I’ve pinned your pattern to share with even more people.
I love this pattern, so cute!
Thank you
I discovered this a couple days after it was posted and jumped right on making one for my 1 year old. I used a G hook for the entire hat and it fit him perfectly! I still consider myself a beginner, but this tutorial was excellent and easy to follow. Thanks so much!
[…] Sly Fox Hat Pattern by goodknits with adjustments […]
Any suggestions on getting the ears even? Mine are a bit off after 3attempts! I think tilt still look cute on a 1yr old!
[…] crochet sly fox hat by good knits Vanna’s choice yarn: brick red, gray, white… purchased at Michaels […]
[…] CLICK HERE for the instructions […]
[…] Hat pattern: http://goodknits.com/blog/2013/10/01/crochet-sly-fox-hat/ […]
Hi Lisa,
This is an awesome pattern, but I’m having trouble attaching the ears so they stand up. I’m pretty inexperienced at joining and wondering if you have any tips on the method you used. I crocheted mine using an I hook for a larger hat.
Any help would be much appreciated!
Thanks,
Stacey
Stacey, Isn’t this a fun pattern? I’ve made it twice in the last couple of days. To get the ears to stand up, this has worked for me. When you sew the front and back of the ear pieces together, do not close the bottom side. Then when you go to attach the ears to the cap, you can sew the front and back on separately, just a stitch apart. Makes a little teepee that stands up nicely. Hope that helps.
HI there,
I was wondering if you could give me the measurements of the hat your made for your son? I’m trying to figure out if it would match up to my kiddo’s head or not so I can figure out if I need to go down a hook size or not.
Thx!
Hi! I’m sorry I didn’t reply sooner! Laying flat, unstretched with the face up, it’s about 10.25″ across. Doubled, that would be about 20-21″ circumference. The fabric will have some stretch, so it could accommodate even bigger noggins.
Lisa, Thanks so much for sharing this pattern. I’ve made it twice with worsted wt yarn. First time with an I hook, turned out adult size; second with a G (following same instructions) turned out child size. I’m going to try it with DK/sport wt next to go for baby size. I’ll probably stop the increases a row early. Free patterns off the internet are sometimes great, like your, and sometimes have errors or hard to figure out instructions. Yours are perfect! I did make one change. For the nose, after the first 6 sc, instead of 2 sc in each stitch around, I just did one. This gave me a nice 3D button nose. Thanks again. Your son is adorable and he looks like Mr. Personality, too.
[…] Sly Fox Crochet Hat from Goodknits […]
Thank you for the patteren, I have used it to my daughter
http://villevesten.blogspot.no/2013/11/what-does-fox-say.html
How would I make this hat if I only wanted the point in the front but not the slants around the ears? I just want to make it a beanie with a point in the front.
That’s a whole different pattern. The points are created with increases, so you would have to create a pattern with an increase at the front and a decrease to balance it out.
Thank you got sharing this pattern. My 4 1/2 yo was excited when I completed the ca. he couldn’t wait to put it on and head outside to play while wearing it.
[…] From Good Knits […]
Hi, I am trying to work this in a DK or 8-Ply (Australian Yarns), what would I have to adjust the Hook size to. I will be doing this for a 4 yr old with a head circumference of 20 – 20.5 Inches.
Hi there. My son in the photos is 5, so head size is probably not off by much. You can probably go down to a 4mm hook safely. If it looks too small at Round 9, though, you might have to employ the increasing instruction I put in the pattern. Good luck!
I can’t wait to make this. Thanks for sharing your beautiful designs.
Love this! Both my daughter, 7, and my son, almost 4, wanted this hat. Made it with the hook size in the pattern and it came out big. But that’s normal for me. Should have known to go down a size. It’s big on my son but he can wear it. My daughter’s head is smaller so it’s huge on her. Fits me perfectly! I’m kinda thinking about making them for the whole family and all wearing them next when we’re out doing something this fall. Wonder if my husband would go for it? We’ll see. :)
I made this hat with the intention on it fitting my 4 year old but I have to agree with Lana mine came out pretty big…but no worries it’ll make the perfect gift for my 8 year old niece :)
Thanks for the pattern it’s adorable
Thank you for the pattern I am going to be starting this pattern very soon. My daycare is wanting me to make them for all the kids because they are obsessed with the song and know all the words!
I love the hat, it is awesome. Would you consider doing a tutorial on it?
I have a little bit of an addiction to animal hats, what happens when the cousins get too old? That being said this hat is awesome thanks so much of sharing, can’t wait to make a little old silvery gray fox. blessings, DD
I’m so excited to spin this out today for my son. Thank you for sharing the pattern! I will be posting a picture promptly after.
[…] it turned out… And the pattern was easy to follow… The Free Pattern is available on goodknits… She has great patterns for both Crochet and […]
[…] een muts te maken? Bekijk dan de patronen eens voor een beer, Yoda, aap, varken of uil. Ik hebt dit patroon voor een vossenmuts wat aangepast: de 3 DC heb ik enkel gedaan op de plaats waar de neus komt. De eerste en derde keer […]
Thank you so much for this pattern, I just finished making one for my son. It will stay on his head for days…