By Lisa Gutierrez on 12/10/2014 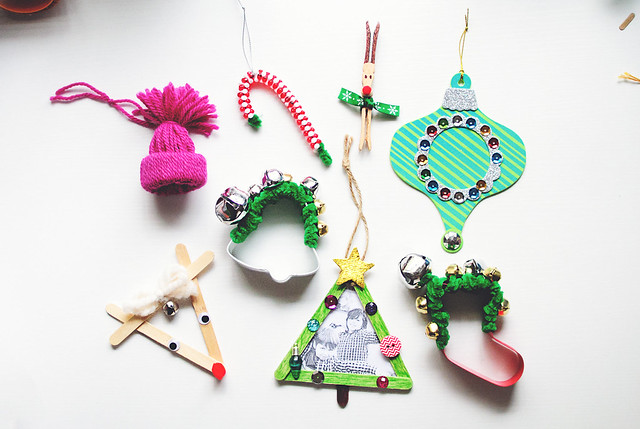
Christmas crafts are my jam! I adore handmade ornaments and now that my kids are old enough, I can force them help them to make their own. I thought I would share some of the ones we’ve made, this year. Some were already made during our last few scout meetings (oh, Tigers!) and others, I’m taking with me to our scout Christmas party, so the evening isn’t just a bunch of kids with sugar rushes running around the community center.
1. The top left corner is my FAVORITE. Winter Hat ornaments made with leftover yarn and a toilet paper roll.
2. Cookie cutter jingle bells are a kid favorite. Just use pipe cleaners to secure bells to a Christmas cookie cutter. I found these Wilton ones at Tuesday Morning for 29 cents! Score! If you don’t have a Tuesday morning, this 18-piece set looks good. looks good.
3. The foam ornament in the right hand corner is a kit from Hobby Lobby. It’s actually a photo ornament, so there goes one of our Tiger electives.
4. The beaded candy cane is an idea from a kit I saw. Just alternate red and white tri-beads on a pipe cleaner, then shape it into a candy cane.
5. The popsicle stick Rudolph is pretty self-explanatory. My MIL had one my husband made when he was little, so I just copied hers. Three popsicle sticks glued together, wiggly eyes put in place, and a red pom-pom nose, with a jingle bell tied to the center by a piece of yarn.
6. The popsicle stick Christmas tree was fun to shop for. Make a triangle with popsicle sticks, then let the kiddos color it green with markers. We glued sequins, buttons, and other “ornaments” on to decorate it. The photo was a quick print on my home printer on regular printer paper. Twine at the top to hang it.
7. Last, but not least, the baby wooden clothespin Rudolph. These wooden clothespins were actually given to me by my MIL. They were leftover from when she did this craft with her kids! So, early 90s? Anyway, it’s 2 clothespins inverted and glued to each other. Mini pom pom nose, ribbon bow tie, and sharpie eyes. Simple, but cute.
I actually put together little ornament kits for my scouts because I am slightly neurotic when it comes to messes. I KNOW they’d help me clean and I should trust them more with supplies, but let’s be real–things are gonna get crazy. SO, each kid gets all the supplies they need and they can make them at the party, or take them home to work on. It was actually quite pleasing to lay out all the supplies and then make little baggies of craft stuff.
What are you crafting for Christmas? How is your Christmas knitting going?! I have made a ton of those bulky zig-zag cowls and oh boy, I am loving that pattern still.
Pin It
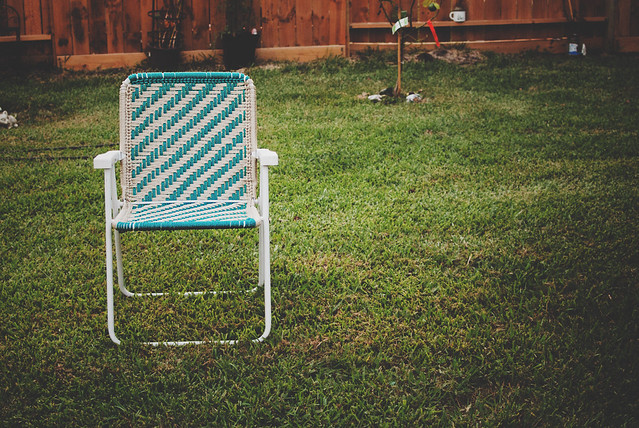
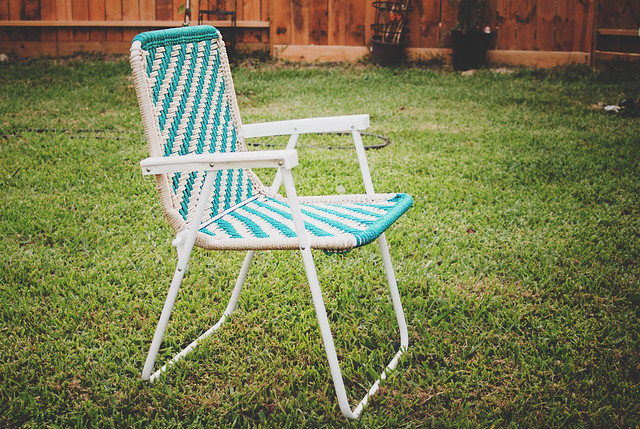
By Lisa Gutierrez on 06/27/2013 I bought two lawn chairs last year when Target had them on clearance. Oh, I KNOW you know the magnetic pull that is a 50-70% off sale at Target. They were white aluminum with yellow (plastic) woven webbing and under $10 each. A series of events (rain, summer sun, etc) mixed with a bit of neglect left them in shambles. Like, a guest at my kids’ birthday party fell through one! Don’t worry, they weren’t seriously hurt. Unless you count their pride because…kids. They like to giggle when adult bums go through chairs.
I knew something had to be done. I didn’t want to just throw them away, you know? Plus, my kid secretly asked his grandpa to get him a trampoline for his birthday and HE DID (!!!), so I now needed something comfortable to sit on while I watched my kid jump. My remaining lawn chair quickly started looking threadbare and once one of the webbing strips snapped, I put it away until I could figure out what to do. Buy new webbing and re-weave them? Crochet a hammock-like seat and pray I’m not too heavy for it? No. No, thank you.
Instead, I Googled “DIY lawn chair” and one link led to another until I found myself HERE. Macrame lawn chairs! Brilliant!
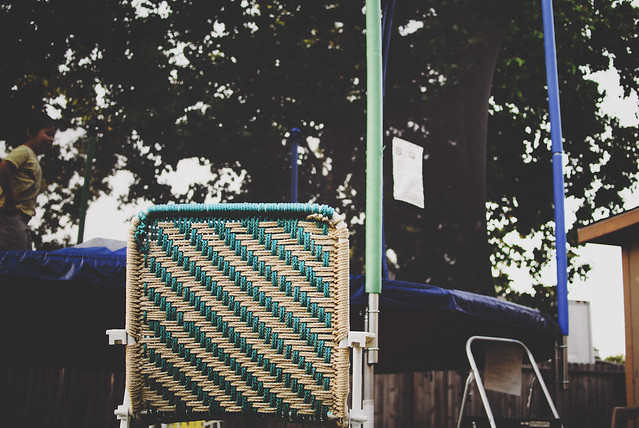
Over the next few days, I watched the video several times, made a trip to Hobby Lobby, and got to work. It was more like weaving, in my opinion, but I think the knots you make at the end of each row with the hooks make it macrame. I didn’t have a book, so I just did a really simple weave pattern.
I used two 100yd balls of 6mm Bonnie Macramé Craft Cord (Amazon link. I used ‘pearl’ & ‘teal’) and my biggest crochet hooks. I had a 15.75mm (US – Q) and a 19mm (US – S) hook. I would suggest two 19mm hooks! (Amazon link. I used ‘pearl’ & ‘teal’) and my biggest crochet hooks. I had a 15.75mm (US – Q) and a 19mm (US – S) hook. I would suggest two 19mm hooks!
Another thing I would suggest is gloves! My hands were SO sore while working on this. I don’t know if I HAD to pull the cord as tight as I did, but I felt like I should, so that the seat wouldn’t sag under an adult’s weight. You never know who is going to sit in your chairs and if I learned anything from that birthday party incidence it’s that a busted chair is the worst thing a hostess can provide for her guest(s).
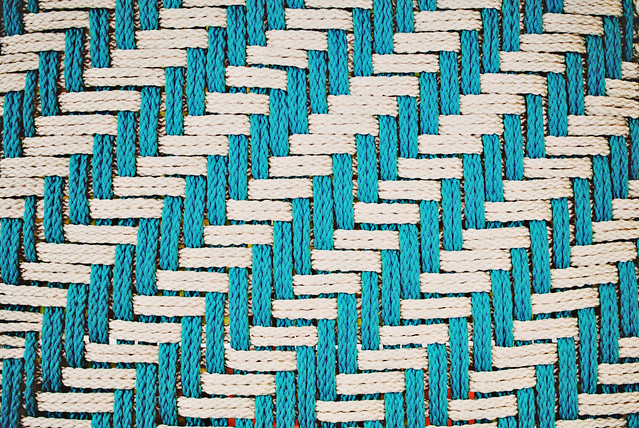
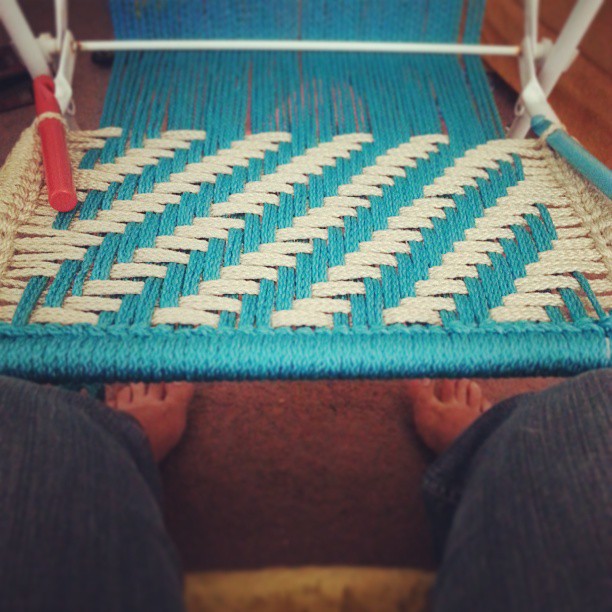
If I would have used just one color, the lovely herringbone pattern would be more apparent. I do like the diagonal stripes, though. The pattern was pretty basic: the contrasting color (beige) went OVER 3 groups – or 6 strands – of the first color (blue), then UNDER 3 groups of the first color. On the next row, you repeat the same pattern, but you shift it over once. After the first few passes across, it’s a really simple process. If it hadn’t been so hard on my hands, the other chair would be done already.
I’m in love. If you have any questions, let me know! Check out the video on the page I linked above. I referenced the video A LOT until I got my rhythm going. Imagine me pausing with my hook in one hand and my head cocked to the side with a “huh?!” face several times. It was a really interesting project as it was something completely new to me!

See the tattered lawn chair on the other side of the trampoline? Yeah…
Would you save your torn up lawn chair? How so? Ever tried to macrame one?
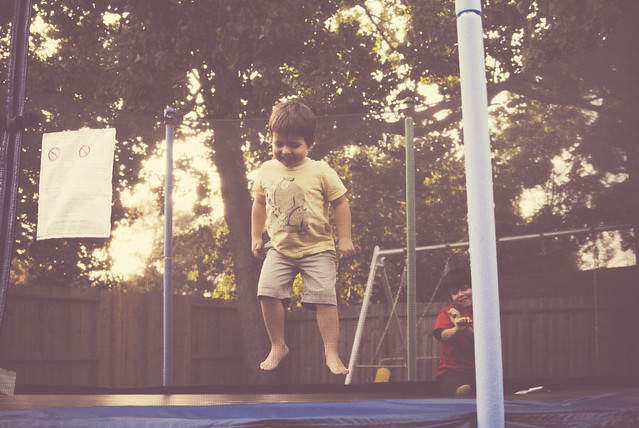
That’s my view. And yes, my kid is mid-Gangnam style in the background.
Pin It
By Lisa Gutierrez on 02/07/2013 
I don’t know if I’ve mentioned it, but my oldest son is in Cub Scouts and I’m sorta kinda (ok, really) in charge of his den. With Valentine’s Day next week, I thought I should help the boys make something for their teacher/mom/dad/little love.
After discussing and demonstrating the overhand and square knots (an elective in their book), we moved on to this leather project. I used instructions from Wood & Faulk and we were able to make key rings in under half an hour.
I had the leather pieces cut & punched beforehand, so I just had to measure out leather cord and then help them lace it right. I am in love with the results!
 Pin It
By Lisa Gutierrez on 11/30/2012 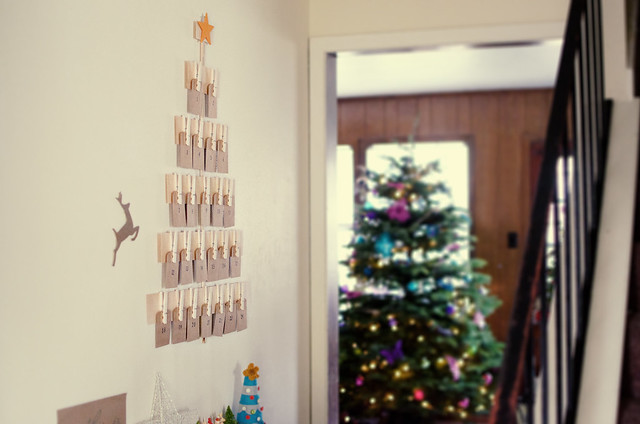
Or advent calendar. Whatever you want to call it, it’s hanging on my foyer wall.
I spent the past week browsing Pinterest and just becoming so overwhelmed with advent calendar ideas. I kept complaining, “we neeeeed a calendar. we neeeeed a countdown. blah, blah, blaaaaaaah.” Finally, yesterday, I stopped complaining and went to Hobby Lobby for supplies. While taking Andrew to the bathroom (OF COURSE), I noticed the shelf with wood sheets and my mind flashed to the few scrap wood trees I’d seen in my Pinterest perusing. Bingo!
I loved the look of the scrap trees, but I wanted something really quick and easy. You can see the exact materials I used, below:

I stamped the numbers using a set my MIL gave me a few years ago. Everything is hot glued together and it hangs with a small piece of yarn. I’m going to fill the tiny envelopes with activity prompts and/or chocolates (I’m thinking Andes!) for both boys. I’m glad I got it done on time. They are super excited for tomorrow! I’m just a little terrified that 2012 is already so close to being over. How’d it go by so quickly?!
Pin It
By Lisa Gutierrez on 10/29/2012 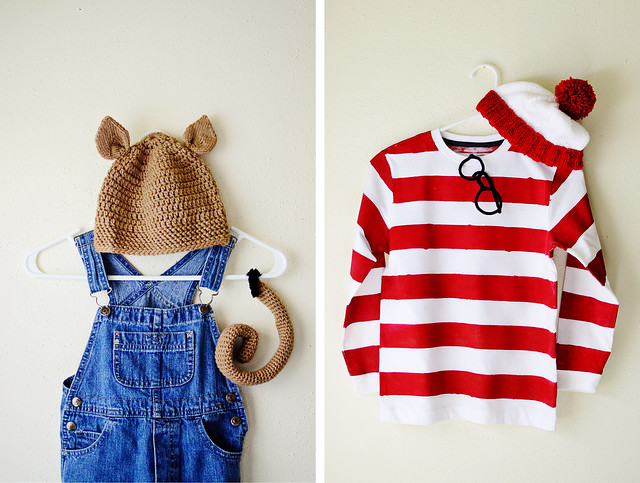
At least mostly handmade.
These are my boys’ costumes for the book character parade at their school. Andrew (4) chose the mouse from If You Give a Mouse a Cookie and Nathan (7) chose Waldo of Where’s Waldo? fame.
You would think the Waldo costume were the easiest thing in the world to put together, but..ummm…NO.
The first thing I did was make the hat. That part was easy. I CO 60 with a 5.5mm circular and k2p2 for like 20 rounds, then switched colors and knit about 20 more rounds, then did a basic crown decrease. Giant pom-pom completes the look. It fits him perfectly and took only a few hours. I want to make more in a bajillion different colors.
Next, I looked for a Waldo shirt. I only found red & white striped shirts that were for the adult version of the Waldo costume. Nothing that would fit a 7 year old! So, I figured I’d just paint a white shirt. I looked at Target for a white shirt–nothing. I looked at Wal-Mart–nothing. Frustrated, I moved on to the glasses. I thought I’d just find some at a thrift store and pop out the lenses, but no. I couldn’t find any round ones! SOOOO, pipe cleaners to the rescue! And the boy could help, so WIN!
I just needed the darn shirt. I finally found white long sleeve t-shirts at Old Navy and they had his size–whew! Painting was a whole other ordeal. I mixed my acrylic paint with some textile medium I’ve had forever. I used blue painter’s tape to mark off the stripes. It came out better than I was expecting. Even though some of the lines are a little messy, I still like the look. I heat set it, today, but I’m afraid to wash it, so the boy is going to wear it as-is. The acrylic was really rough, but the iron smoothed it out considerably. He’ll wear blue jeans and I’m thinking of letting him take my old Polaroid camera with him. He wants to be a zombie for Halloween night and I’m going to try so hard to get him to be ZOMBIE WALDO. How cool would that be?
Andrew’s mouse costume was easy-peasy. I made a basic crochet beanie (SO QUICK!) and then I knitted the ears on. I made the ears in the round with short-row shaping. I don’t know why I decided I would knit them, but I’m glad I did. Since they’re double-thick, they stand up and are just so damn cute. He wore the hat to the school’s Fall Festival this weekend (and a blue cape!) and received many compliments. However, they all thought he was a cat or even some sort of bear? Oh well! His tail is a long tube with a JUMBO pipe cleaner shoved down the center. Seriously. Easiest costume ever. I added a little loop to the back of his overalls to “tie” his tail on. He’s in love and so am I.
This next costume is for you 90’s kids. Get ready…
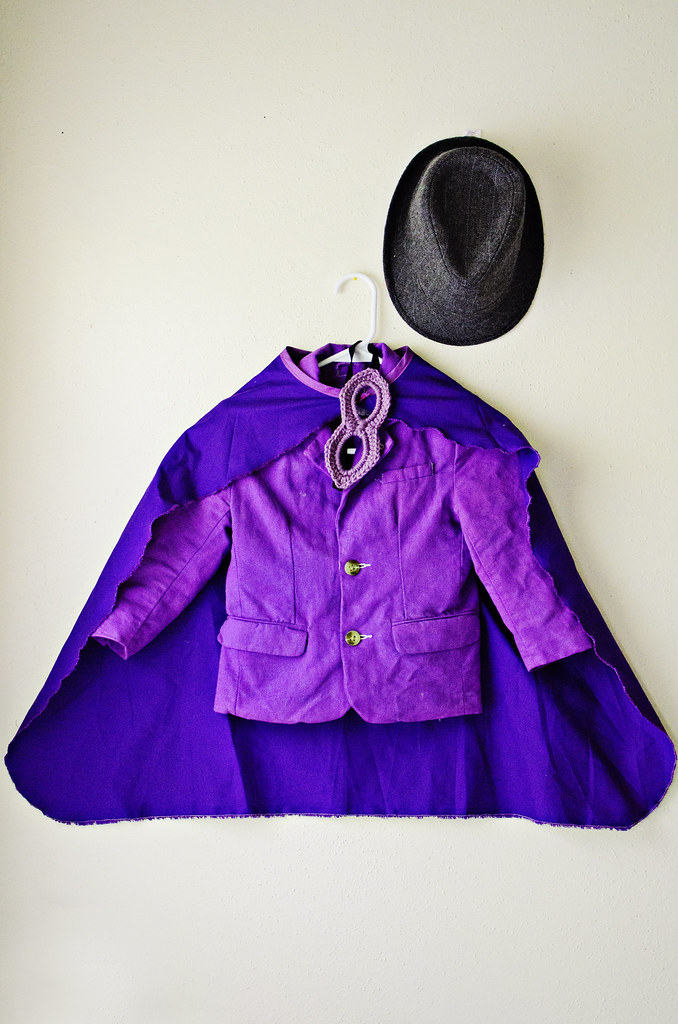
Do you know who he’s going to be? Hmmmmmm??
If you guessed Darkwing Duck, you are correct! My husband introduced them and so my littlest has been raving about a Darkwing Duck costume all month. The first thing I knew he would need was a purple blazer. OF COURSE there were no purple blazers for boys to be found. I went to Goodwill and found a cream linen blazer, picked up a packet of purple dye, and BAM! Purple blazer. The boy swooned. Like, really. He was so giddy to put it on. I made the cape (cut out the general shape, use double-fold bias tape around the neck, then zig-zagged around the edges) and crocheted the mask (I made the first row around a pipe cleaner so it’s stiff!). He already had the fedora. I just need to figure out what pants he’s going to wear. Darkwing Duck doesn’t wear pants, but it’s going to be too cold to go pants-less. He has some yellow boots to wear as duck feet, so I was thinking white pants, but I can’t find any! Ah!
Anyway, I kind of went all out with the DIY, this year. To be completely honest, this is the first year I’ve put together costumes for them. It’s usually my sister that buys them whatever they want or we go to a thrift store and my kid picks out a super-hero costume. I’m pretty excited for Halloween, this year! We may put them on tomorrow so I can get photos.
Pin It
|
Disclosure You may find affiliate links and banners throughout my blog. I earn a small commission from purchases made through these links. It helps pay for keeping this blog running! All reviews and products are items I have personally used and loved. |


