“All is Full of Fluff” knit pillow pattern

All is Full of Fluff knit pillow pattern

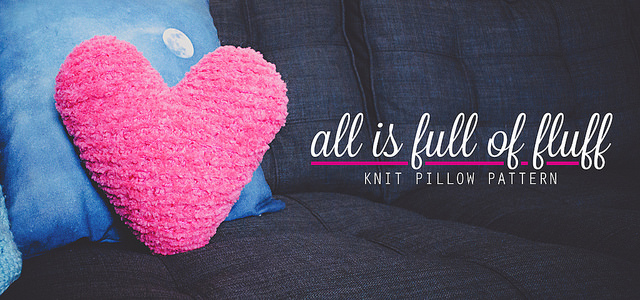
Pillows are my jam, right now! With Valentine’s Day just around the corner, a heart pillow was naturally on the top of my list. I wanted something fun and most definitely pink. This is the first time I’ve used a fur yarn and I kind of LOVE it.

Materials
2 skeins Lion Brand Luxe Fur in pink and 1 skein of worsted weight acrylic. I’m not 100% sure of the brand–I just looked for a hot pink in my scraps that blended well with my fur yarn. I would guess it was about 100 yards.
9 mm (US 13) needles
yarn needle for sewing/weaving in ends
poly-fil stuffing

Abbreviations
CO: cast on
K: knit
Kfb: knit in front and back loop of stitch
K2tog: knit two together
SSK: slip slip knit (slip each of the next two stitches separately, then put them back on the left needle and K them together)

Pattern
Make 2

Bottom of heart
With BOTH yarns, CO 2
Row 1: Kfb across, turn. (4)
Row 2-3: K, turn. (4)
Row 4: Kfb, K 2, Kfb, turn. (6)
Row 5-6: K, turn. (6)
Row 7: Kfb, K 4, Kfb, turn. (8)
Row 8-9: K, turn. (8)
Row 10: Kfb, K 6, Kfb, turn. (10)
Row 11-12: K, turn. (10)
Row 13: Kfb, K 8, Kfb, turn. (12)
Row 14-15: K, turn. (12)
Repeat the process of increasing in the first and last stitches and knitting two even rows between the increase rows until you have 24 stitches on your needle. Knit 3 rows and then move on to the lobe directions.

Lobe
Row 1: K 10, K2tog, turn. (11 stitches, leave 12 un-worked on other needle)
Row 2-3: K, turn. (11)
Row 4: SSK, K 9, turn. (10)
Row 5: SSK, K 8, turn. (9)
Row 6: K, turn. (9)
Row 7: K 7, K2tog, turn. (8)
Row 8: K 6, SSK, turn. (7)
Row 9: K, turn. (7)
Row 10: SSK, K 3, K2tog, turn. (5)
Row 11: K, turn. (5)
Row 12: SSK, K 1, K2tog, turn. (3)
Bind off 3 stitches.

Attach yarns at outside edge of remaining 12 stitches, arranging them on opposite needle. Repeat Rows 1-12 for second lobe. When you turn after Round 12, the wrong side will be facing. Bind off all stitches. Weave in ends on this wrong side.

After making two hearts, arrange them with wrong sides together and whip stitch them together with the worsted weight yarn only. Leave a 2-inch gap for stuffing. I stuffed mine almost until it was a little too stiff. From my experience, over-stuffing is better because it will get compacted with use. Sew the gap shut once you are satisfied with the amount of fluff.

All is Full of Fluff, knit pillow pattern from goodknits

I’m not sure if this pillow will be out all year, but for now, it’s sitting pretty on my couch, which I am still loving. I want to make a million pillows for it but at the same time I just want to stare at the bare couch all the time. Maybe I should just knit a pillow for every season/holiday so I can have a nice selection from which to choose!

All if Full of Fluff, knit pillow pattern from goodknits

Pin It

knitting: the pickle pillow

96.365: the pickle pillow

I made this enormous bolster pillow and the kids immediately started calling it “the pickle pillow.” It doesn’t really fit on the love seat (I needs a couch, yo), so the boys use it as a head rest when they’re laying in front of the tube watching episodes of Inspector Gadget. It’s their new favorite TV show. It’s 22 minutes, so they get to watch one episode unless they’re sick and quarantined to the living room.

I love garter stitch

fat garter stitch

Details:
TWO strands of Lion Brand Wool-ease Thick & Quick in lemongrass (which was ON CLEARANCE at my local Michael’s last week for $3.99/ball)
Size US19 needles.
35 (or 36? something like that) stitches and approximately 22 garter ridges (44 knit rows).
Seam the BO to the CO, then cinch one end shut.
Fold a towel in half (short end to short end), then roll it up and wrap it with a few layers of quilt batting.
I made an inside case with some green fabric so the guts wouldn’t be so obvious through the stretched stitches.

Stuff it! Close the other end.

I LOVE garter stitch. It’s so easy and textural and……yeah! it’s awesome. <3

doily love

Inspired by the doily pillow tutorial on Smile and Wave, I started scouring thrift stores and craigslist for any little sets of doilies I could find. I HAD to make one. My couch NEEDED it!

One of the thrift stores close to our new house had some and I was SO excited! Until I saw the price tag. GAH! Them ladies knew how long and tedious doily making was and priced them accordingly. Unfortunately, doilies aren’t in the family budget, so I had to pass those up.

A week later, we headed back to our old stomping grounds in South Houston and hit up our old favorite thrift stores, including SeAM. I’m happy to say SeAM did not disappoint. I found a bunch of doilies for about two bucks. I used all the large ones, a medium one, and a few small ones to fill in open spaces. I still have a medium sized one and two little baby doilies left. I’m in LOVE!

the doily pillow

I did this a little differently than the tutorial. After figuring out the configuration (most exciting craft-related puzzle!), I pinned the doilies to some yellow fabric, about 17.5″ square. I then hand-sewed them down, overlapping where necessary. I didn’t want to cut any and there wasn’t much overhang, so I didn’t. Most of the doilies were bright white and one was a lovely light brown, so I whipped up a pot of super strong tea and let the pillow top soak for about 10 minutes. I washed it with some dish soap and tossed it in my dryer for a bit. Tea staining for the win!

pillow back

I used a vintage pillow case for the back. Again, i can’t stress enough how much I love reusing pillowcases like this. The hem is already there, so I don’t need to do any extra sewing! I cut out a piece about half the width of the pillow and one that was two thirds. I pinned it down and sewed it up. My 18″ pillow form makes it a little over-stuffed, but that’s how I like ’em.

If you have any doilies you don’t want (psssssh!), please do let me know.