By Lisa Gutierrez on 06/11/2015 Disclaimer: This post contains a review for a kit I received from Wool and the Gang. All opinions are my own.
Hello, friends. I cannot believe it’s been over a month since I touched base with you guys. While summer is upon us and wool is the last thing we want to think about, crochet and knitting are still activities I do on a daily basis. When the weather isn’t quite appropriate for woolly accessories, I turn my focus to other fibers and types of accessories, like lace shawls, cotton yarn, and housewares. The latter is something I’ve drifted away from, the past few years. When we first bought our house, I went a little nuts making pillows, weaving doilies, crocheting blankets, ottomans, etc. I kind of missed it, so I was thrilled to hear about the new line of crochet patterns for the home from Wool and the Gang.
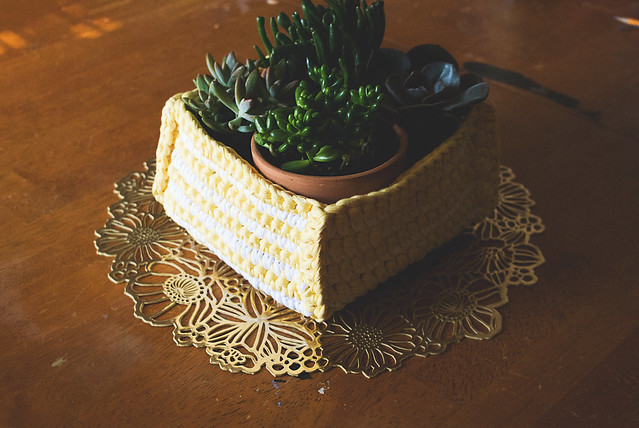
If you remember, I reviewed one of WATG’s knitting kits, way back in February (see here). I loved the presentation of the kits, from the way they are packaged, to the way the patterns are explained. The same goes for the crochet kit I received a few weeks ago. The Bestitched Box Crochet Kit contained 4 cones of their Jersey Be Good yarn, yarn needles for finishing, a pattern booklet, and (the optional) crochet hook. It’s everything you need to complete your project. You only have to decide what colors to use and what to put in it when you’re done.
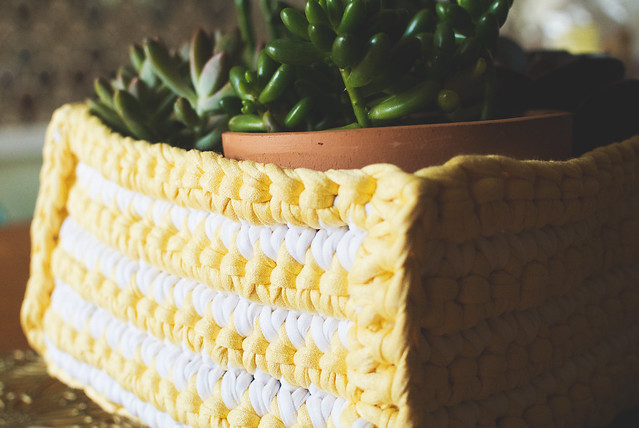
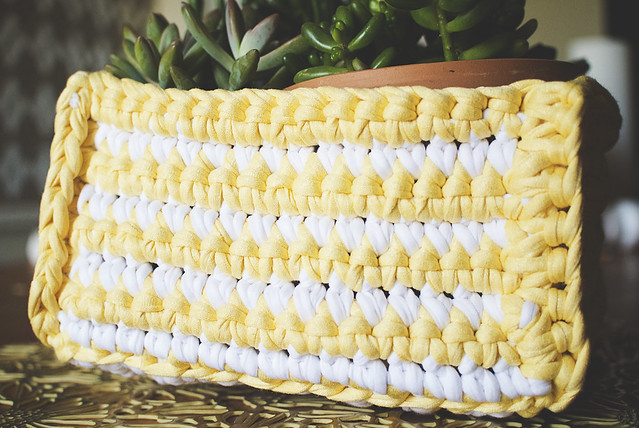
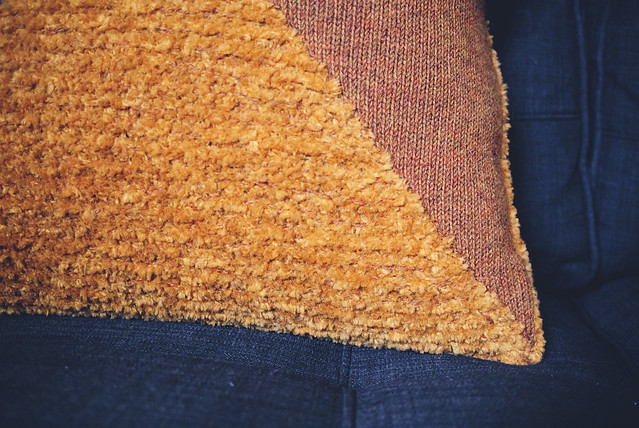
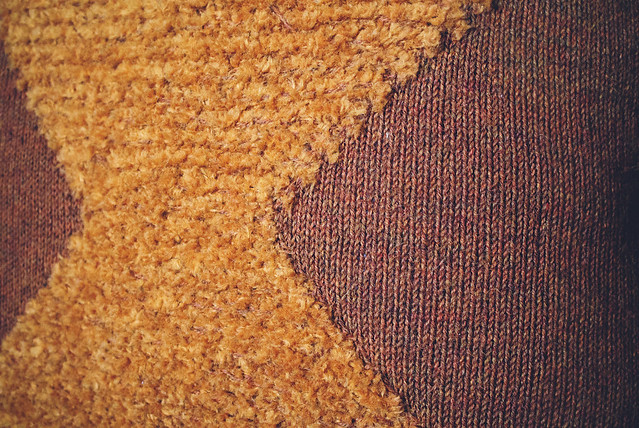
I must admit: I had never used jersey yarn! I had heard about it, I have jersey sheets I want to turn into it, and I love projects made from it…but I had never tried it! My first impression of the cones of yarn were they were softer than I had imagined. That’s weird because I wear t-shirts all the time, so of course it would be soft! It felt a lot stronger, too. I guess I imagined it to be super stretchy and kind of cumbersome to use, but it wasn’t at all. I enjoyed crocheting with it very much. My basket feels quite sturdy and I can see it lasting for years.
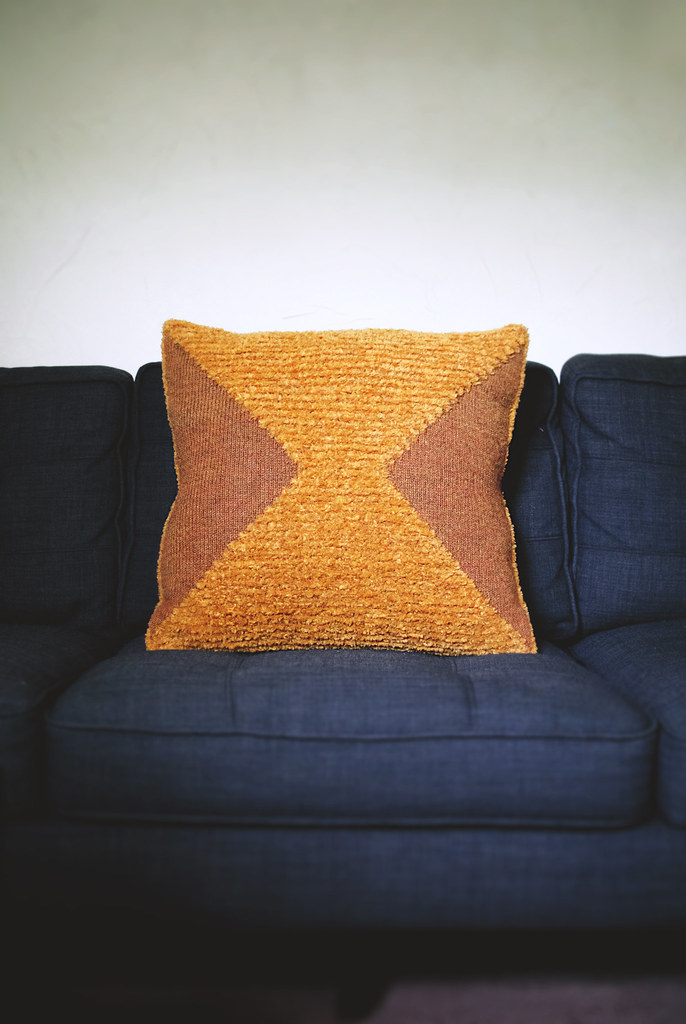
The Bestitched Box pattern comes with directions for two sizes of boxes and includes photos plus information for pretty much every step. The details say it is recommended for intermediate crocheters, but I believe a beginner would be able to make it. It is made entirely in single crochet, so as long as you know how to change colors (for the stripes), you should be able to complete the box. I made the small one and it is an approximately 8″ square.
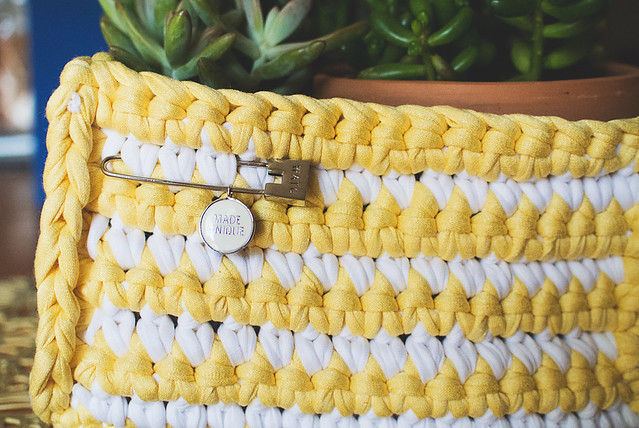
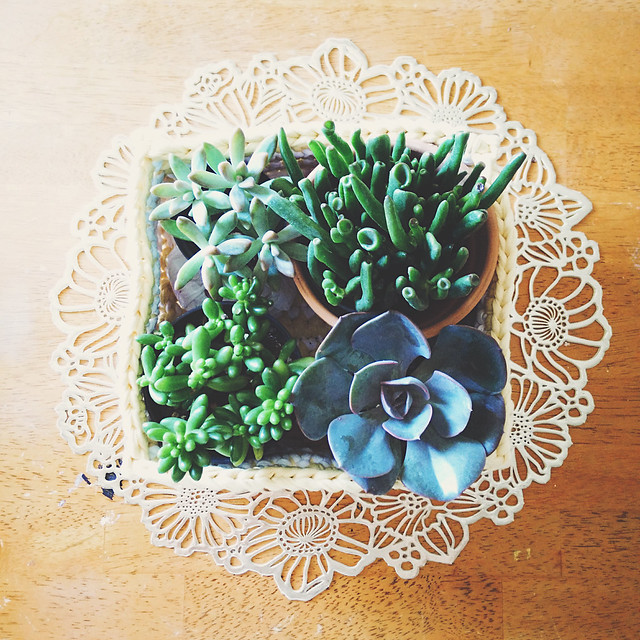
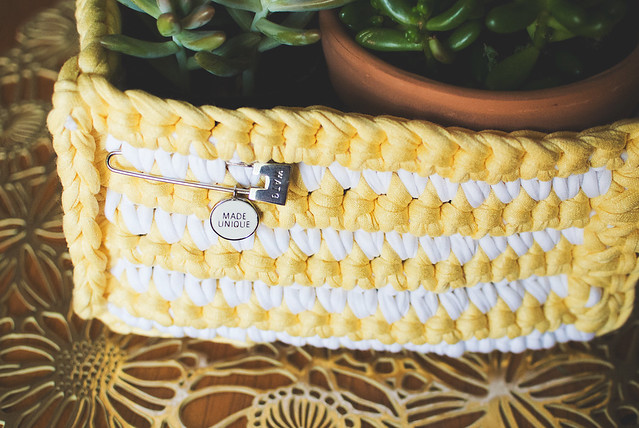
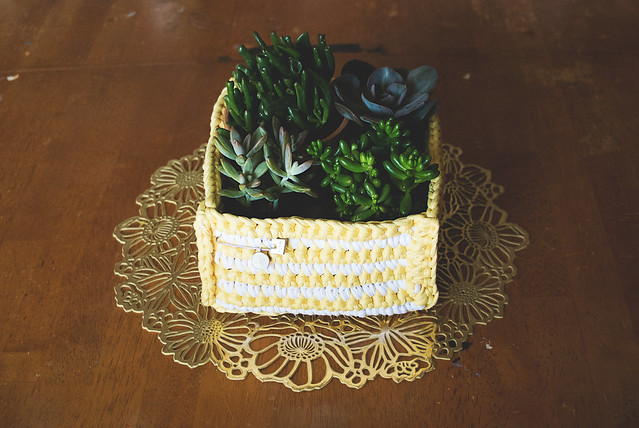
The colors I received are “golden compass” and “white noise.” The white is very bright and the yellow leans more toward a buttercup yellow than a golden yellow. It’s still lovely! Also, isn’t my Made Unique pin the best? Sigh. I want to put it on EVERYTHING, but it might end up on a tote this summer.
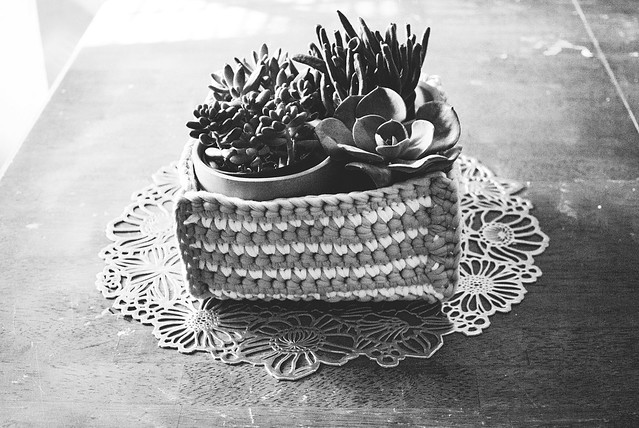
I loved the photo on the kit of a mix of succulents in the box, so I used this as an excuse to buy more plants. I chose four different ones, including a sedum, pachyveria, jade (gollum), and echeveria. I think they’ll stay small enough to live in the box for a little while, then I’ll have to be more!
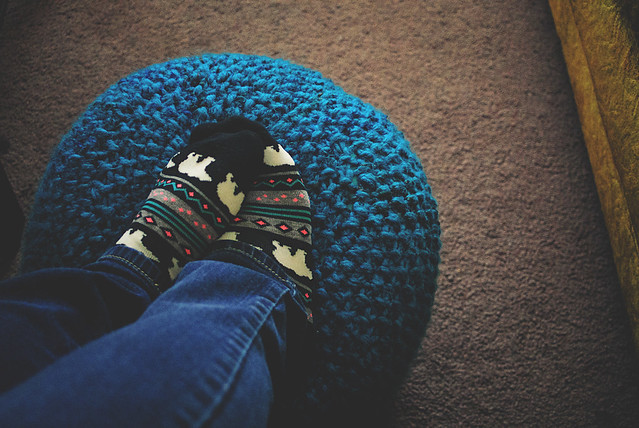
What do you think? Have you ever crocheted with jersey yarn? Check out all twenty five (25!!) colors from Wool and the Gang, here! I think I need a hot pink pouf for my living room, right? I already made a blue one that my kids loved to death. I think the jersey yarn might last (a lot) longer!
Thank you to Wool and the Gang for sending me this cool kit to crochet and share with you. Show them some love on Instagram, Twitter, and Facebook.
Pin It
By Lisa Gutierrez on 11/23/2014 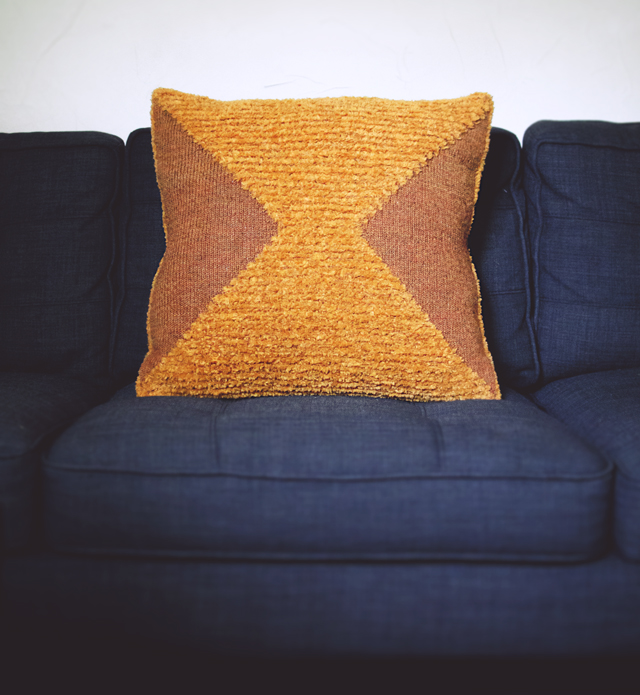
Hey, friends! I was sick for a whole 5 days and didn’t touch my needles. I decided I should probably compose a post about a pillow I knit early this year. I don’t have a pattern written up because I don’t really think anyone wants to knit one, but perhaps you might like the idea of using two gauges at once and YOU want to experiment, too? Anyway…
Way, waaaay back in February, I started knitting a pillow with Lion Brand’s Luxe Fur Yarn . It was on super sale at Michael’s and so so soft, I picked up like 10 balls and was determined to knit something…ANYTHING with it. Maybe a teddy bear?! . It was on super sale at Michael’s and so so soft, I picked up like 10 balls and was determined to knit something…ANYTHING with it. Maybe a teddy bear?!
I knew that it would be a little tricky to knit with yarn that had so much texture, so I paired it with a regular worsted weight yarn in a similar tone. That just so happened to be Berroco’s Ultra Alpaca. I started knitting a gauge swatch and wondered what it would look like if I dropped the fur and worked stripes without it. I knew I’d need to use a smaller needle, so I switched right there. I made a little swatch with furry stripes and knew I was on to something.
What proceeded was a marathon knitting session where I jotted down notes on notes of measurements and calculated possible patterns. I realized that one stitch with both yarns (and the larger needle) was close enough to two stitches with just my lighter yarn (and smaller needle). Using a series of short rows, I was able to create the front of the pillow you see above in one single piece. The blocking I did afterwards was minimal, too. I didn’t have much to do once I finished.
Yarns: Lion Brand Luxe Fur (about 6 skeins) and Berroco Ultra Alpaca (2 skeins)
Needles: 6.5 mm (US 10.5) and 3.75 mm (US 5) 29″ circular needles (you’ll be using both at the same time)
Gauges: (both yarns, bigger needle) 16 sts x 28 rows = 6″ x 6″ in garter stitch
(lighter yarn, smaller needle) 11 sts x 15 rows = 2″ x 2″ in stockinette stitch
I started by casting on 50 stitches with both yarns and the bigger needle. I knit one row, then started my work with both needles and gauges. When I was using the smaller needle, I knit with only the ultra alpaca. When I switched back to the larger needle, I picked up the Luxe Fur.
Row 2 looked something like this: With smaller needle, kfb, switch to larger needle and both yarns, K 48, switch to smaller needle, kfb, turn. [What I ended up with is 4 stitches on the smaller needle and 48 stitches left on the bigger needle]
Still using smaller needle, Rows 3 and 4 were my short rows. For Row 3, I slipped the edge stitch, purled the next stitch, wrapped the next stitch and turned. Row 4, I knit the two stitches, then turned.
Row 5 went right across. When I came to a wrapped stitch, I just picked the wrap up and knit it with the stitch. I started with the smaller needle and slipped 1, P 1, switch needles and K 48, switch needles and P 2, turn. The furry part of the pillow is in garter stitch while the other is in stockinette.
Rows 6 and 7 were short rows like 3 and 4. Row 6: slip 1, K 1, wrap and turn. Row 7: P 2, turn.
Row 8 and every 6th row from here on out, I increased the number of stockinette stitches by knitting in the front and back of the edge fur stitches with the smaller needle. I ended up with 4 rows of stockinette in the lighter yarn equaling 2 rows of garter stitch in the heavier weight. It certainly wasn’t a perfect match, but it worked! I increased the stockinette portion until I only had 10 stitches left in the original gauge on the larger needle and 80 stitches on the smaller needle (40 on each side).
At this point, I started the same sort of pattern, but instead of increasing the stockinette portion, I decreased by using my larger needle and both yarns. Basically, I would use the larger needle and both yarns to turn two stockinette stitches into one on either side of my fuzzy center. Once I got back to 50 stitches on my larger needle, I had about as close to a square as I would get.
It was actually a rather simple pattern, but the result looks rather impressive, if I may say so.
The back of the pillow is two fuzzy panels with twisted rib in the smaller gauge. It was meant to be an envelope design, but I stuffed a 24″ pillow and it gaped too much, so I attached a zipper along the edge of one side and along the furry edge of the other.

Do you ever get the desire to experiment with knitting like this? I can say this is the first time for me. I don’t know if I’ll make anything similar. This pillow is enormous, so maybe one day I’ll knit a smaller one to compliment it. I DO like knitting with yarns I don’t normally have in rotation. That’s why I’m currently in a big chunky yarn fit. I have knit no less than 5 cowls for Christmas. This entire week I’ve been sick, all I wanted to do was knit, but coughing and knitting equals gross.
Pin It
By Lisa Gutierrez on 01/28/2014 
Pillows are my jam, right now! With Valentine’s Day just around the corner, a heart pillow was naturally on the top of my list. I wanted something fun and most definitely pink. This is the first time I’ve used a fur yarn and I kind of LOVE it.
Materials
2 skeins Lion Brand Luxe Fur in pink and 1 skein of worsted weight acrylic. I’m not 100% sure of the brand–I just looked for a hot pink in my scraps that blended well with my fur yarn. I would guess it was about 100 yards.
9 mm (US 13) needles
yarn needle for sewing/weaving in ends
poly-fil stuffing
Abbreviations
CO: cast on
K: knit
Kfb: knit in front and back loop of stitch
K2tog: knit two together
SSK: slip slip knit (slip each of the next two stitches separately, then put them back on the left needle and K them together)
Pattern
Make 2
Bottom of heart
With BOTH yarns, CO 2
Row 1: Kfb across, turn. (4)
Row 2-3: K, turn. (4)
Row 4: Kfb, K 2, Kfb, turn. (6)
Row 5-6: K, turn. (6)
Row 7: Kfb, K 4, Kfb, turn. (8)
Row 8-9: K, turn. (8)
Row 10: Kfb, K 6, Kfb, turn. (10)
Row 11-12: K, turn. (10)
Row 13: Kfb, K 8, Kfb, turn. (12)
Row 14-15: K, turn. (12)
Repeat the process of increasing in the first and last stitches and knitting two even rows between the increase rows until you have 24 stitches on your needle. Knit 3 rows and then move on to the lobe directions.
Lobe
Row 1: K 10, K2tog, turn. (11 stitches, leave 12 un-worked on other needle)
Row 2-3: K, turn. (11)
Row 4: SSK, K 9, turn. (10)
Row 5: SSK, K 8, turn. (9)
Row 6: K, turn. (9)
Row 7: K 7, K2tog, turn. (8)
Row 8: K 6, SSK, turn. (7)
Row 9: K, turn. (7)
Row 10: SSK, K 3, K2tog, turn. (5)
Row 11: K, turn. (5)
Row 12: SSK, K 1, K2tog, turn. (3)
Bind off 3 stitches.
Attach yarns at outside edge of remaining 12 stitches, arranging them on opposite needle. Repeat Rows 1-12 for second lobe. When you turn after Round 12, the wrong side will be facing. Bind off all stitches. Weave in ends on this wrong side.
After making two hearts, arrange them with wrong sides together and whip stitch them together with the worsted weight yarn only. Leave a 2-inch gap for stuffing. I stuffed mine almost until it was a little too stiff. From my experience, over-stuffing is better because it will get compacted with use. Sew the gap shut once you are satisfied with the amount of fluff.

I’m not sure if this pillow will be out all year, but for now, it’s sitting pretty on my couch, which I am still loving. I want to make a million pillows for it but at the same time I just want to stare at the bare couch all the time. Maybe I should just knit a pillow for every season/holiday so I can have a nice selection from which to choose!
 Pin It
By Lisa Gutierrez on 01/10/2014 
My first project of 2014 is complete! I started it on December 30 and finished it up on the 6th.
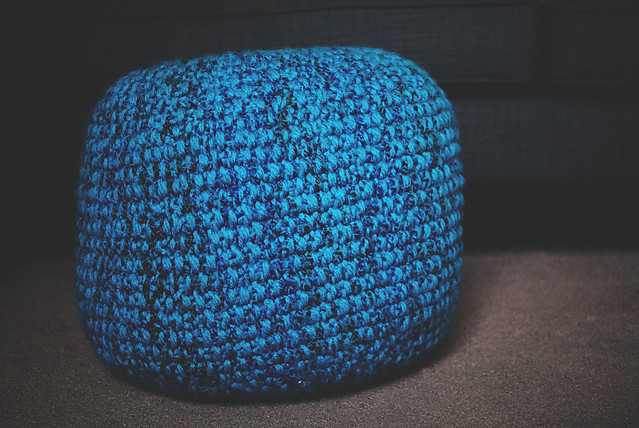
Pattern: Pouf pattern from DROPS design with modifications, listed below
Yarn: 5 skeins of Loops & Threads Charisma in electric blue and 2 skeins of Lion Brand’s Homespun in lagoon; 2 strands of Charisma and 1 strand of Homespun held together
Needle: 9 mm (US 13)
Modifications: I used different yarn and needle size, so I adjusted the pattern a bit to accommodate. I CO 38 stitches and my short rows were worked to 6 stitches before the end, then 12. I knit in seed stitch instead of garter until it was about 50″ along the center.
I stuffed it with a standard pillow wrapped in a twin size duvet wrapped in a flat queen size sheet. It turned out the perfect height for use as an ottoman/foot stool in front of our new couch! Oh, I forgot to mention: we bought a new couch! Finally. After living in this house for 3.5 years and only having a love seat + 2 chairs, we now have a couch. I feel so grown up.


It’s also a pretty great seat for my boys to do their homework at the coffee table.
What’s your first project of the year? Oh yeah, HAPPY NEW YEAR! I’m only a week and a half late. I hope everyone had a nice holiday. The kids are finally back in school and so I have a little more time to knit.
Tell me: what’s on your needles/hooks?
Pin It
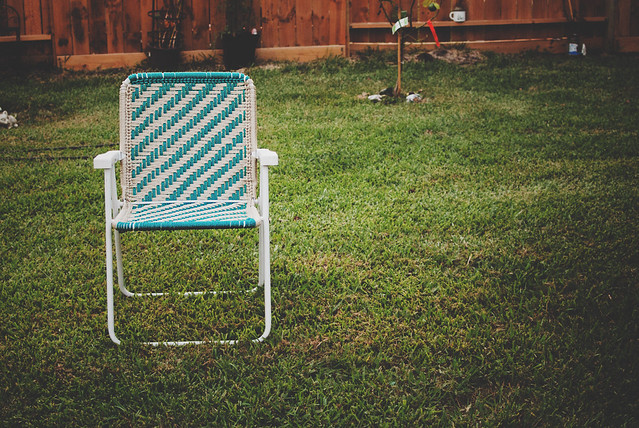
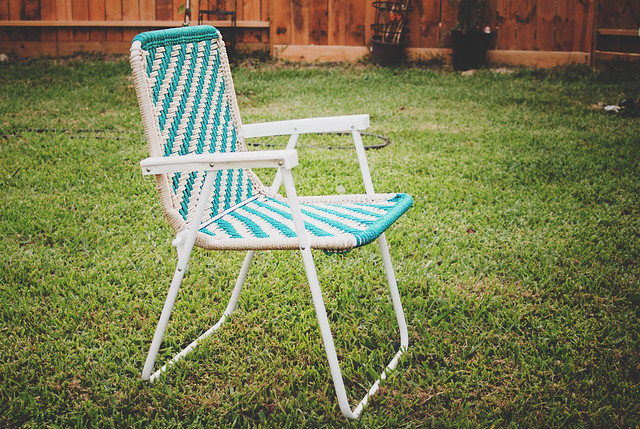
By Lisa Gutierrez on 06/27/2013 I bought two lawn chairs last year when Target had them on clearance. Oh, I KNOW you know the magnetic pull that is a 50-70% off sale at Target. They were white aluminum with yellow (plastic) woven webbing and under $10 each. A series of events (rain, summer sun, etc) mixed with a bit of neglect left them in shambles. Like, a guest at my kids’ birthday party fell through one! Don’t worry, they weren’t seriously hurt. Unless you count their pride because…kids. They like to giggle when adult bums go through chairs.
I knew something had to be done. I didn’t want to just throw them away, you know? Plus, my kid secretly asked his grandpa to get him a trampoline for his birthday and HE DID (!!!), so I now needed something comfortable to sit on while I watched my kid jump. My remaining lawn chair quickly started looking threadbare and once one of the webbing strips snapped, I put it away until I could figure out what to do. Buy new webbing and re-weave them? Crochet a hammock-like seat and pray I’m not too heavy for it? No. No, thank you.
Instead, I Googled “DIY lawn chair” and one link led to another until I found myself HERE. Macrame lawn chairs! Brilliant!
Over the next few days, I watched the video several times, made a trip to Hobby Lobby, and got to work. It was more like weaving, in my opinion, but I think the knots you make at the end of each row with the hooks make it macrame. I didn’t have a book, so I just did a really simple weave pattern.
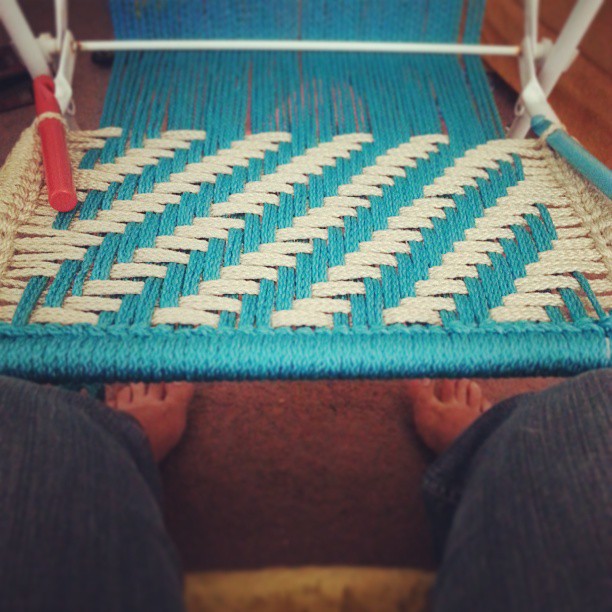
I used two 100yd balls of 6mm Bonnie Macramé Craft Cord (Amazon link. I used ‘pearl’ & ‘teal’) and my biggest crochet hooks. I had a 15.75mm (US – Q) and a 19mm (US – S) hook. I would suggest two 19mm hooks! (Amazon link. I used ‘pearl’ & ‘teal’) and my biggest crochet hooks. I had a 15.75mm (US – Q) and a 19mm (US – S) hook. I would suggest two 19mm hooks!
Another thing I would suggest is gloves! My hands were SO sore while working on this. I don’t know if I HAD to pull the cord as tight as I did, but I felt like I should, so that the seat wouldn’t sag under an adult’s weight. You never know who is going to sit in your chairs and if I learned anything from that birthday party incidence it’s that a busted chair is the worst thing a hostess can provide for her guest(s).
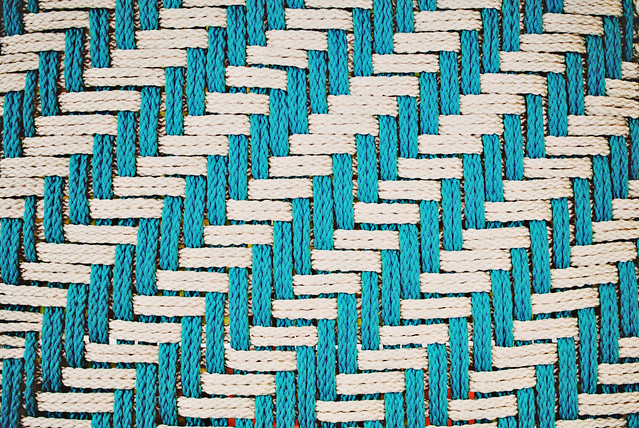
If I would have used just one color, the lovely herringbone pattern would be more apparent. I do like the diagonal stripes, though. The pattern was pretty basic: the contrasting color (beige) went OVER 3 groups – or 6 strands – of the first color (blue), then UNDER 3 groups of the first color. On the next row, you repeat the same pattern, but you shift it over once. After the first few passes across, it’s a really simple process. If it hadn’t been so hard on my hands, the other chair would be done already.
I’m in love. If you have any questions, let me know! Check out the video on the page I linked above. I referenced the video A LOT until I got my rhythm going. Imagine me pausing with my hook in one hand and my head cocked to the side with a “huh?!” face several times. It was a really interesting project as it was something completely new to me!
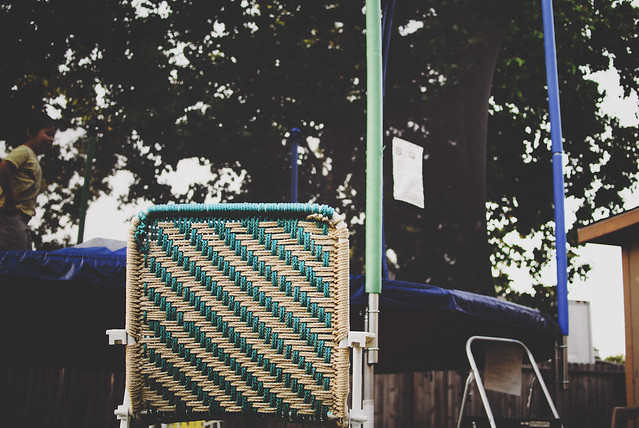

See the tattered lawn chair on the other side of the trampoline? Yeah…
Would you save your torn up lawn chair? How so? Ever tried to macrame one?
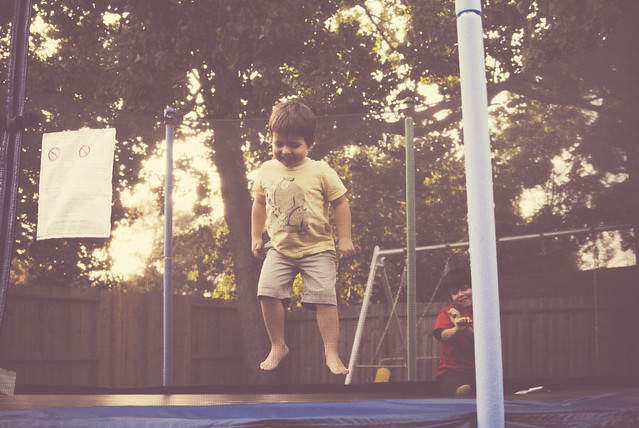
That’s my view. And yes, my kid is mid-Gangnam style in the background.
Pin It
|
Disclosure You may find affiliate links and banners throughout my blog. I earn a small commission from purchases made through these links. It helps pay for keeping this blog running! All reviews and products are items I have personally used and loved. |


