

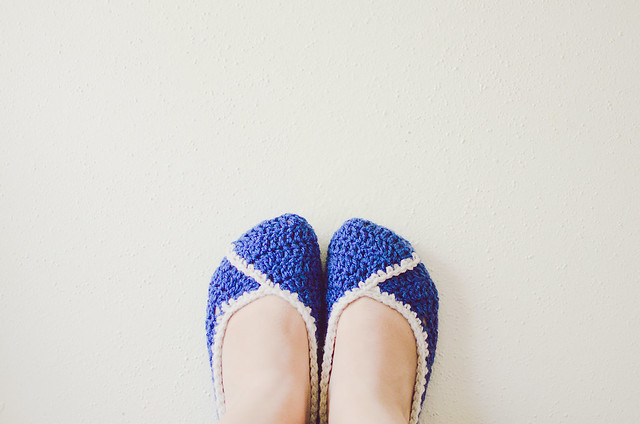
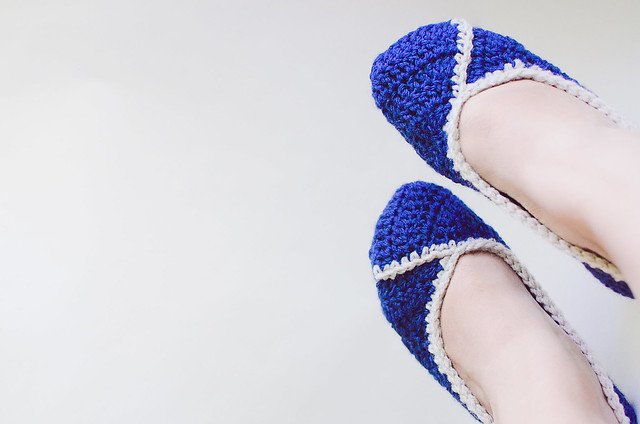
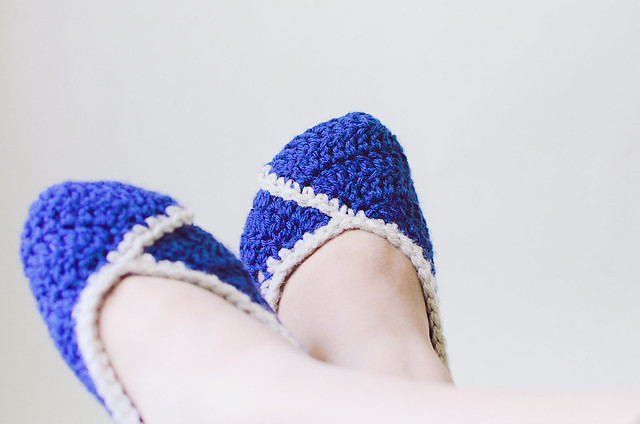
I have been wanting a new slipper for a while. I kept putting it off because I couldn’t think of anything that didn’t start exactly like my Mary Janes. I knew I wanted something bold, but timeless.
I had the idea for a wrap shoe, but I was stuck on the same sort of construction as the Mary Janes (from the toe to heel). I knew FOR SURE I wanted something that was crocheted in one piece.
I picked up some yarn and started with the toe and made some interesting shaping, but once I got to the sole I realized it was way too similar to the MJs. I frogged it and started over.
This time, I started at the heel! Working back and forth across some stitches, I shaped the heel a bit, then crocheted a sole for a few more rows. When I got toward the toe, the fun began! Using a combination of increases and eventually some decreases, I ended up shaping a wrapped toe.
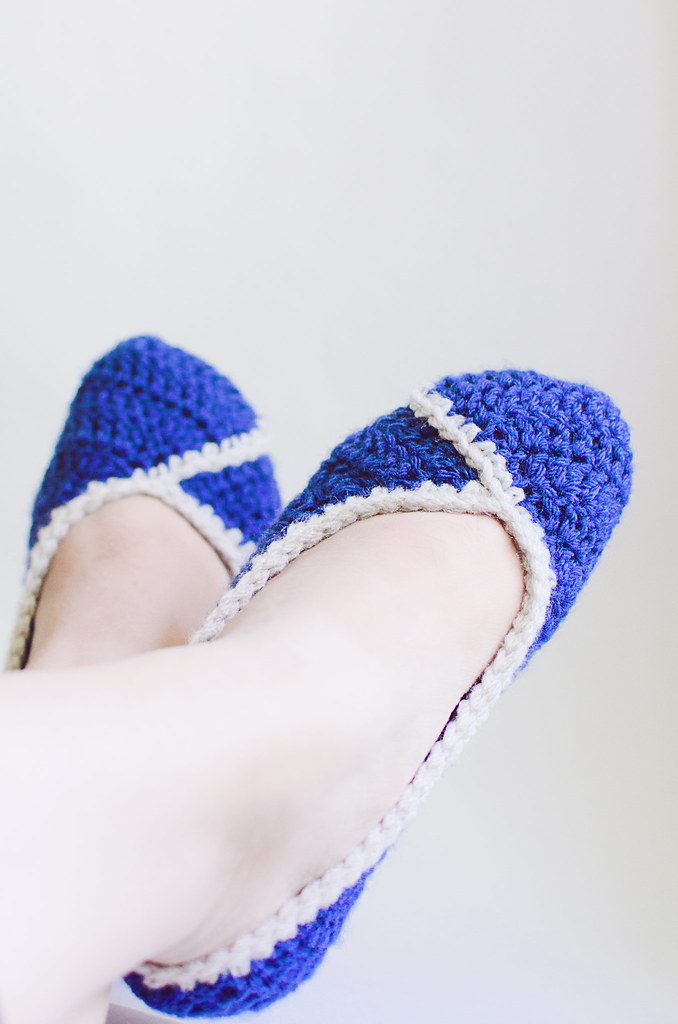
I wasn’t in love. There is my confession. It looked OK after I seamed it up, but I was kind of meh about it. I thought about it for a day and then started another pair. After I finished the first, I made the quick decision to seam up the second one with the wrap going in the opposite direction. Aha! That’s what was missing.
I was in love.
Check out the pattern below. I’ve even included some photos to help guide you during the assembly. Truly, it’s the only tricky part. I would suggest crocheting both slippers first, then sitting down to assemble them. I used Vanna’s Choice because it comes in such a great assortment of colors and tends to hold up really well.
Let me know what you think! Add your project to the Ravelry page so I can see your slippers!

MATERIALS
MC— 2 oz (100 yards) Vanna’s Choice yarn (100% acrylic, worsted weight; 3.5 oz/100 g—170 yards per skein) in “Colonial Blue”
CC– less than 1 oz Vanna’s Choice yarn in “Linen”
5mm (US H-8) hook
safety pin or other removable marker
yarn needle
NOTES
Common U.S. terminology used in this pattern.
Ch: chain
DC: double crochet
SC: single crochet
Slst: slip-stitch
DC2tog: double crochet 2 together
DC3tog: double crochet 3 together
St: stitch
Sk: skip
Rep: repeat
Rem: remaining
RS: right side
Beg Ch 3 of rows = 1 DC; DC last stitch into top of beg Ch 3 of previous row.
Gauge
15 DC x 8 rows = 4″ with 5mm hook
Size
9″ un-stretched, to fit shoe sizes 8-10. Fabric is very stretchy and will accommodate a variety of sizes. To make a smaller size, crochet less rows for the sole and make a few SC decreases when you work the border.
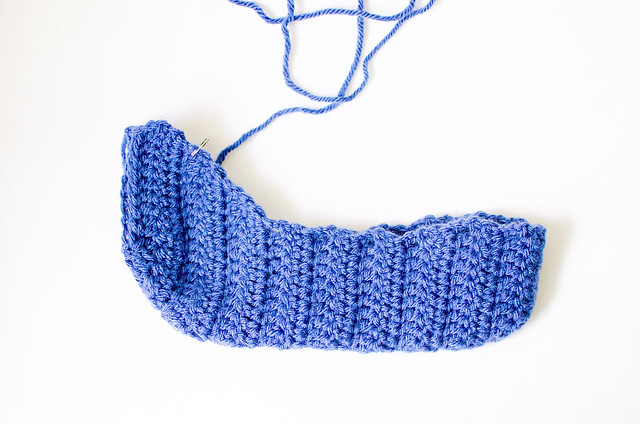
PATTERN (make 2)
Pattern is worked from the back of the heel up to the toe.
Leaving 12″ tail, Ch 18.
Row 1: DC in 4th Ch from hook, DC in next 5 ch, 2 DC in next 2 ch, DC to end. Ch 3, turn. (18)
Row 2: Sk first DC, DC in next 7 sts, 2 DC in next 2 sts, DC to end. Ch 3, turn. (20)
Row 3: Sk first DC, DC in next 8 sts, 2 DC in next 2 sts, DC to end. Ch 3, turn. (22)
Row 4: Sk first DC, DC across. Ch 3, turn. (22)
Row 5: Sk first DC, DC2tog, DC to last 3 sts, DC2tog, DC in last st [last st = ch 3 of prev row]. Ch 3, turn. (20)
Row 6: Sk first DC, DC across. Ch 3, turn. (20)
Row 7-12: Rep Row 6.
Row 13: DC in first st, 2 DC in next st, DC to last 2 sts, 2 DC in each rem sts. Ch 3, turn. (24)
Row 14-15: Rep Row 13. (32 sts after Row 15)
Row 16: DC in first st, 2 DC in next st, DC in next 8 sts, DC2tog 6 times, DC in next 8 sts, 2 DC in rem 2 sts. Ch 3, turn. (30)
Row 17: DC in first st, 2 DC in next st, DC in next 6 sts, DC 2tog 7 times, DC in next 6 sts, 2 DC in last sts. Ch 3, turn. (27)
Row 18: Sk first DC, DC in next 7 sts, DC2tog twice, DC3tog, DC2tog twice, DC in last 8 sts. (21)
Leave at least 12″ of MC. FO.
Use the beginning tail to seam up the back edge.
The assembly is different for each slipper. Once you get the first made, the second shouldn’t be too confusing. You’re making opposite folds.

(LEFT SLIPPER)
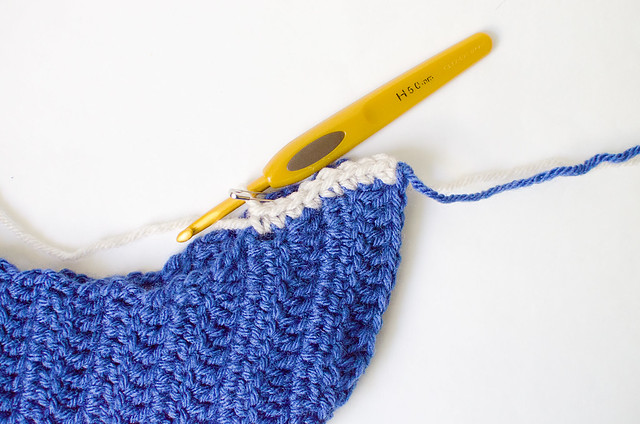
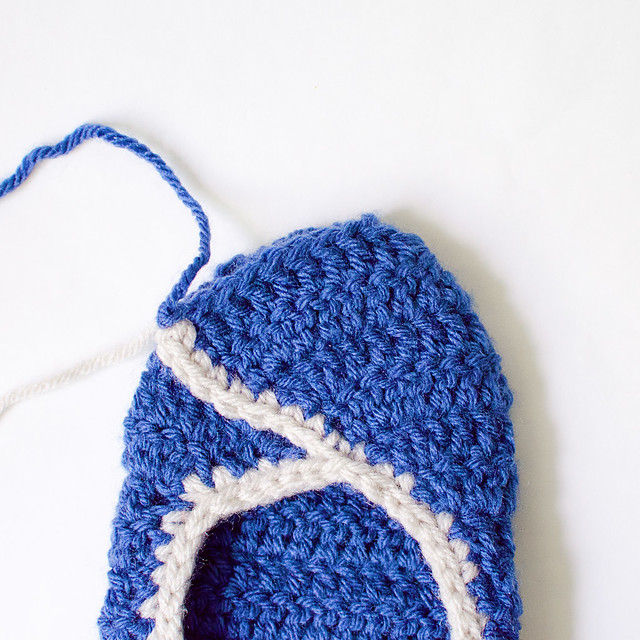
Place a safety pin into beg ch 3 of row 16. (Fig. 1 below)
Leaving a 12″ tail, attach CC yarn at end of row 18 with RS of row 18 facing.
SC down side of last 4 rows, making 2 SC into each row. (Fig. 2 below)
Folding opposite flap down into slipper, make next SC into 5th row AND the ch-3 with a marker in it (Fig. 3 below). Make next SC into JUST the 5th row. Continue making 2 SC into the side of the rows.
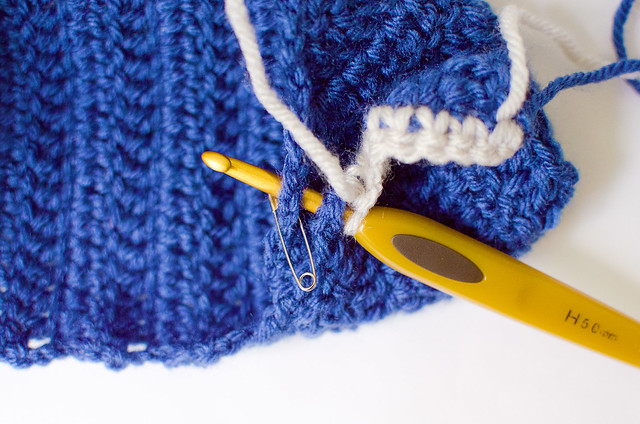
When you get to the heel, make only 1 SC into row, then skip the heel seam and make 1 SC in first row. Make 2 SC in the rows back toward the toe.
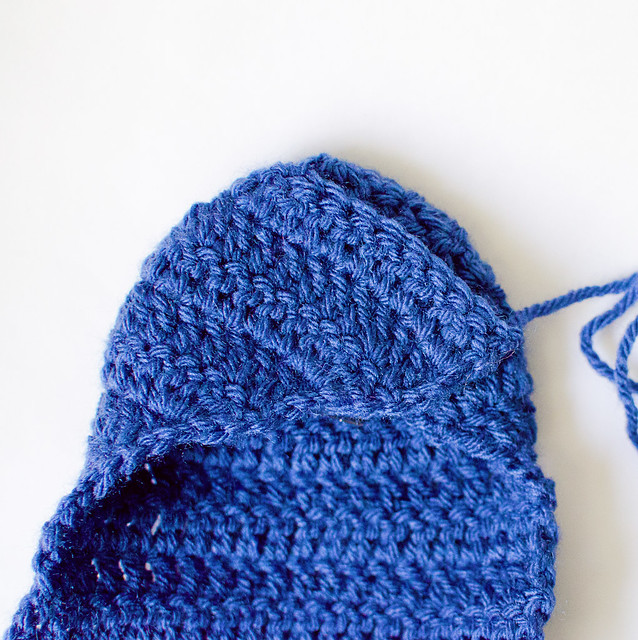
When you get to the joining SC, slst into it, then slst into all SC around the slipper opening (Fig. 4 below).
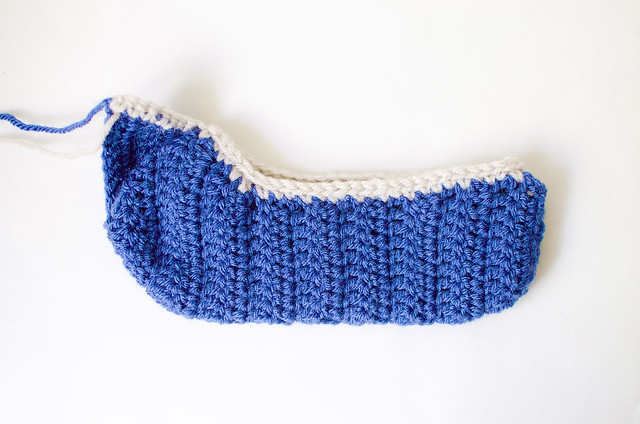
FO and weave in that end. Seam the toe stitches down (Fig. 5). Weave in ends.
Note: The CC single crochet along the edge of the first 4 DC should lay directly on/across Row 15. I sew the SC down with a running stitch through the tops of the single crochet stitches and the tops of Row 15 double crochet stitches. I use a whip-stitch to sew the Row 18 stitches down along the top of the toe. Stretch them up so the seam sits on the edge of your toes. This will make it less visible from the top.
(RIGHT SLIPPER)
Place a safety pin into beg ch 3 of row 16.
Flip shoe “inside out” so Row 18 tail is now on the opposite side (Fig 6).
Leaving a 12″ tail, attach CC yarn at Row 15, with RS of row 15 facing you. 2 SC into the side of that DC. 2 SC into side of each row of DC toward the heel. Make only 1 SC into the rows at the seam. 2 SC into the side of each row of DC back toward the toe.
When you reach the 5th row from the top, make 1 SC into that row, then make 1 SC into the same row AND beg ch-3 of Row 16 (directly to the right of the first sc).
Continue making 2 SC into the sides of remaning 4 DC rows. FO leaving a 12″ tail.
Attach CC yarn at joining SC. Slst into 1 SC of previous round. Slst around slipper opening. FO and weave in that end. Use remaining tails to seam edges.
Pattern is free for personal use only.


These are absolutely adorable! My first pair of crocheted slippers have seen better days (read: there’s holes in the soles…Big, non-crochet-related holes..), these are the perfect replacements.
Thank you so much for the pattern. They’re lovely. :)
Nancy
Palmview, TX
Love these Lisa, can’t wait to start them….I know many mama’s who will love these once the cool weather kicks in here! These are also going to make amazing x-mas gifts…many family members got your MJ slippers a couple years back and I know they will love these! You Rock!
Such an awesome design, I can’t wait to try some!
I love this slippers. Will have to start some tonight! Love your stuff. Have made 6 doily afghans and currently working on #7.
“Beg Ch 3 of rows = 1 DC; DC last stitch into top of beg Ch 3 of previous row.”
Can anyone help explain this to me? I’m a bit confused by this. Sorry for this since this is only my second project :( Any help would be much appreciated!
Welp, after reading it all over again, I’m assuming this only applies to sizing the slipper smaller, yes?
That should have actually been put under NOTES and not size. Sorry for the confusion!
Hi Lola,
“Beg Ch 3 of rows = 1 DC; DC last stitch into top of beg Ch 3 of previous row.”
This means that the ch 3 at the beginning of every row counts as a 1 stitch. The stitch count at the end of every row will include that beginning chain. At the end of each row, you crochet your last stitch into the top of that ch 3. The way the pattern is written, you make the chain 3 at the end of each, then you turn and work on the next (but it’s still called a “beginning chain”).
I hope that helps!
Ahh, okay. That makes much more sense! Haha, I’m always confused when it’s late so sorry about that. Thank you very much Lisa! I love the pattern a lot! :D
At the beginning of each row, you chain3 which will equal the height of a dc stitch. You will count this as ur 1st dc for that row. Similarly when you finish a row you dc into the 3rd chain of the previous row 3 chains. Hope you can understand… Good luck
Thanks for this cute slippers tutorial! I’ve featured it on our site:)
Another timeless design… I love the Lizzie Slippers! Hope you won’t mind me linking up at Tangled Happy tomorrow. Wishing you a very happy Friday! :)
Hi Lisa, I love the pattern and am on row 16 of my first slipper – I’m so lost, maybe you can help me… I ended on 32 sts on row 15 as said. How I’m reading row 16 there are not enough sts to complete.
(#) denotes row 15 sts used + previously used sts
DC in first st (4 = chain of three plus first st)
2 DC in next st (1 + 4 = 5)
DC in next 8 sts (8 + 5 = 13)
DC2tog 6 times [I’m reading this as the next 12 sts will be used] (12 + 13 = 25)
DC in next 8 sts (8 + 25 = 33)
2 DC in rem 2 sts (2 + 33 = 35)
Ch 3, turn. (3 + 35 = 38… not 30!)
Can you please help, I’m sure it’s the simplest thing I’m missing.
Thanks! – Bethany
In Rows 13-15, you are increasing by 2 stitches in the beginning and end of each row. You got that right because you ended up with 32 after Row 15.
In Row 16, you increase the 2 at the beginning, by making a DC into the first st and then 2 DC in the next (including the beginning ch 3, you now have 4 stitches), then you make a single DC in each of the next 8. You should have 12 stitches right now, but you have 13? I’m not sure how you ended up with an extra.
Moving along, you DC2tog 6 times (so, you’re working over the next 12 and decreasing it down to 6; 6 + 12 = 18). Make a single DC into the next 8 (8 + 18 = 26), then make 2 DC into each of the last 2 stitches (4 + 26 = 30).
I count the first ch-3 as ONE single DC. I do not count the ch 3 at the end of each row as a stitch for that row, as it’s actually a “beginning” ch 3 for the next row. I just add it to the end of each row for the pattern directions.
I hope this helps and didn’t confuse you further! Let me know if there’s anything else I can clarify.
I understand Bethany’s dilemma because I am also confused with Row 16. I completely follow you upon finishing my last DC2tog’s. The problem for me comes after this. I do not have enough stitches left to single DC into the next 8, and make 2 DC’s into each of the last 2 stitches. I only have 7 stitches left to crochet into and I need 10sts. And my Row 15 did end with 32 sts. I understand that the row should end with 30 sts but I do not have enough sts to make this happen. I am so anxious & excited to finish these slippers. Please tell me what I am doing wrong.
Thanks so much! – Debbie
Hi Debbie!
If you have 32 stitches at the end of Row 15, you should definitely have enough to complete row 16. Let’s take it stitch by stitch, ok?
You chain 3 (that counts as the first stitch of Row 16) and turned.
Make a DC in the very first stitch you see (now you have 2 stitches from that 1 below)
Make 2 DC in the next stitch (2 + 2 = 4 worked from 2 of Row 15)
Make 1 DC in each of the next 8 stitches (4 + 8 = 12 worked over 10 from Row 15)
DC2tog 6 times across the next 12 stitches (12 + 6 = 18 worked over 22 from Row 15)
Make 1 DC in each of the next 8 stitches (18 + 8 = 26 worked over 30 from Row 15)
Make 2 DC in the next stitch (26 + 2 = 28 worked over 31 from Row 15)
Make 2 DC in the final stitch (28 + 2 = 30 worked over all 32 from Row 15).
I hope that helps! Let me know if you need any further clarifications!
Thank you so much for your quick response. My problem was prior to Row 16 and perhaps the chain 3 that I forgot somewhere. :) And thank you also for sharing such an adorable pattern!
what size does this make?
Size
9″ un-stretched, to fit shoe sizes 8-10. Fabric is very stretchy and will accommodate a variety of sizes. To make a smaller size, crochet less rows for the sole and make a few SC decreases when you work the border.
Hi could you make this into a PDF for me? That would be amazing I read patterns from my iPod and when I don’t have wifi it is not possible so that would be amazing!
Hi, please help, I’m new at crochet. On the Mary Janes slippers, do I ch3 after row 5? And to make a little smaller, you said to crochet less rows for the sole. Would that be rows 7-12? Thank you so much, I so love these slippers, and hope to be able to make them. Sandy
Me again, that’s how confused I am, lol, My question is for Lizzie slippers( blue ones with white trim) Thanks again, Sandy
I have larger feet do I just ad sts to make these larger or is there someting you would suggest.
why do some patterns do this (ch 6 + 2) why not just says ch 8!
What pattern are you talking about?
Some times you need to chain a multiple of a # + another 2 or 3 for the turning chain.
I have the same question as Sandy, on Lizzie pattern, do I chain 3 after row 5? Thanks! Great pattern, just started!
Yes! Sorry, I answered her question via email, so it didn’t get posted.
Gaaah, I’m stuck in Rows 14 and 15. Somehow it doesn’t add up to 32 stitches. I’ve done it like 5 times already :(
You are increasing by 4 stitches each row, 2 at the beginning and 2 at the end. Count the beginning ch-3 of each row as a stitch!
thank you! it’s working out. I am a bit intimidated by what’s next. We’ll see how it goes.
muy lindas gracias
Hi! I am sorry but I made all the rows w/ no problem. Now I just need to assemble them and I do not understand how to. It seems like its written very confusingly. I am going to just wing it for now and see how it goes. But if there’s anyway you could simplify it that would be great! I know it might not be possible because it may be too much to bother with. By the way, i really do like this pattern and up until now they were very easy to make. Hopefully, i can finish them. Thank you.
Melissa, I am confused by the assembly as well. I will keep trying and post if I figure it out. Is there a video tutorial anywhere maybe! Seeing it would be very helpful…
Never mind, I got it! Thanks!
Hey Lisa! Thanks so much for this adorable slipper pattern! :) I have a quick question…I am going to make a smaller version (using the info you provided) but I was wondering which part of the pattern I should shorten. I know you mentioned that we’re crocheting from the heel to the toe, so my guess is that you’re referring to rows 6-15…is that correct???
Thanks again for the great pattern! :) I’m excited to crochet these for my bestie for Christmas!
I love love love the look of these! I included a link to them on my blog this morning for a gift idea roundup: http://www.mooglyblog.com/last-minute-crochet-gifts-30-free-patterns/
[…] slippers by the time I need them again. As such, yesterday I went to make a new pair. I found a really cute pattern that looked like it would work up fast and got to […]
Hi Lisa,
I’m currently working on the pattern and i’m already a little lost in the beginning. I keep doing the first row but keep getting 16 or 17 stitches in my row no matter how many times I do it. How come? I have a chain of 18 and do a double crochet in the 4th chain form the hook which leaves me with 14 chains. I do 5 more double crochet leaving me with 9 ch left. Then 2 double crochet in the next two chians, leaving me with 7 ch. I double crochet down. But that only ads up to 17….i’m messing up something or counting wrong. Help!
Nattie, the initial 3 chain that you skip counts as 1 stitch.
I don’t like the turning chain so I do the Chainless Starting Double instead, no holes!
I love this pattern. Get a little lost on how to assembly as well? What to do with the heel?
Awesome pattern!!! I’ve made one pair and will most likely make another :). Thank you!!!
Love the pattern, easy to follow even for a left-handed novice like me. I’ve so far stuck with easier stuff based around granny squares etc and expected to find this pattern tricky. First time doing dc2tog and dc3tog. I found it was best to count my stitches after each row to check that I was still on track. I’ll be making myself another pair soon, I’m sure :) Thanks for posting!
Hi Lisa! These are awesome and I’m really excited to make them. I just have one suggestion. It doesn’t mention what/when to sew up the heel seam. I’m just going to wing it, but it might be good to mention to do that before doing the color edging, as I started to do that and then realized I probably needed to sew up the heel first. :-) Otherwise, great pattern and I can’t wait to wear them!
i have worked the stitsh exactly as written and in the same colors ..
m so happy with my new slippers, thanks for the pattern
Is there a possibility of a sketch or pic of these laden flat before assembly? It might help picture how they go together.
I wish I wasn’t intimated by these on-line instructions. I have such a fear and wish it was a step-by-step sitting next to someone but unfortunately no one around me crochets. I know once I do one or two pairs, I’d get the hang of it and bang them out as gifts for my loved ones.
when my mother had dementia, I went to a website called Healthboards and it was there I met a wonderful group of ladies who wrote and stroked each other through the day-to-day horrors of the illness with our loved ones. We use to say to those who first came on that we were giving them a pair of fuzzy slippers and wrapping them in a large towel as a virtual hug. I just wish I could crochet these without fear and send them to those women as a thank you for them coming into my life. I made just great internet friends.
Wish I had someone to crochet these with who was knowledgeable.
Diane Caldarulo
[…] Lizzie Slippers by ohmygoodknits! […]
Hi,
I am confused on how to seam the toe stiches down after slip stitching, and then I’m also wondering if the heel stays open like that down the seam?
Thanks!
After making the border, I suggest putting it on and seeing how your foot stretches the slipper. You can pin the top flap down or even make the first stitches while it’s on your foot. Just use a yarn needle and your tails from crocheting to stitch in an out across the edges of the flap.
The heel should be seamed together. I originally forgot to put that instruction. You use the beginning 12″ tail to seam it up.
[…] made a portrait of Maddie, my Bear, for her Valentine’s present, and some fuzzy and soft pink slippers for myself while she was away helping her mom last week. I made Maddie’s water color from a […]
On Row 1: DC in 4th Ch from hook, DC in next 5 ch, 2 DC in next 2 ch, DC to end. Ch 3, turn. (18)
What do you mean by ” 2 DC in next 2 ch”? By 2 DC do you mean a cluster of double crochet?
Thanks ever so much for replying, I really wanna make your beautiful slippers, but I’m confused (and a beginner).
Hi Lorraine–
I don’t see that anyone has responded to your question, so I thought I would. 2DC means to put 2 double crochets in the indicated chain/stitch. Don’t cluster them or you won’t have enough stitches to work into on the next row. Here, you will put a total of 4 DCs in the two chain that are mentioned. Hope that helps!
I love these. I made one slipper…and tried it on…but it is so loose on my foot. So I made another one, tried making it more tightly…still looks ridiculous on my foot because its so loose. I’m not sure what I’m doing so wrong, but I feel like I’ve tried everything , even a smaller hook (as small as a d) and it’s still too loose on me. My size is around a 5 1/2-6. So I’ve adjusted for length , that’s all. Help =(
Hi, Bethany,
I have a really small foot (1 1/2 kids size,) so I made a few adjustments. Maybe one of them will help you.
I used a soft cotton yarn instead of the acrylic. Since the yarn was a little smaller than the acrylic would be, I used a smaller hook. Using an F hook gave me 3 3/4″ for 8 rows and about 4″ for 16 stitches wide. (Hint: always check your gauge. Everybody crochets differently.) Then I took out 4 stitches in width. (Ch 14 instead of 18 to start, and split skipped stitches between the two halves to keep the slipper symmetrical.) Finally, I shortened it by one row (row 12.)
Maybe if you take out 2 stitches in width and one row but use acrylic yarn and whatever hook gives you the stated gauge it will work for you.
Good luck! I really love mine.
Thank you for the tips, Mary!!
May I put this on pinterest?
I want to give a big shout out to Lisa for being so patient and helpful to everyone. You are one fantastic lady!
By the way, nice pattern too. :)
These are really cute. I think I will make them tonight.
[…] http://goodknits.com/blog/lizzie/ […]
Cute! Im going to try….
thank you so much for the pattern! LOve these. Can”t wait to make them for stocking stuffers!!!!
beautiful i will surely try this pattern
WOW! I made one and it was huge,so I took it out a ways.I only made 13 rows much better.Cute pattern.Thank you!
These are Wonderful! I haven’t been crocheting long but your instructions made it easy!
All of the women in my family think they need a pair!
Think I will try them tonight Thank you
I absolutely LOVE this pattern!! I have made two pair so far and plan on making lots more!! :) Thanks so much for sharing!! :D
How could this pattern be modified to add some Boye Suede Slipper Soles.
Hi! Thank you for the pattern very useful,I like to ask permission to post your page on crochet 4 the masses it’s a free page for crocheterers I would like every one to see your beautiful work the page is on facebook,I woul appreciated very much, thank you once again.
Just finished my first pair and made progress in assembling between the first and the second slipper. Even as imperfect as they are, they are darling! Very cute!
To adjust the fit, I did as someone suggested and in the slip stitch finish round, pulled three stitches together. Worked fine. Thank you for such a fun project:))
Thank You! This pattern is just perfect and doesn’t take long at all. I am unable to buy patterns, so I really appreciate this free pattern.