By Lisa Gutierrez on 07/13/2016 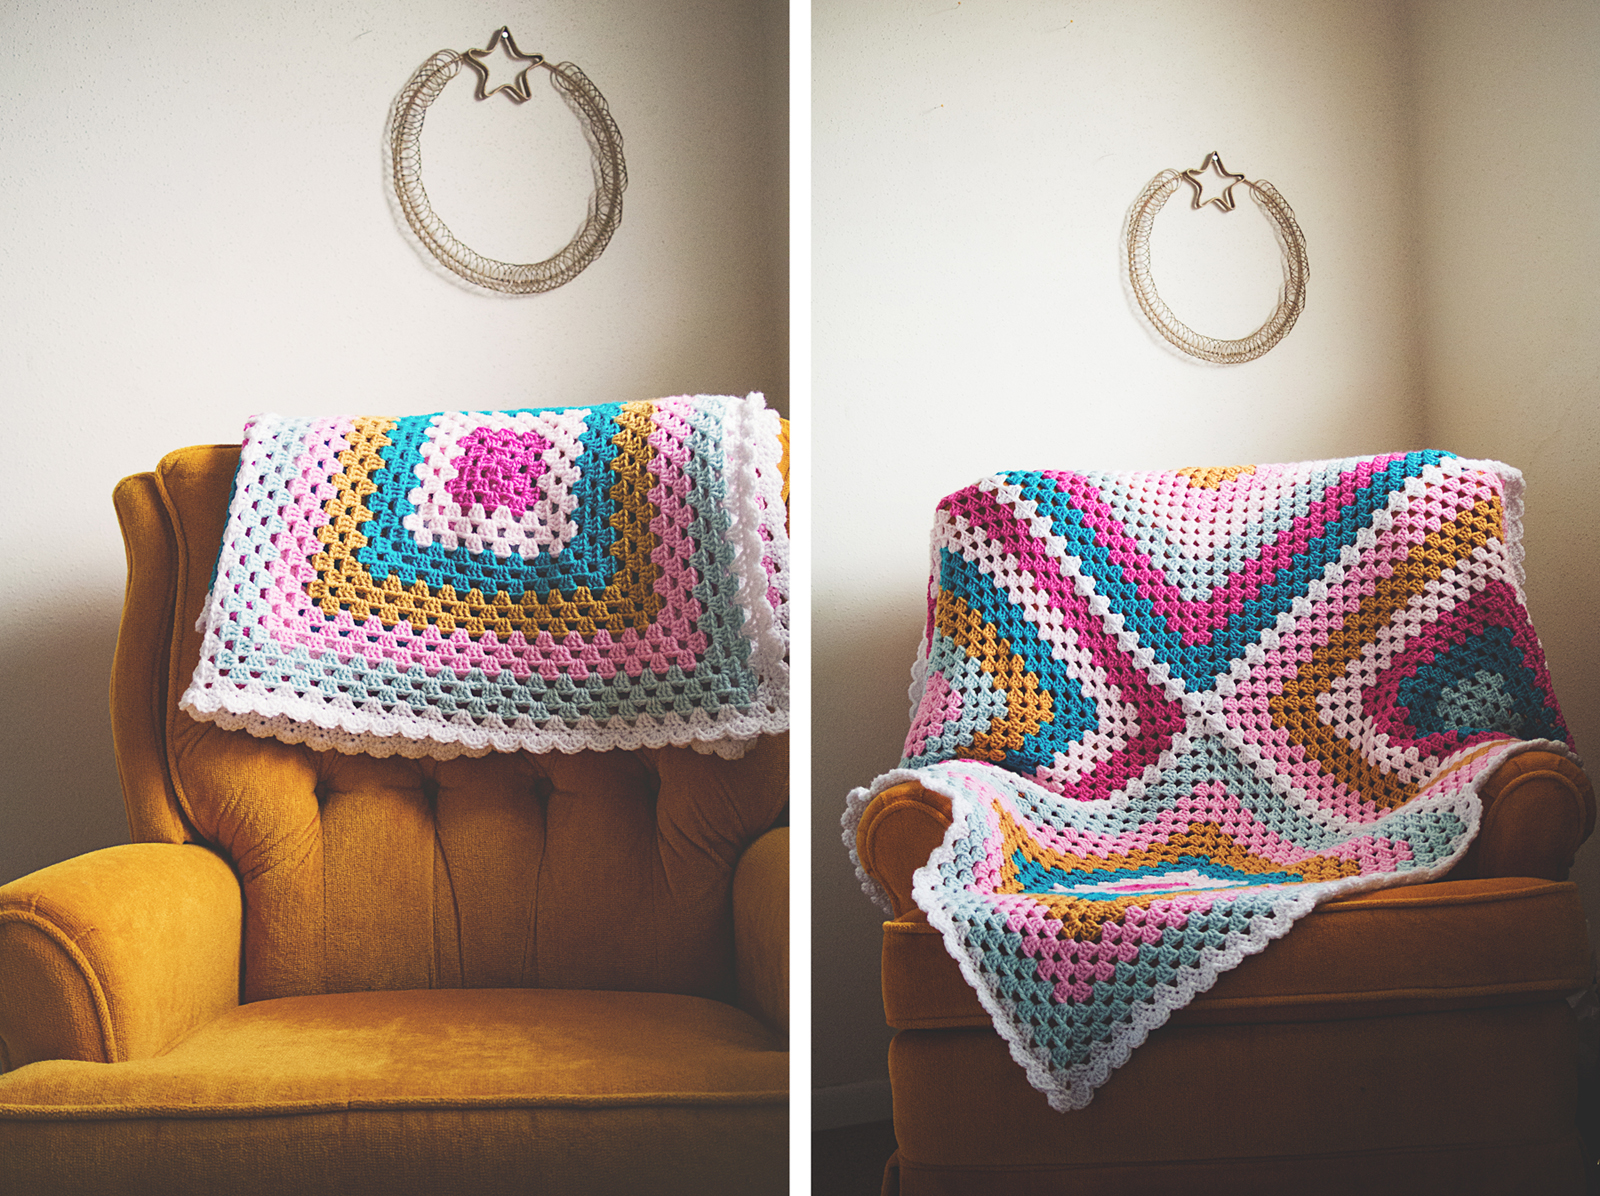
I started and finished this blanket for my cousin’s new baby, waaaaaay back in March. That’s over 4 months ago! If you couldn’t tell, I’ve been on hiatus for a while. How the heck are you?! Any cool projects I should check out? I haven’t had a chance to hit up my blog reader in a while. Is anyone still out there? Say hello in the comments! I would love to get back to sharing my crochet and knitting projects, so I figured this would be a good start.
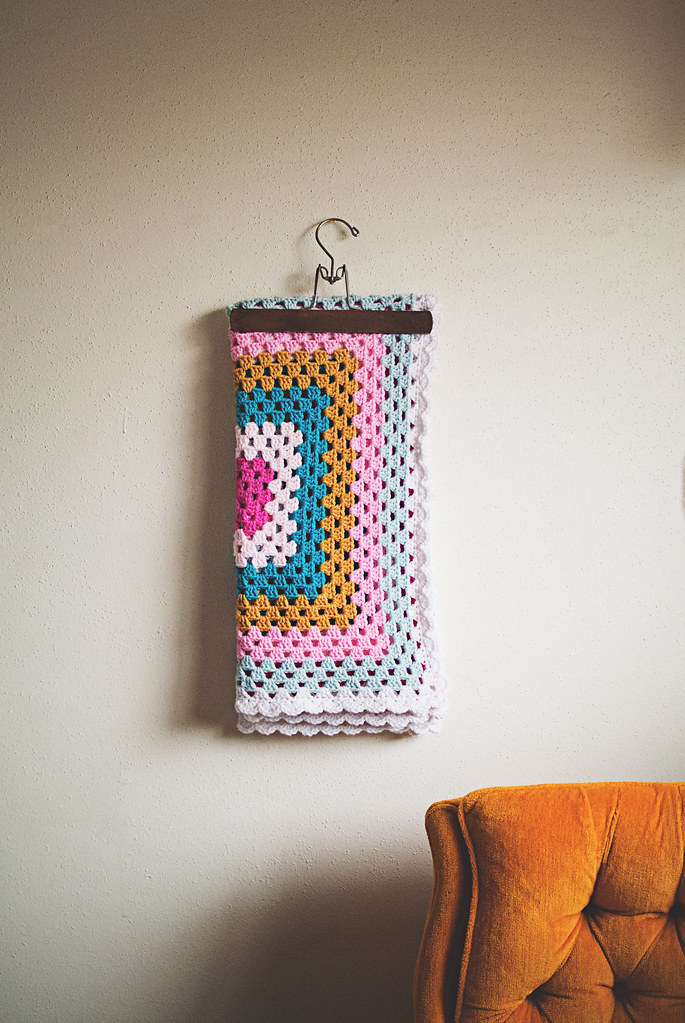
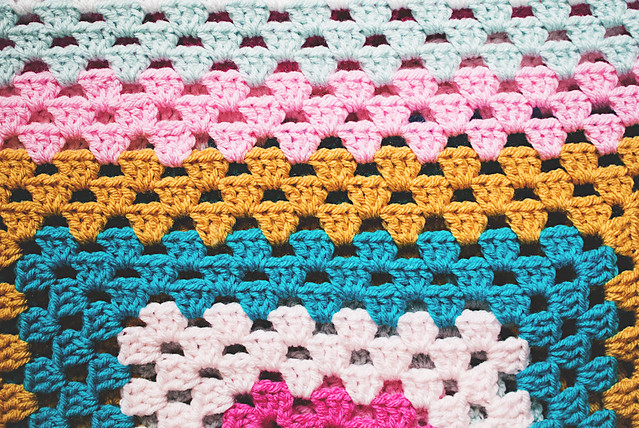
This blanket started with the yarn. I chose 3 shades of pink, 2 shades of blue, a yellow, and white. I used Hobby Lobby’s “I Love This Yarn!” because they have a ton of colors in store and it’s pretty dang soft. After I had my colors in front of me, I used the nifty granny square generator at granny-square-colors.com to get a completely random granny blanket. I kept refreshing until I saw one that I LOVED. I took a screen shot of my result, so I could keep it handy while I worked.
Since I was using worsted weight yarn, I used a 6 mm (US 10/J) hook for a looser feel. I was feeling a bit anxious around this time and it was definitely reflected in my yarn tension. The larger hooked helped a lot! As did the crochet work. Interesting enough to keep going, mindless enough to help me relax.
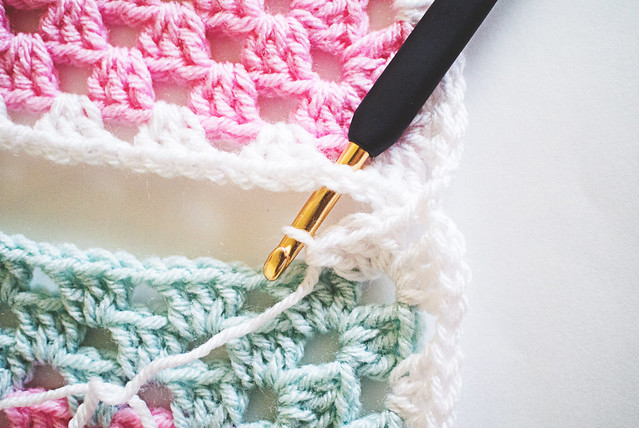
Each square was three rows of each of the six colors, minus white. I used white to make a final round on the squares, employing my favorite granny square join (between the chains, pretty much) until all four were connected. If there is an official name for this join, let me know. You aren’t crocheting into the other square so much as THROUGH it.
Here’s how it went:
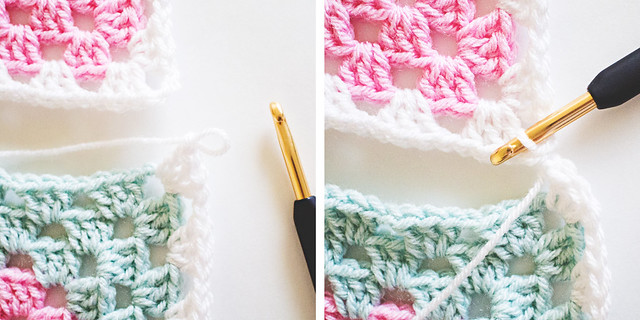
When you get to the first corner of the second square’s white round, make a DC cluster into the corner, chain 1, then take your hook completely out of the current chain. Insert it into the corner you want to join to, put the chain back on the hook and THROUGH that space and then simply continue as you were: chain 1 again, and make the next DC corner cluster. Before your next “Ch 1” in the granny square (space between each cluster), you repeat the process of removing your hook from the chain and pulling it through the space you want to connect to. It looks like this:
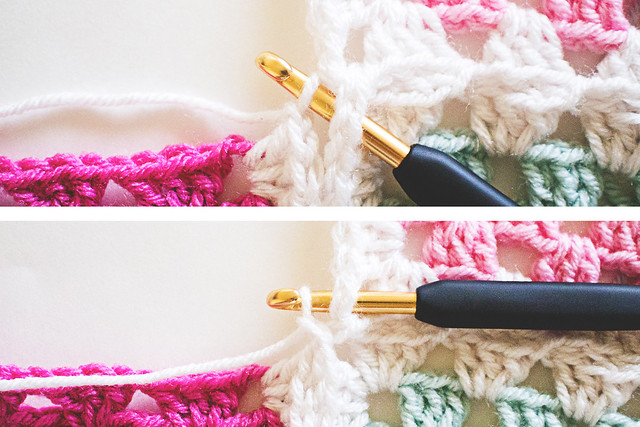
You continue the final white round, connecting in the chain spaces as needed. When you get to your third square, you have to connect the corner in two squares, but it isn’t that much more difficult than connecting to one. My granny squares have a “Ch 2” corner, but I still chained 1 before taking the hook out for my first join. I brought the chain through one of the squares, chained 1 again, then brought that chain through the other square and chained 1 a final time. This makes it a “Ch 3 corner” but that’s OK for the final rounds.
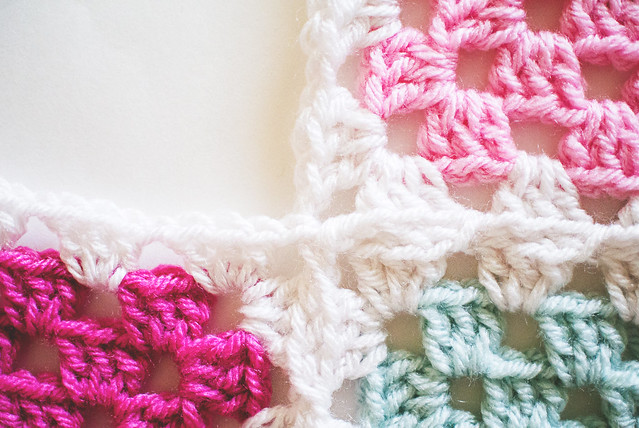
Attaching the fourth square is just as easy; attach the corner to the square on the right and the square above.
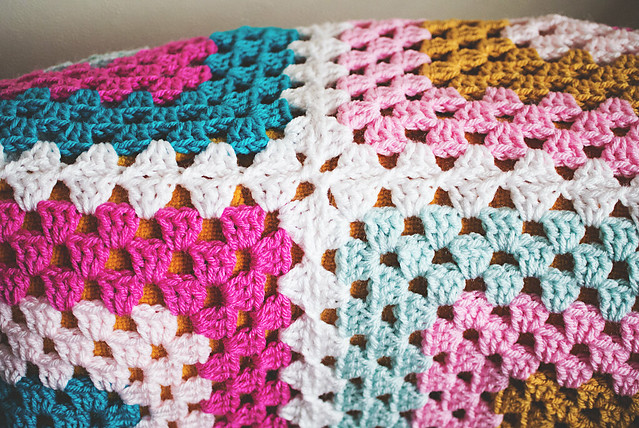
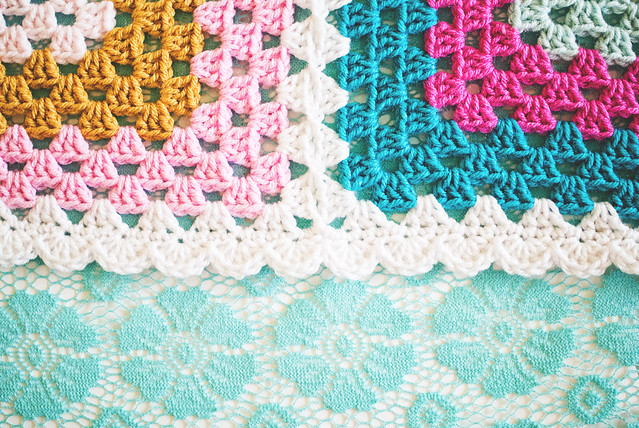

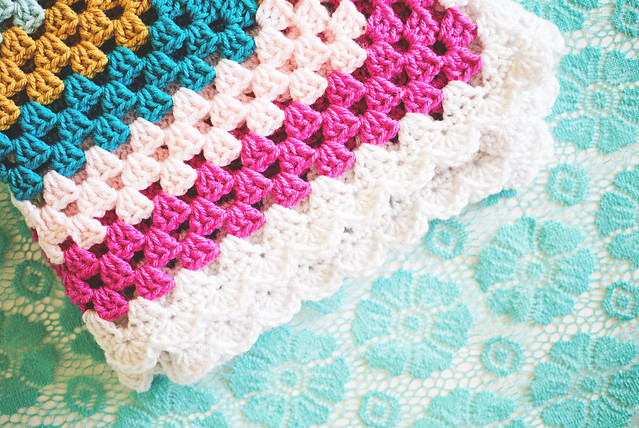
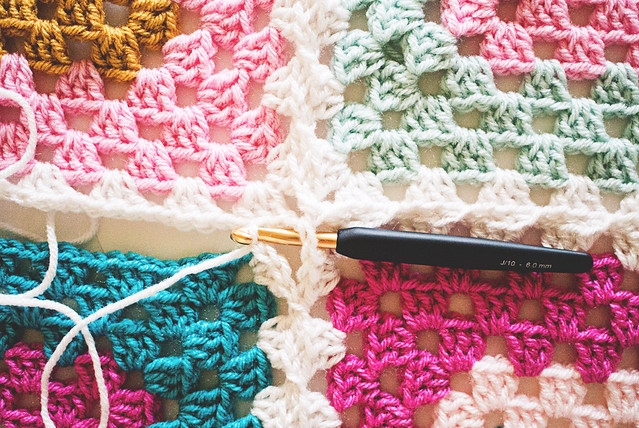
After joining all four squares, I made a round of SC and then a round of 5-DC scallops. This blanket was perfect for people like me who have problems completing projects with a lot of parts, like regular granny square blankets. Four big squares with different color patterns keeps things interesting and is finished before you know it.
 Pin It
By Lisa Gutierrez on 03/14/2016 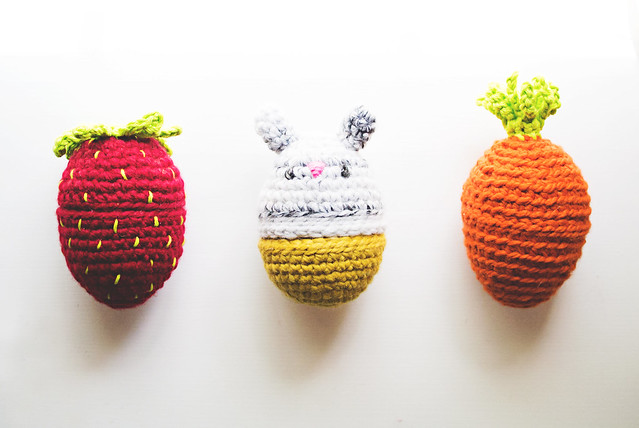
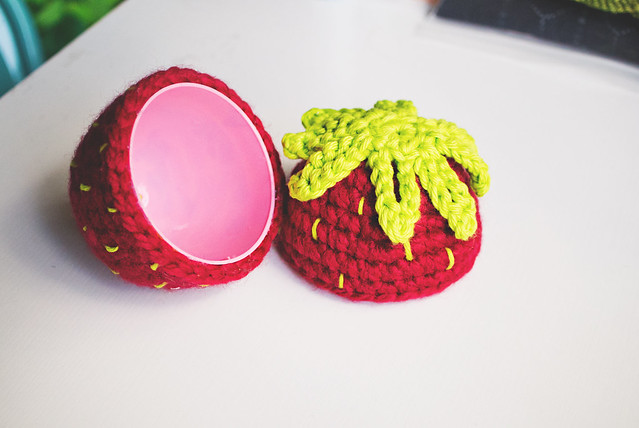
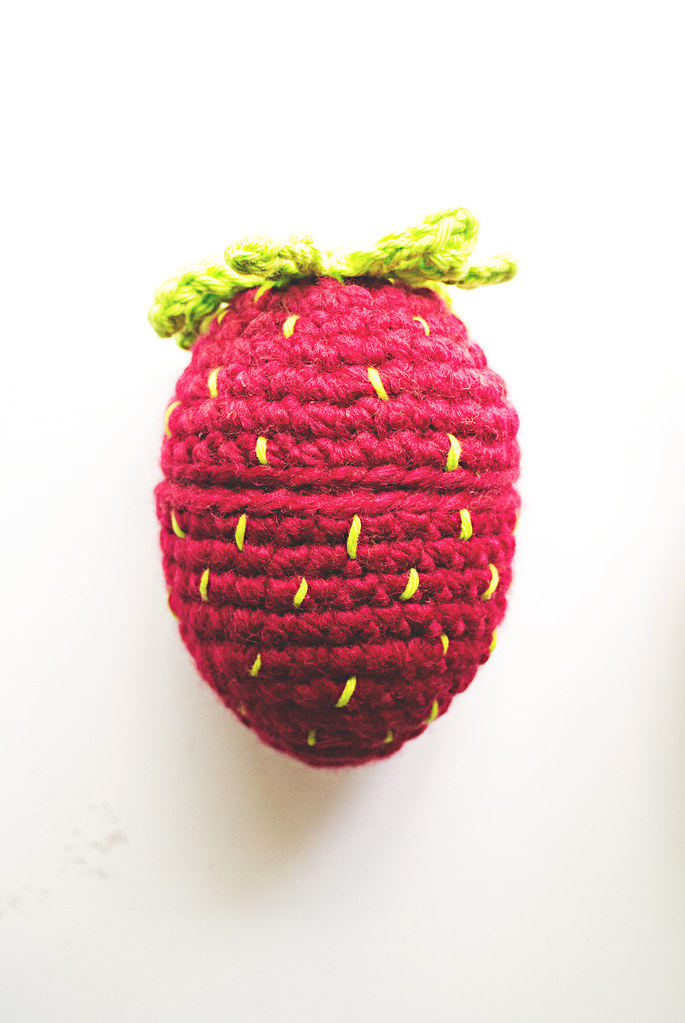
Last Easter, I made a fluffle of amigurumi bunny eggs for my favorite kiddos. This year, I’m branching out into bunny food–carrots and strawberries! They’re little amigurumi crocheted and glued onto Easter eggs. You can fill them with whatever treats your tiny humans might want.
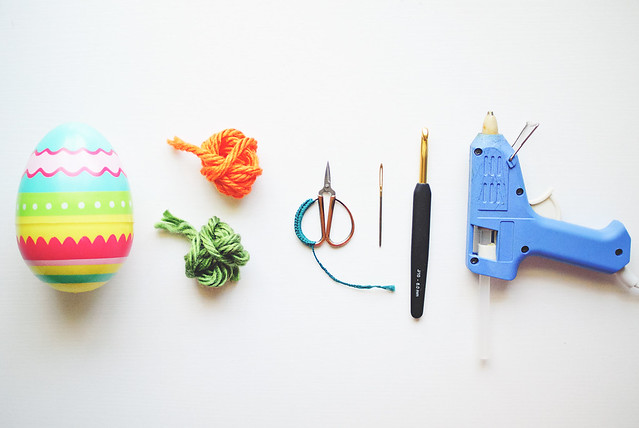
The perfect eggs for these amigurumi are from Target. The plastic feels a little thicker, so I feel like they’ll last longer, and they’re a great size! They’re large Spritz brand eggs and come in a pack of three. I may have a bag full of them under my desk, right now.
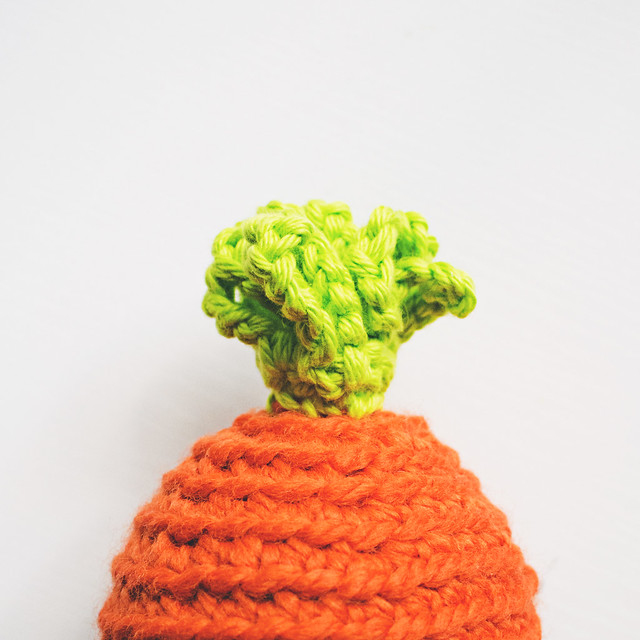
My favorite orange for carrots are bulky yarns from Lion Brand, specifically Hometown USA in “Syracuse Orange” and Wool-Ease Thick & Quick in “pumpkin”. For the strawberry, I used Wool-Ease T&Q in “cranberry”. My hook for both was a 6 mm (US J). The green tops on both is worsted weight cotton held double. Use your favorite shade!
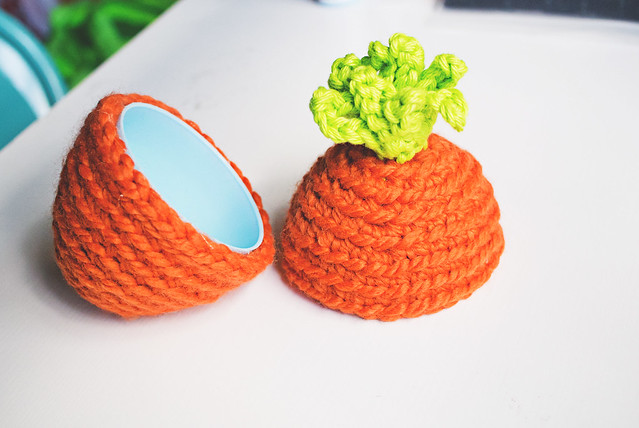
The “body” of the egg for both is pretty much the same. Start with a magic loop and do NOT connect at the end of the rounds. Place the cover on the egg part as you go, to ensure the fit. Add a stitch or two, if it’s too small. If it’s too big, skip an increase. Remember you will be gluing, at the end, so it doesn’t have to be perfect, but it should be able to cover the egg with minimal stretch or scrunch. Here’s the pattern I use:
Work in the back loops only for the carrot.
Egg Top
Round 1: 6 SC into ring
Round 2: 2 SC into each st (12 SC)
Round 3: [SC into 3, 2 SC into next] 3 times (15 SC)
Round 4: [SC into 2, 2 SC into next] 5 times (20 SC)
Round 5: [SC into 4, 2 SC into next] 4 times (24 SC)
Round 6: [SC into 3, 2 SC into next] 6 times (30 SC)
Round 7-9: SC into each st (30 SC)
Round 10: slst into each st (30 slst)
Fasten off.
If working the strawberry, you may need to make round 10 SC instead of slst.
Egg Bottom
Round 1: 6 SC into ring
Round 2: 2 SC into each st (12 SC)
Round 3: [SC into next, 2 SC into next] 6 times (18 SC)
Round 4: SC into each st (18 SC)
Round 5: [SC into 2, 2 SC into next] 6 times (24 SC)
Round 6: [SC into 3, 2 SC into next] 6 times (30 SC)
Round 7-8: SC into each st (30 SC)
Fruit tops
Using 2 strands of worsted, or a single of bulky
Round 1: Ch 1, 8 HDC into ring, slst to top of first HDC
Round 2: [Ch 8, slst into third ch from hook, Ch 4, slst into same HDC], *slst into next HDC, rep from [ to ]; repeat from * for 8 chain loops total, slst to first st. Fasten off, leaving long tail for sewing.
If making a carrot top, weave tail through the loops, and cinch it together, so the loops stand up. Sew onto egg bottom. For strawberry, sew the solid hdc circle onto egg bottom, leaving leaves free.
Use the green yarn to embroider strawberry seeds all over, before gluing.
Use hot glue to attach your pieces to your eggs. Start with the tips and work your way around and down. Be careful and don’t sacrifice any finger tips for perfection!
Fill eggs to your heart’s desire.

If you want to make a bunny with this thicker yarn, use the same pattern for the strawberry body and then add some ears. Mine were super simple, start with 5 SC in a ring, increase to 10, then to 15 and work for however long you like. Fasten off, leaving a longish tail to sew onto your egg top. Sew the ears and embroider the face before you glue! Let me know if you make any!
Pin It
By Lisa Gutierrez on 01/24/2016 Disclaimer: Haven for Hands sent me a set of hooks to review. All opinions are my own. This post include Amazon affiliate links.
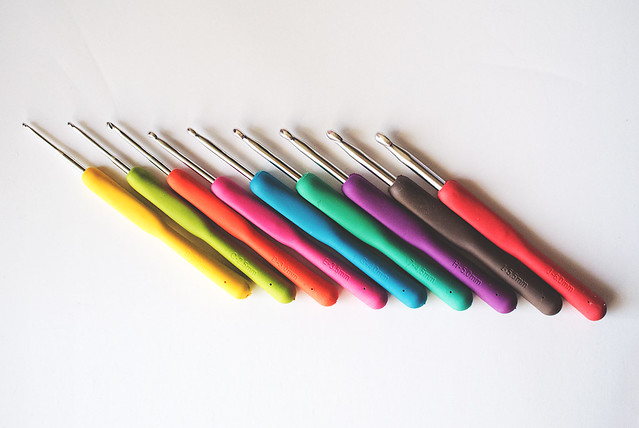
A few months ago, I was contacted by Haven for Hands to ask if I was interested in reviewing a new set of crochet hooks. OF COURSE I WAS! I love to crochet and having an extra set of my favorite sizes is super handy.
This is the Haven for Hands Ergonomic Crochet Hook set, now available on Amazon at a GREAT price!
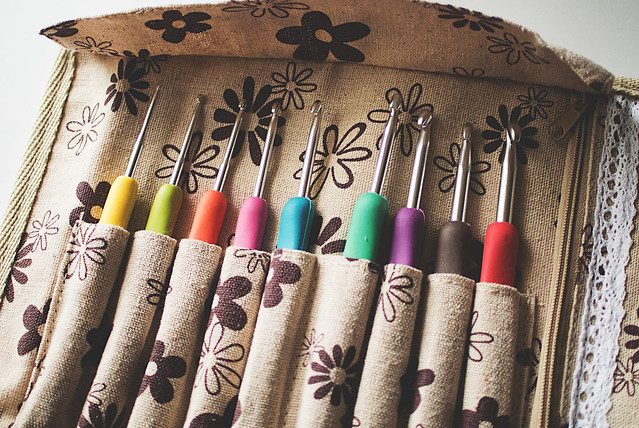
The set comes with nine hooks that have a super comfy grip. The sizes included are from 2.0 – 6.0 mm in 0.5 mm increments. You’ll notice 2.0, 2.5, and 3.0 mm (US B, C, and D) are actually different from regular conversion charts, but that didn’t bother me because now I have sizes that fit between my others. It broadens my crochet reach.
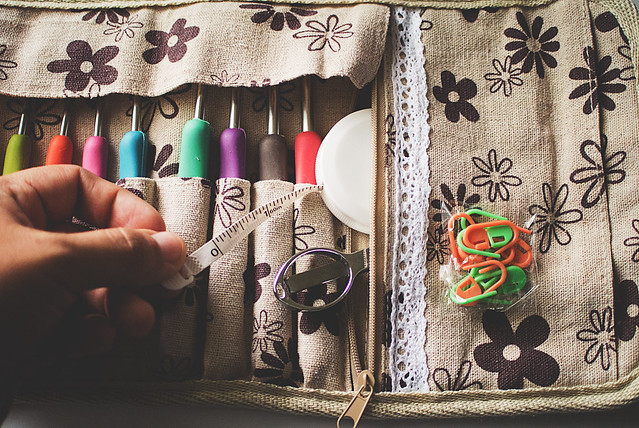
The set also includes a retractable tape measure, a pair of folding scissors with serrated edges, and 10 plastic stitch markers. Everything fits nicely in a roll-up cloth carrying case. There are two colors options to choose from on Amazon! It is perfect for throwing in your purse, when you know you’re going to start a project away from home.
I’ve had these for a few months, so I feel like I can give you a fully-formed opinion.
First up, the handles are GREAT! They have just the right amount of squish for a grip. The part closest to the hook is firm enough for my style of crochet hold, while the bottom tip is flexible for resting in my palm.
Second, The metal hooks are super smooth and glide beautifully through yarn. The hook is pointy without being overly stabby, which is what I like!
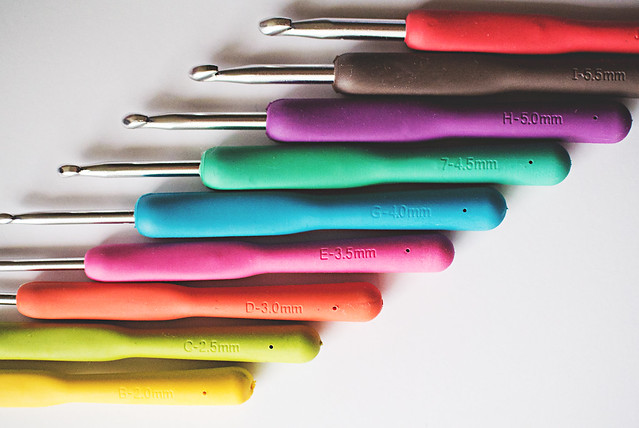
Look at those colors! The engraved sizes are a great detail. You don’t ever have to worry about smudging the text.
Overall, these hooks work really well and are a great addition to my collection. I’ve already lost and found a few in my couch. I consider that a rite of passage for all my craft tools.
Check out Haven for Hands around the web:
Amazon
Facebook
Twitter
HavenForHands.com
Pin It
By Lisa Gutierrez on 10/05/2015 Disclaimer: Amazon affiliate links within.
Are you there, Fall? It’s me, Lisa! I am crocheting and knitting all of the things for you, so please visit as soon as possible. I enjoy the cool mornings when I walk my kiddo to school, but I want you to BITE!
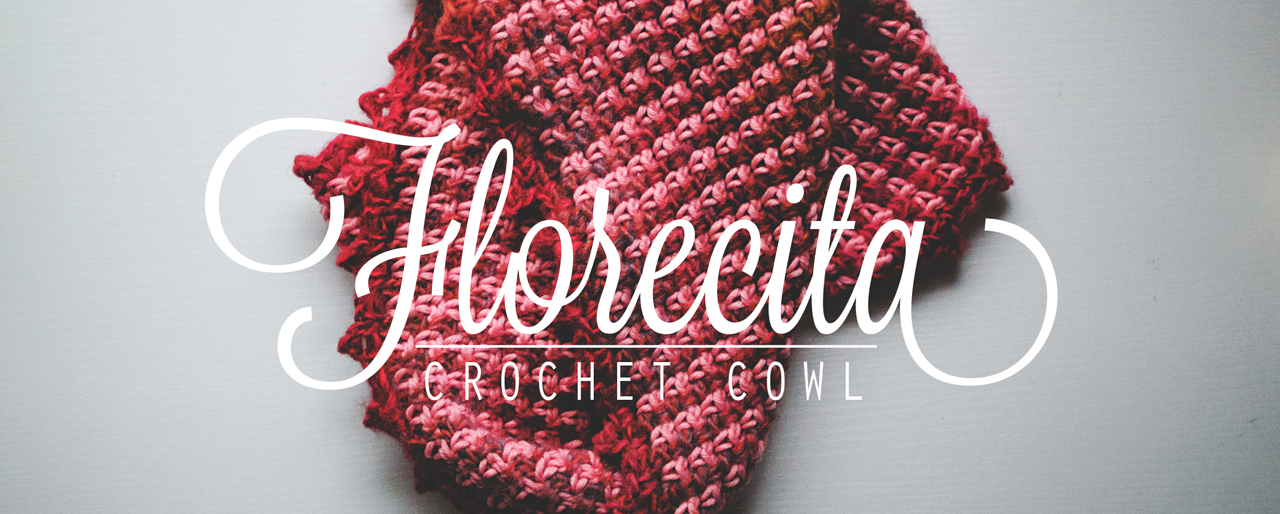
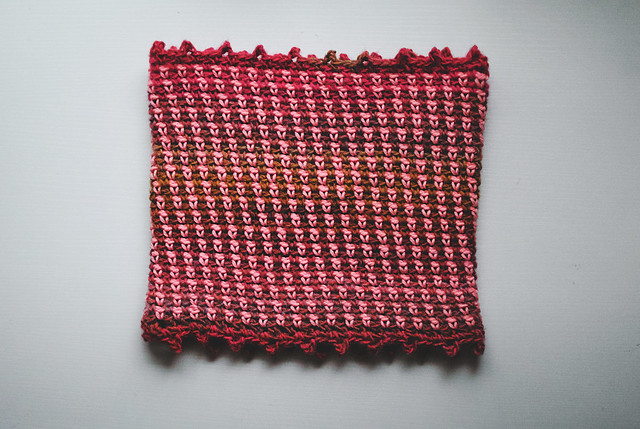
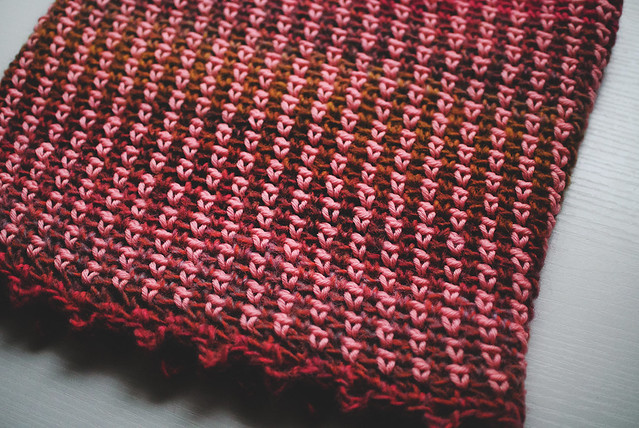
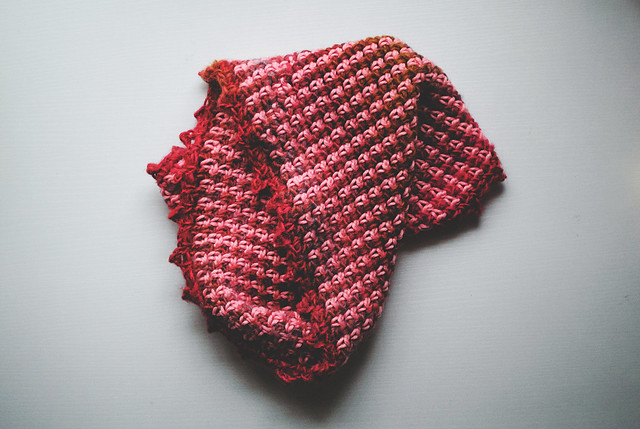
This super simple cowl is the perfect accompaniment to the wrist warmer pattern I shared, last year: Rube. It’s made with the same woven stitch and you alternate colors every row to get sweet sweet vertical stripes! I used Lion Brand Amazing for an extra special color changing treat.
Size
Fits average adult.
Measures 10″ tall by 10.5″ wide, flat & un-stretched.
Gauge
7 sts x 16 rounds = 4″ in woven stitch
Abbreviations (US terminology)
Ch: chain
Slst: slip stitch
SC: single crochet
sk: skip
st: stitch
sp: space
rep: repeat
Materials
1 skein Lion Brand Amazing (Color A “Cactus Flower”)
1 skein Lion Brand Martha Stewart Extra Soft Wool (Color B “Gerbera Daisy”)
6.5 mm (US K-10.5) hook
yarn needle for weaving in ends
Pattern
With color A, Ch 80, join with a slst into first ch, being careful not two twist.
Round 1: Ch 1, SC in same sp, Ch 1, sk 1 ch, *SC in next ch, Ch 1, sk 1 ch; rep from * around, slst to first sc.
Round 2: Slst into first ch-1 sp, switching to next color, Ch 1, SC in same sp, Ch 1, *SC in next ch-1 sp, Ch 1; rep from * around, slst to first sc.
Repeat round 2 to desired height. I stopped at approximately 9″, ending with color A, fasten off color B.
Top picot edge: Still working with color A, Slst into first ch-1 sp, Ch 1, SC in same sp, Ch 3, slst into first ch, SC in next ch-1 sp, Ch 1, *SC in next ch-1 sp, Ch 3, slst into first ch, SC in next ch-1 sp, Ch 1; rep from * around, slst into first SC. Fasten off.
Attach color A into a ch-sp made by the foundation chain, Ch 1, then work like top picot edge, starting with the “SC in same sp…”
Fasten off and weave in all ends.


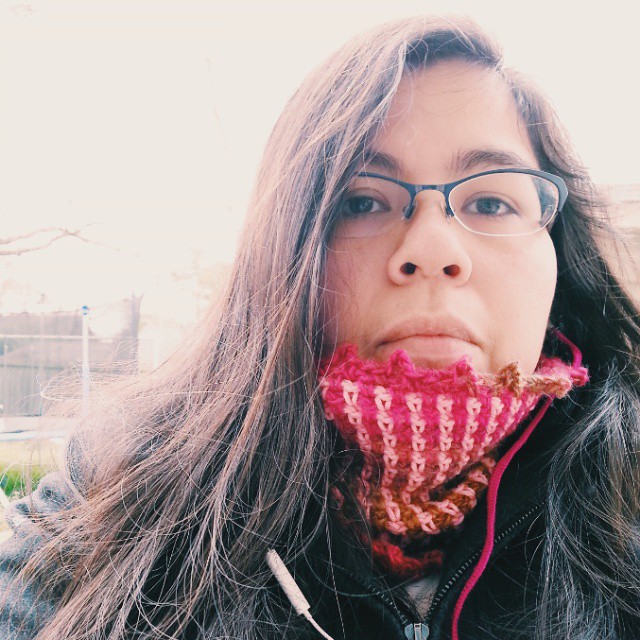
Me, when I first crocheted it, back in FEBRUARY!
There will be a visible “seam” where the rounds end and new color is joined. It looks more visible in photos than it does in person!
If you want a downloadable PDF of the pattern, check it out on Instructables!. Click “vote” at the top right corner of the page to help me out. :)

Pin It
By Lisa Gutierrez on 09/18/2015 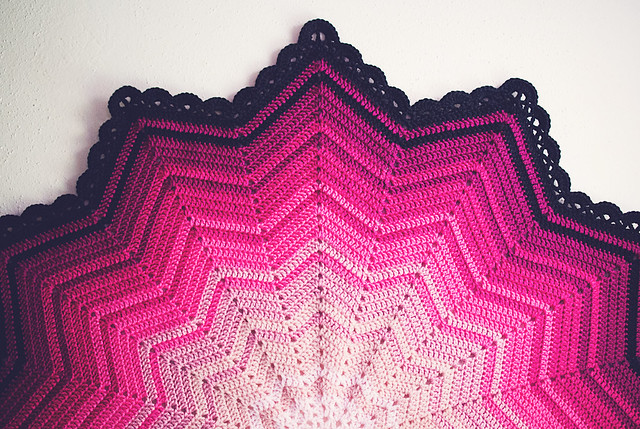
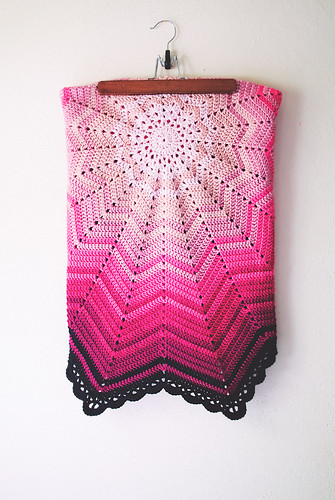
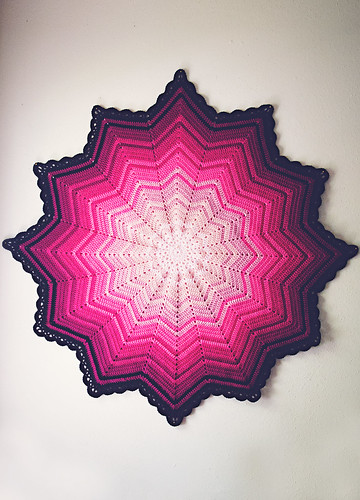
Pattern: Rainbow Ripply Baby Blanket
Size: 35 rounds, including the border, approximately 46-48″ from one corner to the other
Hook: 5mm (US H/8)
Yarns: You can find the exact measurements I used on my Ravelry project page, but from the center out they are as follows:
–Plymouth Encore Worsted in “0029 Pink”
–Vanna’s Choice solids in “Pink”
–LB’s Heartland in “Denali”
–Caron Simply Soft in “Watermelon”
–LB’s Heartland in “Biscayne” (c/o Lion Brand Yarn)
–Red Heart Soft in “Berry” and “Black”
In the next two months, I’ll be going to TWO baby showers, both for baby GIRLS! I am preeeetty excited about it. I am mostly excited for all the newborn baby snuggles I am expecting come Christmas day. Like SO EXCITED. I’m not being very coherent. I just want to cuddle a baby.
The first blanket I made is a Rainbow Ripple blanket in pinks. I looked to my stash for the yarn and was so happy with my selection. I feel like I got a good mix of shades. The color pattern is one that is mentioned in many of the projects, called the “Rule of 5” and inspired directly by THIS beautiful peony blanket. Mama likes pink and black, so I reversed the pattern and went light to dark.
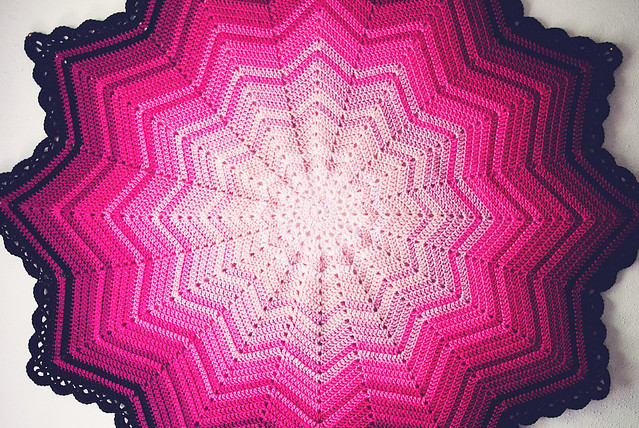
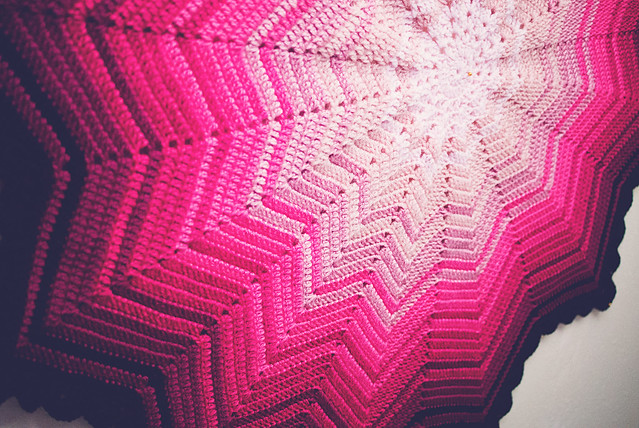
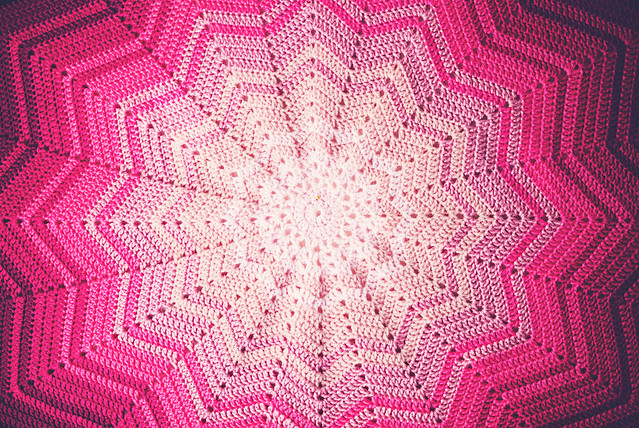

The border starts after Round 33 and is a simple lace round–just V-stitch every third stitch–and a scallop round–alternating SC and scallop into every V-stitch.
Round 34: Slst into next st, Ch 3, sk 2, [(DC, Ch 2, DC) into next st, sk 2] 6 times, (DC, Ch 2, TR, Ch 2, DC) into corner, sk 2, rep between [ ] 6 times, DC in next st, sk 2, *DC in next st, rep between [ ] 6 times, (DC, Ch 2, TR, Ch 2, DC) in corner, sk 2, rep between [ ] 6 times, DC in next st, sk 2; Rep from * around, slst to top of beg ch-3.
Round 35: Slst to first ch-2 sp, Ch 3, 5 DC into same sp, SC in next ch-2 sp, [7 DC in next ch-2 sp, SC in next Ch-2 sp] twice, 6 DC into each of the next ch-2 sp, [SC in next ch-2 sp, 7 DC in next ch-2 sp] twice, 6 DC in next ch-2 sp, SC between next two DC, *6 DC in next ch-2 sp, [7 DC in next ch-2 sp, SC in next Ch-2 sp] twice, 6 DC into each of the next ch-2 sp, [SC in next ch-2 sp, 7 DC in next ch-2 sp] twice, 6 DC in next ch-2 sp, SC between next two DC; Rep from * around, slst to top of beg ch-3.
Pin It
|
Disclosure You may find affiliate links and banners throughout my blog. I earn a small commission from purchases made through these links. It helps pay for keeping this blog running! All reviews and products are items I have personally used and loved. |


