By Lisa Gutierrez on 05/28/2013 Disclosure: Yarn bowl provided by uncommon goods. All photos and words are mine.
After my last post, I completely changed my mind about the sweater I wanted to knit. Instead of the Lopapeysa style, I decided on a basic striped raglan. I wanted something with a simple design for my son to wear to school in the fall. I sorta kinda already finished it. So much for this being a “summer project!” I’m thinking of adding some little pockets to the front, but not really sure yet. I’m also brainstorming things to bribe him with to wear it in this heat. I need some modeled photos stat!
Anyway…
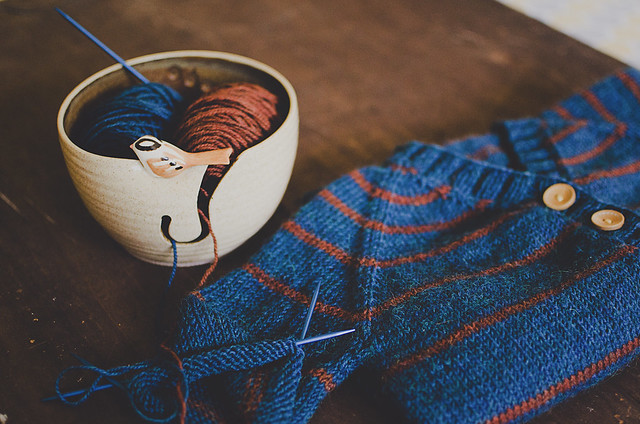
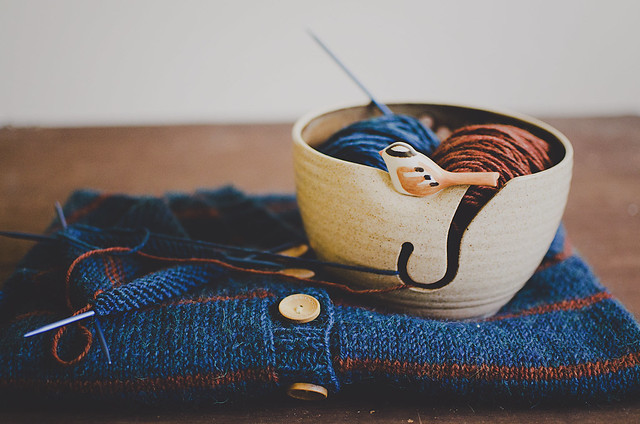
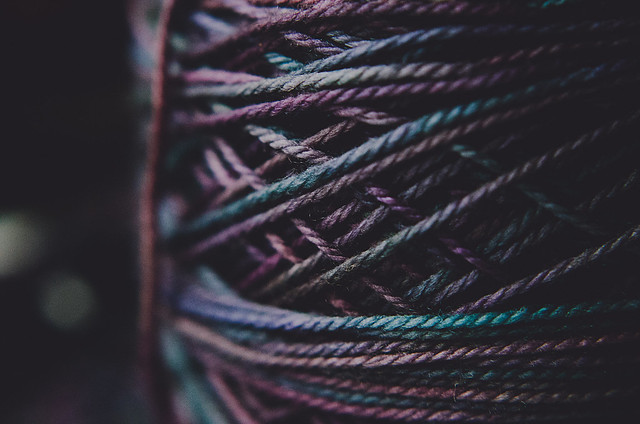
The good folks over at uncommon goods sent me this absolutely gorgeous birdie yarn bowl (you can get your own HERE) to test and share my thoughts about.

I was in the middle of this project when it arrived, so I just plopped my remaining yarn in as soon as I got the package open. I was knitting the sleeves, so my color changing was coming faster. I found it extremely useful in keeping my little skeins in the right place. Admittedly, when I knit, I keep my supplies on the couch right next to me and they stay there until the end of my project. I loved having my yarn in this bowl to carry around easily when I wanted to knit elsewhere, like outside or at my dining room table during breakfast with my boys.
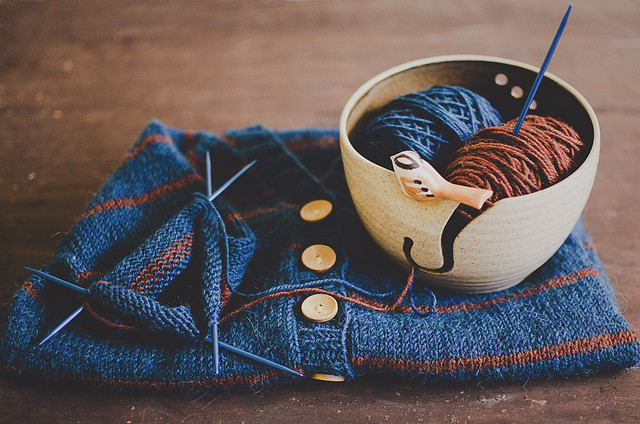
Two 50 gram skeins fit perfectly in the bowl. I believe you can thread your yarn through the holes in the back, but I was already working, so I just put them through the opening on the side. I thought maybe it would come loose, so I was extremely pleased to be wrong about that! Overall, I see myself using this bowl a ton in the future.

What do you think about getting projects done in the wrong season? I’m so anxious for him to wear this regularly! Summer is just not my season.
Pin It
By Lisa Gutierrez on 01/03/2013 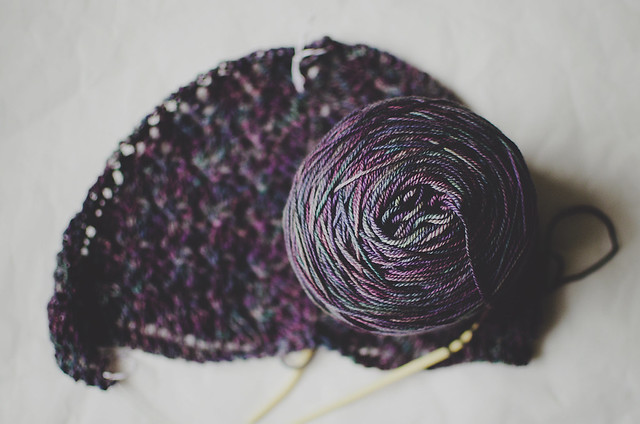
Technically, this could be the last project of 2012, but I won’t be finished with it for at least another week. I took a break to work on a doily blanket order, because heeeeyyy– I still have a shop!
Anyway, I cast on December 29. I was browsing Ravelry and remembered this yarn I won in a giveaway from the WEBS yarn store blog…in 2011. Over a year ago! It’s pretty luxe for my taste, so it remained zipped away in a bag, only to be taken out and admired every once in a while. I don’t think I could ever knit cashmere socks, so when I decided I should knit a shawl, this yarn came to mind immediately. It’s Smooshy with Cashmere by Dream in Color (here). It’s supremely soft and the colors are nothing short of perfect.
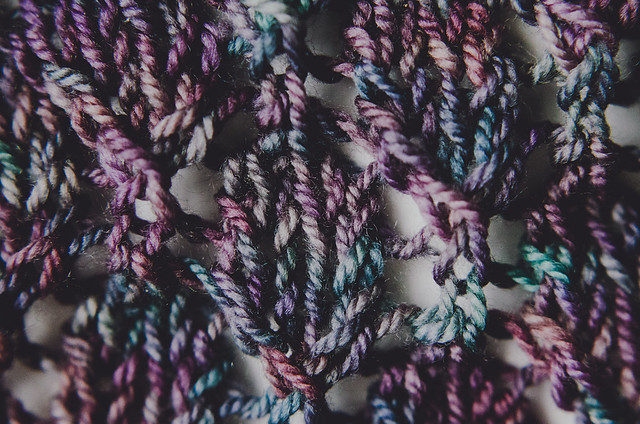
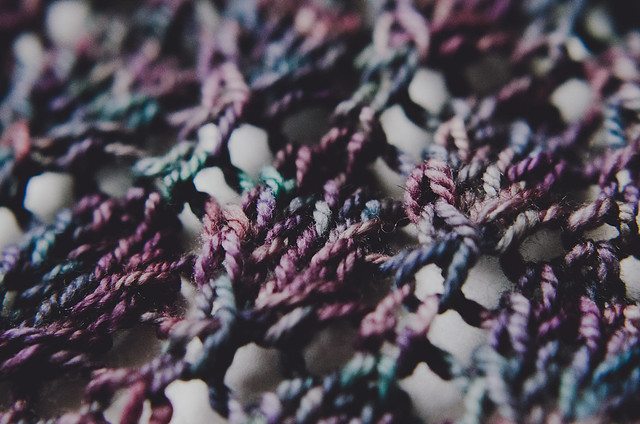
I’m using the tried and true Swallowtail Shawl pattern from Evelyn Clark (on Ravelry), which is now available for free! I first knit this pattern when it came out in Interweave Knits (Fall ’06). I started it in March of ’07, then it hibernated through the Spring, and I finished it at the end of summer. I am a crocheter first, so this is the most intricate knitting I’ve ever ventured. I hope to change that, this year! I want to write more crochet patterns, of course, but I also want to knit more complicated designs. I guess this could be considered a crafty resolution! Get intricate. Work my crafty brain out! And also blog more. I miss craft blogging.
Did you set any crafty resolutions?? I want to know!
By Lisa Gutierrez on 11/16/2012 
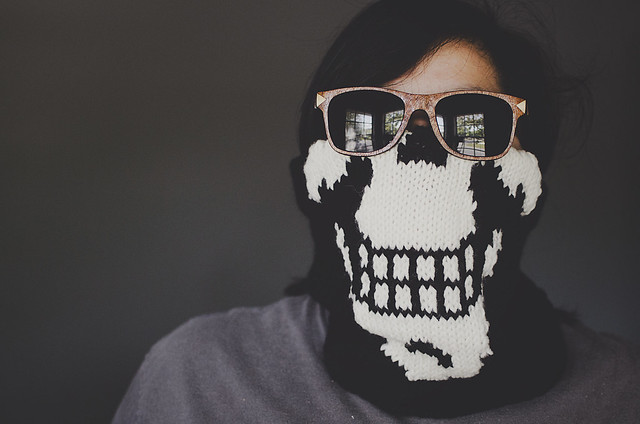
Pattern: The SkullKerchief by Knitty or Nice
Yarn: Patons Classic Wool
Needle Size: US 6
I knit this as a gift, but it was so warm and cozy to wear in these photos, I’m strongly thinking of knitting one for myself. I may have to change the color work pattern, but I would definitely stick with the same yarn and shape. It would keep my face nice and toasty on my walks to and from the kids’ school, this winter. Go check out the FREE pattern (linked above)!

By Lisa Gutierrez on 10/29/2012 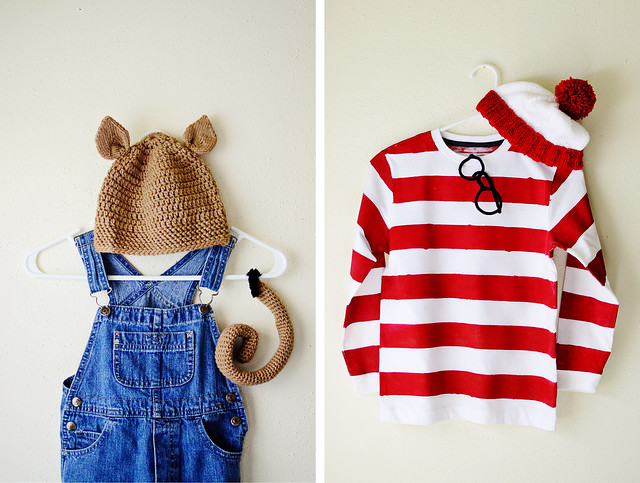
At least mostly handmade.
These are my boys’ costumes for the book character parade at their school. Andrew (4) chose the mouse from If You Give a Mouse a Cookie and Nathan (7) chose Waldo of Where’s Waldo? fame.
You would think the Waldo costume were the easiest thing in the world to put together, but..ummm…NO.
The first thing I did was make the hat. That part was easy. I CO 60 with a 5.5mm circular and k2p2 for like 20 rounds, then switched colors and knit about 20 more rounds, then did a basic crown decrease. Giant pom-pom completes the look. It fits him perfectly and took only a few hours. I want to make more in a bajillion different colors.
Next, I looked for a Waldo shirt. I only found red & white striped shirts that were for the adult version of the Waldo costume. Nothing that would fit a 7 year old! So, I figured I’d just paint a white shirt. I looked at Target for a white shirt–nothing. I looked at Wal-Mart–nothing. Frustrated, I moved on to the glasses. I thought I’d just find some at a thrift store and pop out the lenses, but no. I couldn’t find any round ones! SOOOO, pipe cleaners to the rescue! And the boy could help, so WIN!
I just needed the darn shirt. I finally found white long sleeve t-shirts at Old Navy and they had his size–whew! Painting was a whole other ordeal. I mixed my acrylic paint with some textile medium I’ve had forever. I used blue painter’s tape to mark off the stripes. It came out better than I was expecting. Even though some of the lines are a little messy, I still like the look. I heat set it, today, but I’m afraid to wash it, so the boy is going to wear it as-is. The acrylic was really rough, but the iron smoothed it out considerably. He’ll wear blue jeans and I’m thinking of letting him take my old Polaroid camera with him. He wants to be a zombie for Halloween night and I’m going to try so hard to get him to be ZOMBIE WALDO. How cool would that be?
Andrew’s mouse costume was easy-peasy. I made a basic crochet beanie (SO QUICK!) and then I knitted the ears on. I made the ears in the round with short-row shaping. I don’t know why I decided I would knit them, but I’m glad I did. Since they’re double-thick, they stand up and are just so damn cute. He wore the hat to the school’s Fall Festival this weekend (and a blue cape!) and received many compliments. However, they all thought he was a cat or even some sort of bear? Oh well! His tail is a long tube with a JUMBO pipe cleaner shoved down the center. Seriously. Easiest costume ever. I added a little loop to the back of his overalls to “tie” his tail on. He’s in love and so am I.
This next costume is for you 90’s kids. Get ready…
Do you know who he’s going to be? Hmmmmmm??
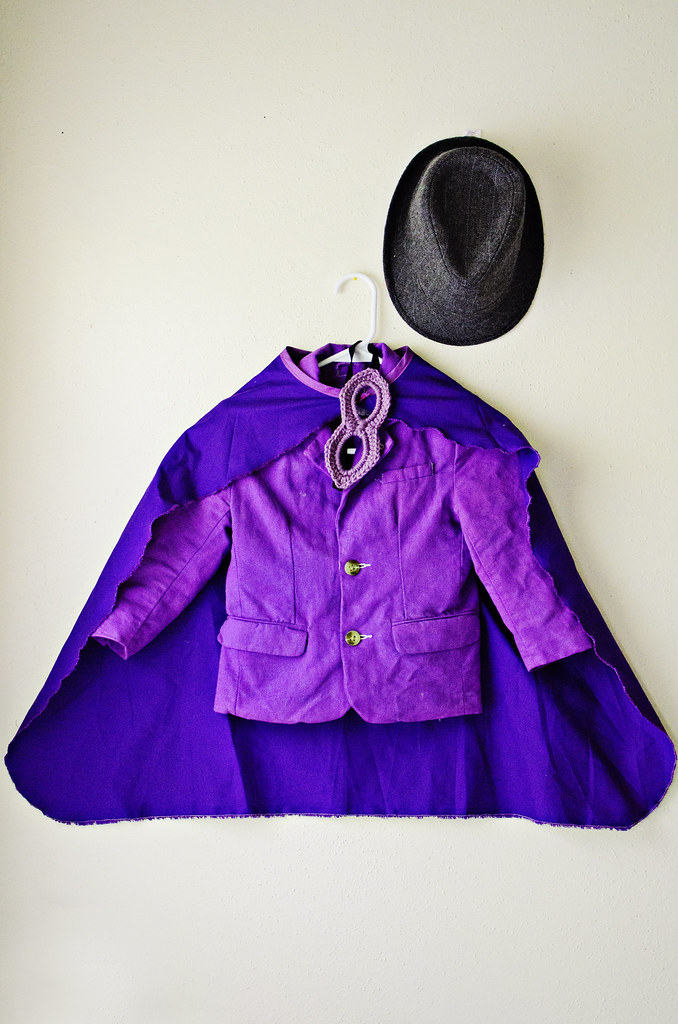
If you guessed Darkwing Duck, you are correct! My husband introduced them and so my littlest has been raving about a Darkwing Duck costume all month. The first thing I knew he would need was a purple blazer. OF COURSE there were no purple blazers for boys to be found. I went to Goodwill and found a cream linen blazer, picked up a packet of purple dye, and BAM! Purple blazer. The boy swooned. Like, really. He was so giddy to put it on. I made the cape (cut out the general shape, use double-fold bias tape around the neck, then zig-zagged around the edges) and crocheted the mask (I made the first row around a pipe cleaner so it’s stiff!). He already had the fedora. I just need to figure out what pants he’s going to wear. Darkwing Duck doesn’t wear pants, but it’s going to be too cold to go pants-less. He has some yellow boots to wear as duck feet, so I was thinking white pants, but I can’t find any! Ah!
Anyway, I kind of went all out with the DIY, this year. To be completely honest, this is the first year I’ve put together costumes for them. It’s usually my sister that buys them whatever they want or we go to a thrift store and my kid picks out a super-hero costume. I’m pretty excited for Halloween, this year! We may put them on tomorrow so I can get photos.
Pin It
By Lisa Gutierrez on 10/08/2012 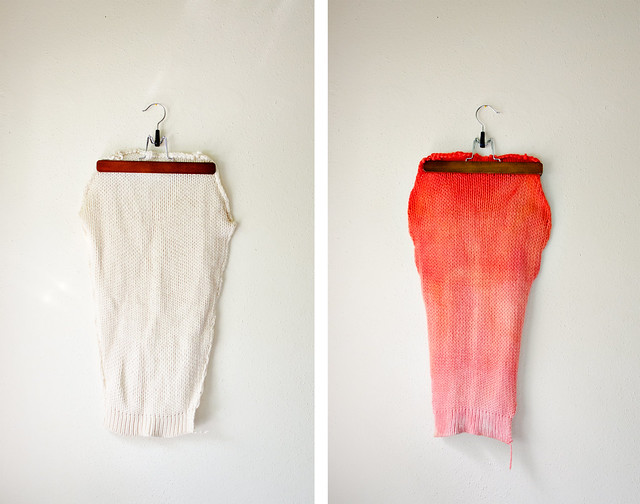
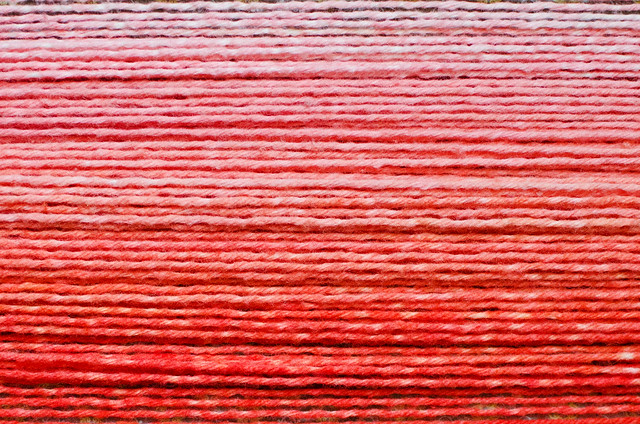
Last month, I got the urge to dye yarn. I didn’t have any bare skeins hanging around, but I did remember I had pieces of a white wool sweater in my closet. Waaay back in 2010, I thrifted a large white wool sweater. It had the perfect seams to unraveling, so I took it apart almost immediately. …Then we bought a house and moved. It got trapped in a box of random crafty shit and I just forgot about it for a year. Last year, I dyed one of the sleeves and then last month I finally dyed the other.
I like sleeve dyeing because it makes me feel like I have more control over where the dye goes. Last year, I used these directions from craftystylish, but this time I wanted to try something different.
I wanted a gradient/ombre look, so I thought about how people get that with shirts by putting small parts of the fabric in at a time. Would it work? YES! I probably made it a little more difficult than it needed to be, but I was working with what I had–2 packs of pineapple Kool-Aid and 1 pack of cherry.
I started by putting my sleeve in a bowl of water with a splash of vinegar. I made sure it was completely saturated, then I put it in the microwave for a minute to temper it. While it was heating up, I mixed the 2 packs of pineapple with 1 cup of vinegar and 1 cup of water and put it in a pot to heat up. I pulled my bowl out of the microwave and lifted the sleeve out (over the bowl, because it was dripping), gently squeezing a bit of the excess water out. I was able to handle it with my bare hands, but use caution if it feels too hot to you.
I started by dipping about 6-8 inches, counting to ten and dipping another 6 inches. I could see a lot of the dye getting absorbed pretty quickly and by the time I got to the last bit, there was hardly any yellow coming off my liquid. I quickly mixed the pack of cherry and 2 cups of water and then lifted my sleeve over the pot, mixed in the cherry and started dipping again. by the time I got to the top, the water was pink. Yay!
I let it sit in the warming water for a few quick minutes (no boiling!) and then I rinsed it with hot water, slowly getting the temperature down. When I could handle it, I put a dash of baby shampoo in to get any excess dye out. After it was done, I rolled it up in a towel and squeezed out most of the water, then let it hang in front of a fan for a few hours. Once dry, I went about the arduous task of unraveling and getting this yarn into a skein, which entailed ANOTHER bath (once unraveled). It was all worth it, as it looked so pretty wound into a ball.
I had various shades of coral and pink throughout. I was afraid the mix would be too orange, but it came out so lovely!
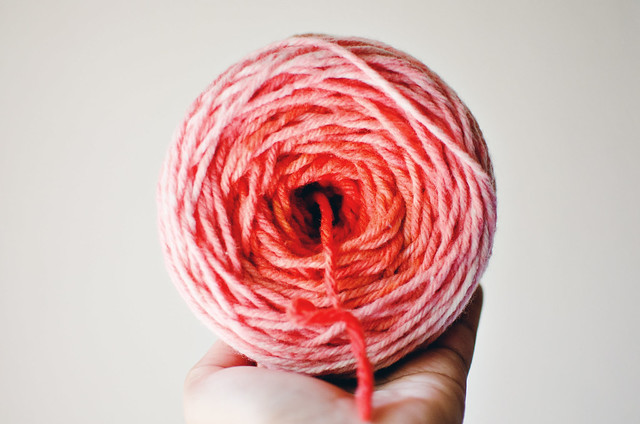
It took another week or two for me to finally knit something out of it, but here it is! A basic knit hat. The yarn was pretty chunky, so I was able to make a 60-st hat in a day.

It was big enough for me to tuck my hair into.
Do you like to dye your own yarn? Have you ever tried dyeing a sweater sleeve then re-purposing the yarn into something else? I’ve dyed with Kool-Aid before, but this is the first time I’ve actually tried to get the colors to look a certain way.
Pin It
|
Disclosure You may find affiliate links and banners throughout my blog. I earn a small commission from purchases made through these links. It helps pay for keeping this blog running! All reviews and products are items I have personally used and loved. |


