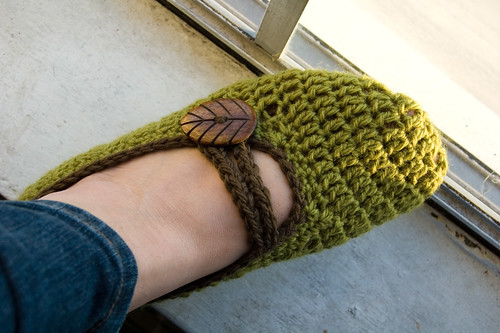
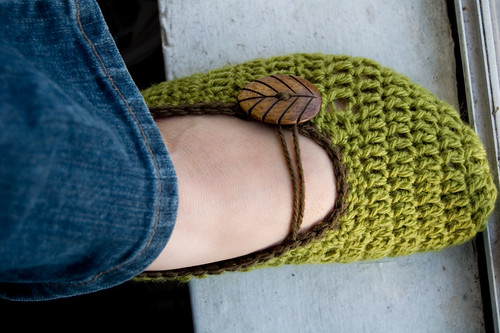
Mary Jane Slippers
By Lisa Gutierrez on 04/01/2008
**I thought this was obvious, but apparently not: PLEASE OH PLEEASE do not use any of my photos without my permission! I’m a nice person, so if YOU ask nicely, I’d make a consideration. Also, don’t post this pattern anywhere else. A simple link to this page would be a great way to share it. You CAN sell slippers you make, of course, but for pete’s sake, take photos of what you made to show your customer/s! Keep those hooks going!**

PRINTER-FRIENDLY version link at bottom!
![flower garden slippers [4]](http://farm5.static.flickr.com/4055/4412351745_1cc2bb5572.jpg)
I’ve received many messages via Ravelry about these slippers. It’s more of a tutorial than a pattern. It’s very easy to adjust to your size, but if you still have questions, please feel free to email me! lisa@goodknits.com.
Crocheted Mary Jane Slippers
(women’s large–9.5-10)
Materials:
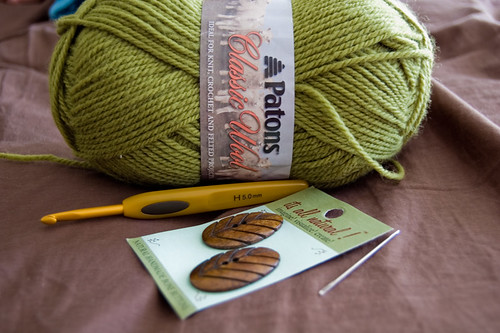
worsted weight yarn
H-hook
2 buttons
tapestry needle
you’ll also need some yarn in a contrasting color. I forgot to put that in my photo.
First, start with 8 DC into a circle. This is how I like to do that:
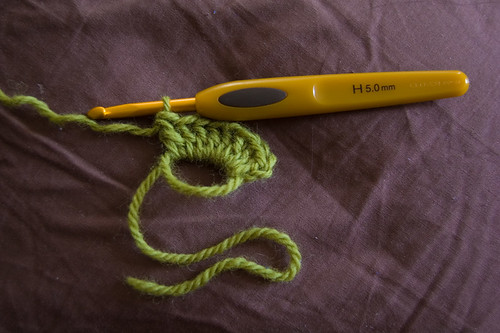
see the little tail on bottom? you pull that and it cinches the circle closed, as such:
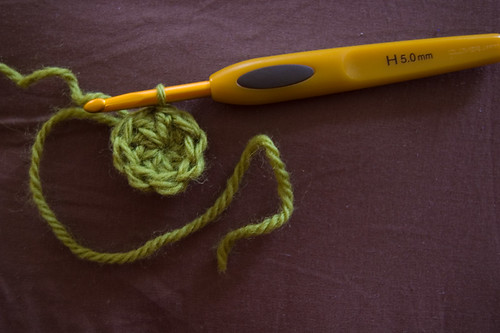
after cinching, slst into the top of the first DC, ch 2.
[See THIS POST, if you need more information about the beginning round.]
Round 2: 2 DC into each stitch, slst into top of the first DC, ch 2. (16DC)
Round 3: 1 DC into same place, 2 DC into next st, *1 DC into next st, 2 DC into next* to the end, slst into top of the first DC, ch 2. (24DC)
Round 4: 1 DC into st and into the next, 2 DC into next st, *1 DC into each of the next 2, 2 DC into the next* to the end of the round, slst into top of the first DC, ch 2. (32DC).
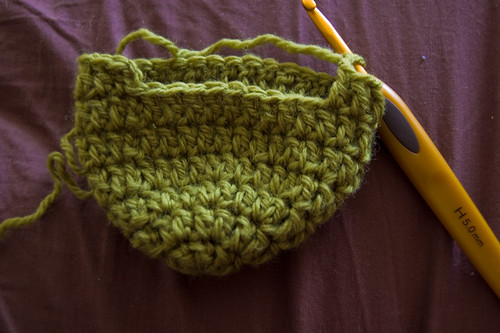
This is what my piece looked like after round 4:

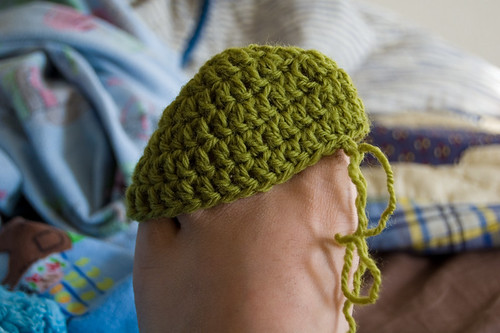
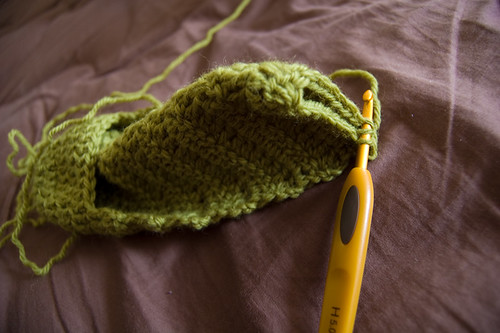
Work 2 rounds even (NO INCREASING). By this time, the little “cup” should fit over your toes, like so:
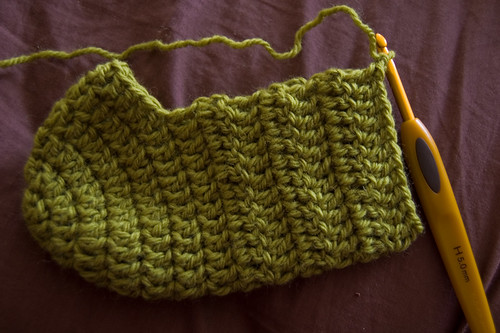
Now, we’re going to be working back and forth in ROWS. DC into the first 23 stitches, leaving 9 unworked. Ch 2, turn. It will look like this:
Keep working back and forth over these 23 stitches for 12 rows.
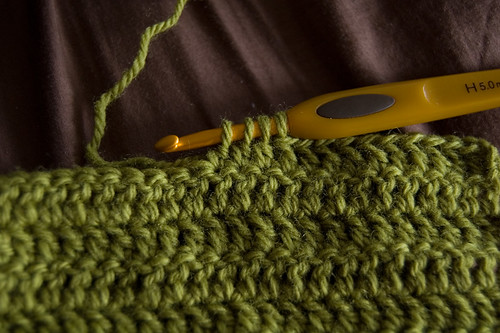
This is my half-way mark:
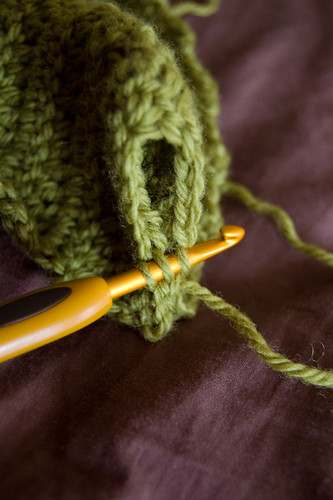
On row 13, DC into first 10 stitches, then DC 3 tog:
DC to the end, then seam up the heel by putting the right sides together and slip-stitching from the top down to the bottom of the heel:
I like to grab the back-loop of the half that’s closest to me and the front loop of the other half:
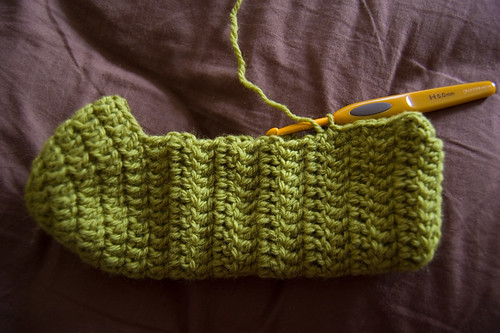
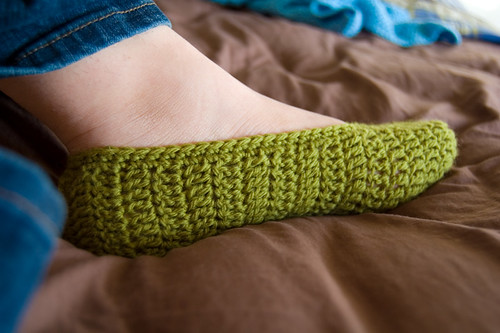
now, you should have a basic slipper. it will fit kind loose around the sides:


the following instructions for finishing up the slipper are probably what most people get stuck on. I really hope the photos help.
Here goes!
join your yarn at the center back of the slipper, above the heel.
sc into that same spot, it should be into one half of the side of a DC.
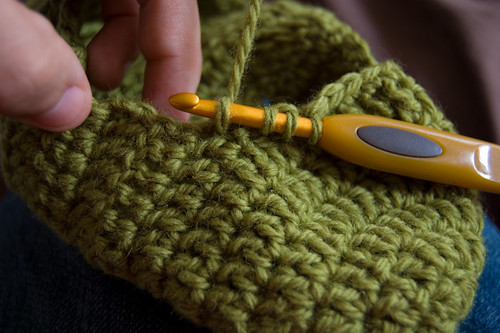
you’re going to be working down the side of the DC that make the foot of the slipper. work 23 sc down the side, or 2 sc into the side of each row, until you get to a corner:
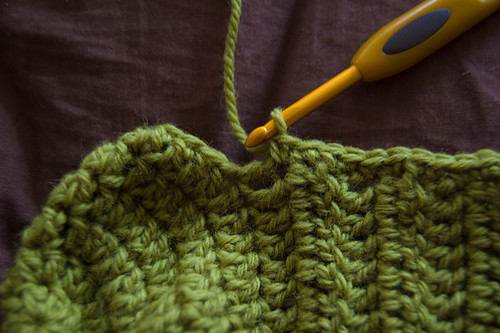
At the corner, sc3tog (half of the last side DC, and the first 2 DC on the top.
SC into next 5 DC.
sc3tog (last 2 DC on toe top, and half of the first DC up the next side:

SC 24 times up the side toward the heel.
you should have space for one last SC, so SC that space together with the first sc.
(working on the second round of single-crochet): SC2tog
SC into next 22
SC3tog at the corner
SC into next 3
SC3tog at next corner
SC into next 22
SC2tog
slst into next, fasten-off.
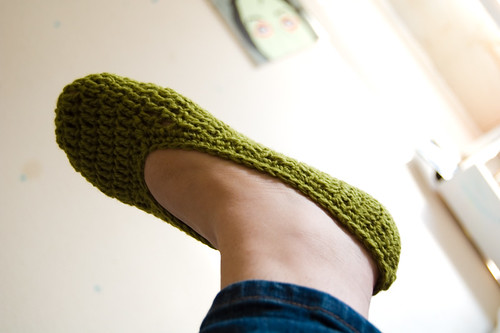
your slipper should fit a little more snug:
If you had any problems with the previous directions, just improvise. You’re basically just making the edge more snug. I liked to decrease at the heel and at the top two corners near the toe.
Now, join your CC yarn at the center back.
SC into same spot.
SC 31 sts (to where you want your loop closure).
On SC #32, bring up a loop approx. 2″ long:
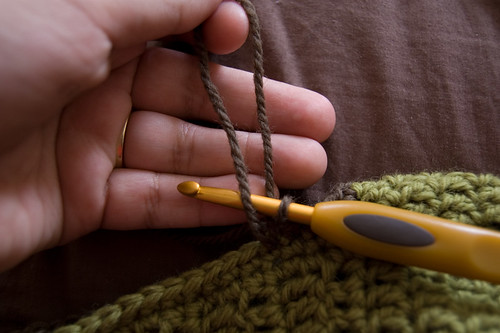
sc as usual (just w/ a big loop!) then sc to the end. slst to first, and fasten-off.
sew a button across from the loop and you’re done!
you could also re-inforce the loop by joining your yarn at the loop-sc and SC all the way around it.
Download the
[PRINTER-FRIENDLY VERSION]
(right-click, Save As…)
It includes no photos and some instructions/tips on adjusting the size and a different starting method. I still suggest viewing the photos if you have any trouble with the steps, because things can get a little tricky and are hard to explain at some points.
This pattern is available for free. If you would like to contribute anything toward the cost of maintaining this blog, please feel free to use the donate button below. Every little bit counts. Thank you so much! Enjoy!


Thank you so much! I love this pattern, and it’s so simple! My feets where a little bit smaller, so I just left round 3 out of the pattern, and instead i just went round (sorry for my bad Englisch), so I got 24 instead of 32. Thank you for sharing this!
Xx
Do you have instructions of similar slippers but using knittinig needles
[…] This month’s project was a pair of slippers and the project is from a blog called Goodknits. […]
Thank you. I love. :)
[…] for making slippers! My frozen toes and impatience led me to a wonderful pattern for crocheted Mary Jane Slippers. I was able to finish a pair in an afternoon. With a few of my own adjustments, I ended my day with […]
[…] So, now I was ready to tackle a pattern and my first choice were these great Mary Jane slippers from Goodknits. […]
The first row you say to crochet 6. Then the next row you say to double crochet 2 in each, which would make 12, but at the end of row two you say it will be a total of 16 stitches. How does that work? Also, are you counting the chain 2’s as the first double crochet? When you slip stitch beginning and end of the rows together does the first stitch of the next row go in that stitch or the next one? Thanks!
The first round is 8 DC into a circle, so doubling that will leave you with 16. The ch 2 does NOT count as a stitch. The first DC of each round goes into the slip stitch and the first DC of each ROW goes into that first stitch.
Hi there!
I just learned to crochet at the beginning of the year, and I have loved working with this pattern! It is very easy to understand. I do have one question, however. After you have joined the heel, do you mean to finish and begin with new yarn at the top of the heel? That’s what I’m understanding you to mean, but I can’t tell for sure from the pictures.
Thank you!
Bethany
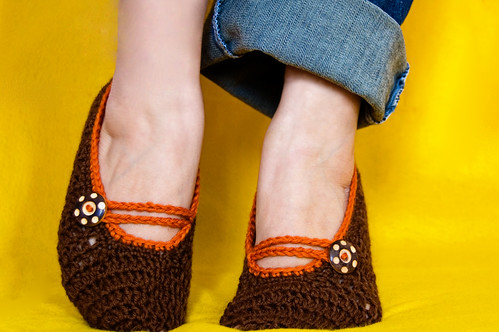
Really easy pattern to follow for MJ slippers – thankyou! The picture at the end of brown slippers with orange trim – how do you do the button strap on that one?
For that one, I just attached my yarn where I wanted the button strap and chained a big loop. I slip-stitched back to the beginning and that was it.
Im not sure how to single crochet around the loop. Can you help me understand?
[…] Mary Jane Slippers on GoodKnits (women’s large, but easily adjustable) […]
Lisa, I think that in round 3 one should start like this: chain 2, DC in the same place, 1 DC in the next, 2 DC in the next and so on. Otherwise, one would obtain 26 DC at the end of the round.
Thanks! This really helped me get a smaller size! :)
Hello,
I’m a primary school teacher from the UK looking for a crochet slipper pattern for my students to use (we’re moving on from hats!).
I’m not able to show them your blog in school because of our web-filtering, so would you agree to me copying the photos into a Word document so I can show them what the slippers should look like along the way?
I think I will have to ‘translate’ the pattern for my students, as we use UK terms – so for us these slippers will be mostly trebles with some double crochet at the end.
Any chance u can tell me how to make thiese in toddler size? Love these. Thanks
es maravilloso todo lo q hace yo estoy todavia empezando pero me llama mucho todo esto me emociona mucho
Thank you for your “MaryJane slipper” pattern, it was very easy. Easy to follow your directions also. The only thing I did different was, I inserted a pair of foam intersoles cause the yarn hurt my foot when standing. Thank you again.
I ready enjoyed the simplicity, flowers were just beyond my imagination,.but now I’ve made them (black w/hot pink) I think I can design my own now! Thank you so much!
This is the best slipper`s pattern i have ever seen !! thank you so much
[…] erste Paar habe ich so gut wie fertig, die Grundanleitung hab ich hier her, hier gibt es auch eine auf […]
love these slippers. they’re just what i was looking for. thanks so much for sharing :)
thank you so much for this pattern. I just whipped a pair of these up for my grandma for her birthday and it only took me a few hours. its super easy to follow and the pictures are a great help!
boa noite adorei sua explicaçoes ..muito obrigada
I wanted to discuss this blog, “Mary Jane Slippers
Thank you, this is exactly what I was looking for to make for mother’s day. Thank you for taking the time to post this.
[…] At this point I was looking to make anything I could that would work up quickly and be fun and a little different to make. So I started to look for some crochet boots. Unfortunately for me these patterns were so difficult to read for a beginner. But I decided to try making a Mary Jane bootie instead just as a place to start. I love them! I will still try a full boot at some point but now that spring has sort of arrived here I will hold off. I love these little booties and will love them more when I finally get some buttons to put on. It was a super easy and fun pattern that I found at this link: http://goodknits.com/blog/mary-jane-slippers/ […]
I made my first slipper last night thanks to your tutorial!
But I have trouble crocheting down the edge once I’ve made the slipper. I seem to have a lot of holes and it didn’t turn out anywhere as neat as yours :(
Any advice on how to fix this?
[…] leírást itt találtam, de persze a méretnek megfelelően változtattam egy-két […]
These are the cutest slippers! Could you please give directions for making and xlarge (10.5-11.5) as well as small sizes. I know all family member will greatly enjoy their new slippers!!
Wow, that’s exactly how I made MY slippers, down to the trim around the edge, I made 3 rows so it’s a bit higher like a cuff. But I never thought to put a button and loop on it. That is so gorgeous and cool. I might just go get my slippers and add that feature onto it!
Your photos are great btw, very clear pictures to accompany the instructions. That’s how I can tell we used a similar pattern. You make it look so easy, you inspire me to make another pair. Happy July!
Thank you so much for posting this pattern, I just made mine in a little over 4 maybe 5 hours. I did improvise on the strap and added flowers to the outside of the straps instead of having buttons. These are so cute and comfortable and I really love them.
Thank you for the free pattern and step by step guide I can’t wait to start making these as christmas gifts for some of my family
from Emily
About how many ounces did you use to make the slippers? I want to make some for my Mother’s christmas gift and need to order yarn. Thanks! I been searching for a long time tonight for some cute ones, and these fit the bill!
I modified a crochet mitten pattern to make slippers very like these. I make the toe part deeper to cover the top of the foot and this way there is no need for a strap. I only make these for my daughter granddaughters and myself. Really easy to make and warm and cozy.
HI MaryJane I am from Austria my problem is I never now the ply of wool like the word worsted weight like we go with say 8plt or a 5ply please could you help out
mary Victoria Frendo
How do you work back and forth? I’m really confused and I am stuck!! Please help!!
When you get to the end and ch 2 just turn your piece around and go back across. So one row you will work on the inside and the next row will be worked from the outside. Hope that makes sense to you.
Love this pattern ! The slippers are adorable ! Thank you for sharing!
Hi , I love this pattern simple ,I try to make this for my aunt .thank you so much .;)
Hi, My Aunt is in love w/ this pattern and wants me to make them for her, about how much yarn would it take to make a pair of these in a size 6 or 7? Thanks,
Jeanne
Hi, I’m looking for the Mary Jane baby booties / ballet style booties, could you point me in the right direction please or can you get them in ect regards Jenny’
[…] λίγο καιρό βρήκα ένα σχέδιο για πλεκτά παντοφλάκια εδώ, και τώρα που η εποχή είναι κατάλληλη είπα να το […]
love this pattern also enjoyed looking through your sight very nice
[…] Oppskriften er gratis, og jeg fant den her! […]
Thank you so much for this easy slipper pattern! This is the first time I’ve crocheted slippers and it was so easy. I’ll be making quite a few pair for Yule presents. ;)
I was wondering how to adjust for a size 7/8. Thank You
Thanks for sharing! This looks like exactly what I have been looking for. I can’t wait to get started on some Christmas gifts.
I really like this pattern, thx!
Any advice for using a “super bulky” yarn?
I LOVE this pattern, I didn’t think it would be so easy!
Going to be making a pair for my grandma for her birthday. :)
Thanks for the pattern and pictures.
[…] bit more refinement but they fit really well. The pattern was listed in Ravelry but can be found on goodnkits […]
Thank you for sharing! this is my first time follow a pattern so thank for making it easy.
What do you mean when you say work 2 rounds but don’t increase? Are there specific directions for these rounds?
Thanks for getting back to me!
I’m glad you said to improvise because I spent 2 hours trying to figure out that “sc” (small letters) meant to “skip” and “SC” (capital letters) of course means to single crochet. If you were to rewrite the last bit of directions and change “sc” to “sk” it would be very helpful. Also if you were to do the trim in a contrasting color it would be easier to follow. It would be worth it to revise your directions since it is a cute pattern (and it could save someone a big headache). (If I am mistaken please let me know) Thanks!
Hi,
How could a purchase a pair of these beautiful slippers?
Im in Calgary, Alberta Canada
Kind regards,
Debbie