Mary Jane Slippers
By Lisa Gutierrez on 04/01/2008
**I thought this was obvious, but apparently not: PLEASE OH PLEEASE do not use any of my photos without my permission! I’m a nice person, so if YOU ask nicely, I’d make a consideration. Also, don’t post this pattern anywhere else. A simple link to this page would be a great way to share it. You CAN sell slippers you make, of course, but for pete’s sake, take photos of what you made to show your customer/s! Keep those hooks going!**

PRINTER-FRIENDLY version link at bottom!
![flower garden slippers [4]](http://farm5.static.flickr.com/4055/4412351745_1cc2bb5572.jpg)
I’ve received many messages via Ravelry about these slippers. It’s more of a tutorial than a pattern. It’s very easy to adjust to your size, but if you still have questions, please feel free to email me! lisa@goodknits.com.
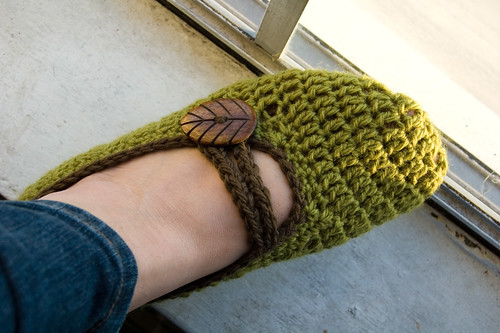
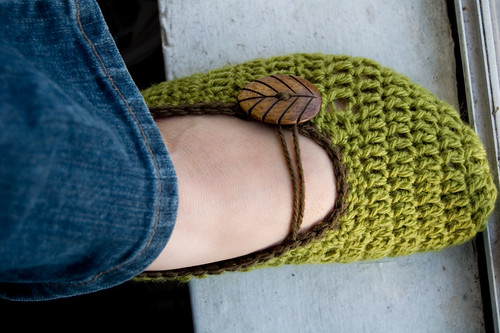
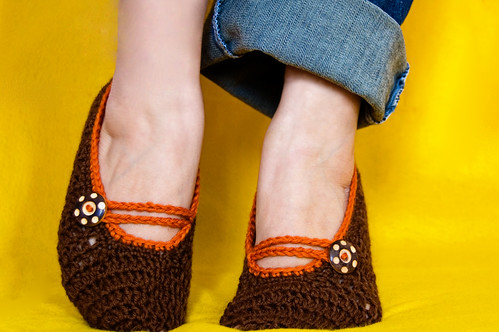
Crocheted Mary Jane Slippers
(women’s large–9.5-10)
Materials:
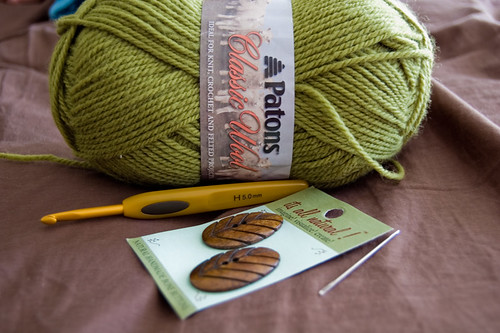
worsted weight yarn
H-hook
2 buttons
tapestry needle
you’ll also need some yarn in a contrasting color. I forgot to put that in my photo.
First, start with 8 DC into a circle. This is how I like to do that:
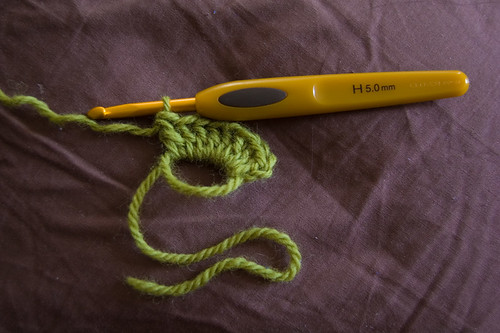
see the little tail on bottom? you pull that and it cinches the circle closed, as such:
after cinching, slst into the top of the first DC, ch 2.
[See THIS POST, if you need more information about the beginning round.]
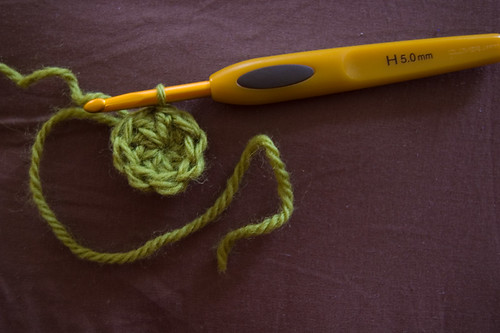
Round 2: 2 DC into each stitch, slst into top of the first DC, ch 2. (16DC)
Round 3: 1 DC into same place, 2 DC into next st, *1 DC into next st, 2 DC into next* to the end, slst into top of the first DC, ch 2. (24DC)
Round 4: 1 DC into st and into the next, 2 DC into next st, *1 DC into each of the next 2, 2 DC into the next* to the end of the round, slst into top of the first DC, ch 2. (32DC).
This is what my piece looked like after round 4:

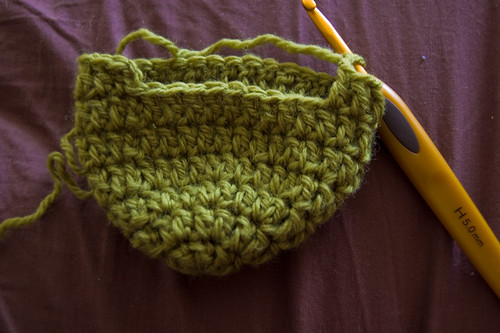
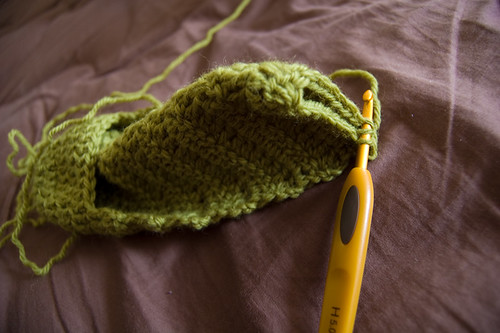
Work 2 rounds even (NO INCREASING). By this time, the little “cup” should fit over your toes, like so:
Now, we’re going to be working back and forth in ROWS. DC into the first 23 stitches, leaving 9 unworked. Ch 2, turn. It will look like this:
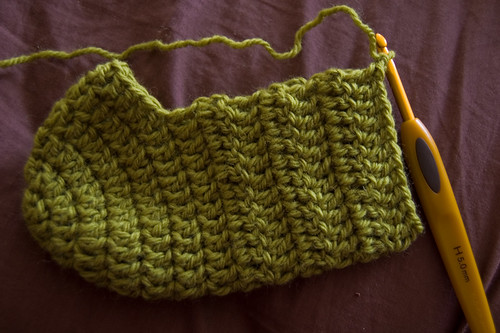
Keep working back and forth over these 23 stitches for 12 rows.
This is my half-way mark:
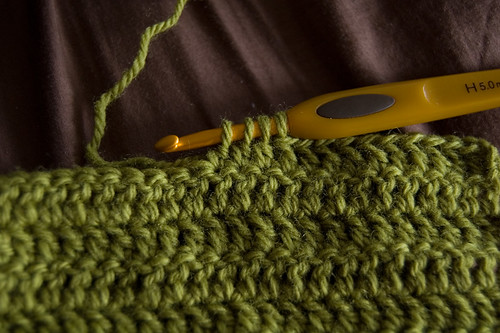
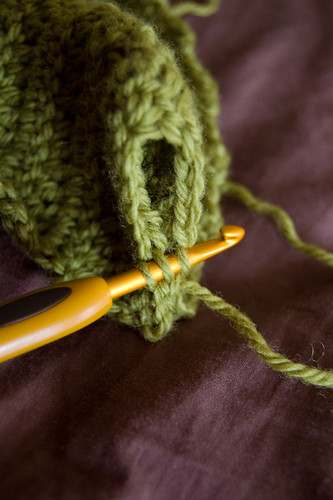
On row 13, DC into first 10 stitches, then DC 3 tog:
DC to the end, then seam up the heel by putting the right sides together and slip-stitching from the top down to the bottom of the heel:
I like to grab the back-loop of the half that’s closest to me and the front loop of the other half:
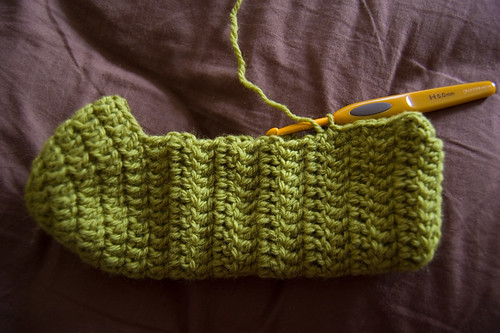
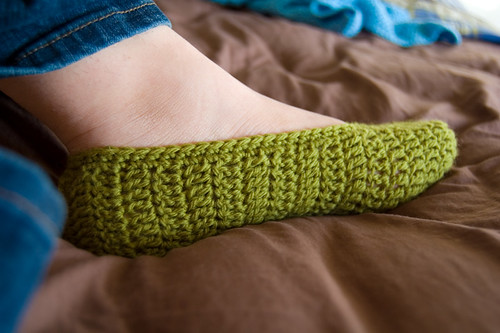
now, you should have a basic slipper. it will fit kind loose around the sides:


the following instructions for finishing up the slipper are probably what most people get stuck on. I really hope the photos help.
Here goes!
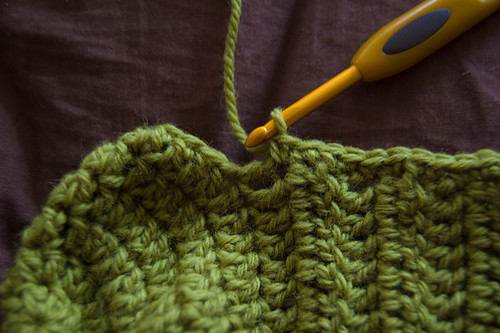
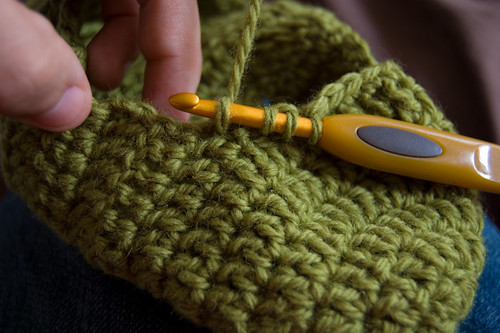
join your yarn at the center back of the slipper, above the heel.
sc into that same spot, it should be into one half of the side of a DC.
you’re going to be working down the side of the DC that make the foot of the slipper. work 23 sc down the side, or 2 sc into the side of each row, until you get to a corner:
At the corner, sc3tog (half of the last side DC, and the first 2 DC on the top.
SC into next 5 DC.
sc3tog (last 2 DC on toe top, and half of the first DC up the next side:

SC 24 times up the side toward the heel.
you should have space for one last SC, so SC that space together with the first sc.
(working on the second round of single-crochet): SC2tog
SC into next 22
SC3tog at the corner
SC into next 3
SC3tog at next corner
SC into next 22
SC2tog
slst into next, fasten-off.
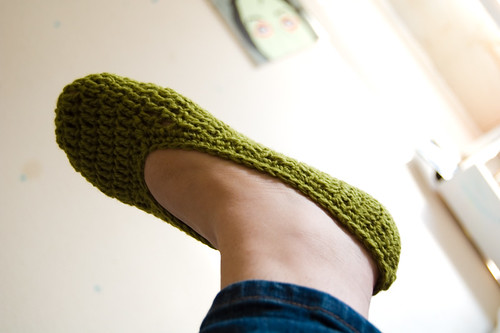
your slipper should fit a little more snug:
If you had any problems with the previous directions, just improvise. You’re basically just making the edge more snug. I liked to decrease at the heel and at the top two corners near the toe.
Now, join your CC yarn at the center back.
SC into same spot.
SC 31 sts (to where you want your loop closure).
On SC #32, bring up a loop approx. 2″ long:
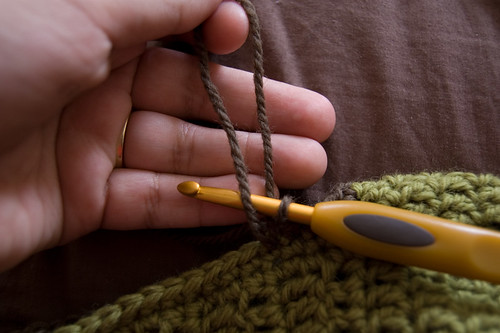
sc as usual (just w/ a big loop!) then sc to the end. slst to first, and fasten-off.
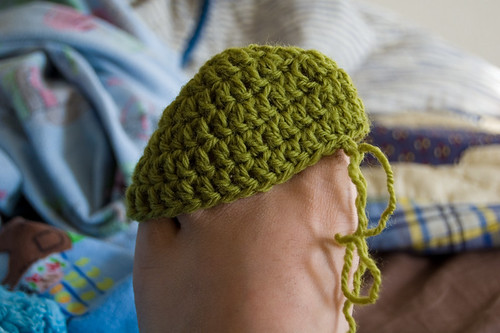
sew a button across from the loop and you’re done!
you could also re-inforce the loop by joining your yarn at the loop-sc and SC all the way around it.
Download the
[PRINTER-FRIENDLY VERSION]
(right-click, Save As…)
It includes no photos and some instructions/tips on adjusting the size and a different starting method. I still suggest viewing the photos if you have any trouble with the steps, because things can get a little tricky and are hard to explain at some points.
This pattern is available for free. If you would like to contribute anything toward the cost of maintaining this blog, please feel free to use the donate button below. Every little bit counts. Thank you so much! Enjoy!


Hello, I’m from Chile and I please copy this pattern for Spanish translation. Thank you.
Here’s a Spanish translation:
http://translate.google.com/translate?u=http%3A%2F%2Fgoodknits.com%2Fblog%2Fmary-jane-slippers%2F&langpair=en%7Ces&hl=en&ie=ISO-8859-1&oe=ISO-8859-1&prev=%2Flanguage_tools
Thank You for sharing and giving us this pattern free! All I wanted was to make my Mom some slippers, but this was the only photo tutorial I found, I’m still learning to read patterns, and there usually isn’t any photos to help. I really appreciate this, thank you!
P.s. I found your tutorial on ravelry :)
Jen
What size of slipper does your pattern make? I appreciate your tips on how to make it bigger or smaller, but I am wondering what is the size you started with. Thanks J
This is probably the best slipper pattern I’ve come across! Thank you so much! I will be making TONS of these!!!!!!!
I also like the chain loop closure. It looks crocheted without the bulkiness of the sc.
please let us know what size this is for otherwise we have to make one to guess. thank you and thanks for the free pattern
At the top of her pattern it shows womens large (9.5-10). Hope that helps :)
Thank you so much!!! I made a pair of slippers the other night and they were too loose. I kept trying to find someone that actually explained a finished pair. I’m off to finish my slippers! Thank you!!! :)
I love this pattern and will be making it shortly! Question: When you say sc3tog or dc5tog, etc., are you meaning to crochet in the same stitch? I’ve had diff patterns mean diff things. Just want to clear that up before I get started. It’s mainly in the edging that tightens up the slippers.
Thanks,
Carrie
It’s a decrease, so you would crochet one SC across 3 stitches (SC3tog) or one DC across 5 stitches (DC5tog).
hi, this will be my first proyect in crocheted so… wish me luck. how I start? just with one hup?
Susana, to start simply make a slip knot. In this pattern she crocheted the 8 double crochet stitches into the slip knot. :)
Last night I made my slippers.
I really want to thank you for this great pattern!!
I published on my blog with a link to your pattern.
Thanks!
Marlene
I love this pattern and I cant’ wait to see the finished product! I’m new to crochet and I am stuck after round 4. When you say “Work 2 rounds even (NO INCREASING)”, do you mean 1DC in each of the stitches for 2 rounds? Also, at the end of round 5 slst and chain 2, as usual?
Thanks in advance!
Thank you for the great pattern! I have been able to easily re-size to make a pair for my 9-year old as well as myself. I think these are my homemade gifts for this year!
Ok so I love this pattern but I need it in PDF so I can read it on the road could you do that for me? Or do I have to do it?
I’m stuck with this……….. When u went around the edges it looked ugggggggly ! Like jagged nothing like yours
The first time I went around the edges, I used the same color as the slipper, so it will create an even edge, then I attach the contrasting color to make the final edge.
Thanks so much for such a wonderful clear pattern xxx I have so many ideas for presents now I don’t know where to start ;-) Just to add that I think this pattern is made in american size 9.5-10 which is actually a UK 7-7.5 xxx
Hi, I have never crocheted before but I wanted to do something special for my new niece that will be here on Christmas. My sister-in-law is particular and I think this would be something that she would love. Would you be able to tell me what I need to do for an infant size? I would be very greatful! :) thank you!
I usually suggest my Toddler slipper pattern for baby shoes. http://goodknits.com/blog/toddler-slippers/
To make them Mary Jane style, make only one even round instead of 3, then work the sole over 5-7 rows. Make the strap when you crochet the border around the opening.
It would be helpful to know her shoe size, so you know how long to make them. There are several sources for converting shoe sizes to inches. Make the slippers about half an inch shorter than you need, so they will stretch over the foot and be more snug. If you make them too loose, they’ll be falling off all the time.
Try it out and let me know if you have any more specific questions!
Hi! I love these and would like to make them for myself and my sisters. Can you please tell me the best way to adjust for a smaller size. Thanks!
I am so confused on step 13…I don’t understand how to finish the heel! Help please’
Row 13: On row 13, DC into first 10 stitches, then DC 3 tog, DC to the end.
The decrease in the center (DC3tog) of a regular row just provides some shaping.
Seam up the heel by putting the right sides together and slip-stitching from the top down to the bottom of the heel.
I hope that helps!
muchos saludos estoy muy agradecida por tan bellos modelos en crochet me gustaria aprender hacer un tejido por mis manos gracias
These are so adorable! I’ve been looking for a slipper pattern that I would actually want to wear for so long!!! These are the winners :). Thanks so much for sharing!
Hello, I am trying to make these slippers for my nieces but the toe keeps turning into a cone shape – not your nice rounded shape. Do you have any tips to stop this from happening?
How is your tension? I think if you crochet too tightly, it’ll make it
more cone-y. If you loosen it up a bit and it’s still not more
rounded, try starting with 10 stitches instead of 8 and then increase
to 20 and then 30. When we make hats, we usually start with 12 and
increase by 12 so the top is way flatter and more rounded. For
slippers, we need to start with less stitches so it curves up more
around the toes. Have you tried them on? Does the cone look weird, or
does it flatten itself out when stretched?
Let me know how it goes!
Muchisimas gracias por el tutorial. Quedan unas zapatillas preciosas. Intentare hacerlas a ver que tal me quedan, no parecen dificiles
besos
I would like to make these for my daughter who is 8, wearing size 3. How would I adjust the pattern for her size? Thank you so much!
First off, it will be loads easier to get the right fit if you can try it on her as you go. Make notes as you crochet so you can make the second slipper with your exact pattern. The Mary Jane slipper page on my blog is mainly a blue print for you to create your own custom patterns!
To start, you should probably increase the toe to only 24 (8, 16, 24), then crochet about 2 rows even (1 DC in each DC), then work the sole across about 18 or so stitches. Create the foot of the slipper about 0.75-1″ shorter than her foot. Crochet stretches, so making it a little smaller will produce a form-fitting shoe. On the last row, decrease by 2 stitches in the center to shape the bottom of the heel (see original page for a visual on how I did that). Seam up the back, then crochet around the foot opening to tighten things up a bit. I suggest crocheting that first border row in the same color as the slipper, then making 1 row of contrasting SC.
Good luck!
Don’t forget to take notes!
Hello! My daughter just requested a pair of home crochet slippers and I considered making them, thus came up on your instructions. However never having crochet before , I do not know if I can do this. Do you sell slippers already crochet? Looking forward to hearing from you. Thank You, Doris
Hi I found your pattern on Ravelry. I hope its OK to post this on my Facebook page? I want to make some for my sisters for Christmas. I am planning to do them in red and green with christmas themed buttons. I will post my photos on my Ravelry page once done. Thanks for the pattern
Nurse Ratched x
You can post a link to the blog page, yes. Please do not reproduce the entire pattern, though. Thank you!
lovely slippers! I´ll put the link in my blogg, Thank you for sharing.
gracias esta pagina es la que buscaba
It didn’t fit around my toe. Should I add another even round?
Add another even round, if it wasn’t long enough. If it didn’t feel wide enough, you might consider adding a few more stitches around.
Thanks, that was helpful. But after seeming up the heel, I find a small hump at the bottom. Can you tell me what went wrong?
Did you figure this out? Where is the hump? by the seam? The purpose of the decreasing in the last row is to curve the heel up a bit, to hopefully avoid any bumps. How does the slipper fit? Is it snug enough (length-wise)? If it isn’t form-fitting, you could try and eliminate a row of stitches from the length and maybe it will smooth out any bumps.
Do you mind if I pin this to my crafts board on pinterest it will direct link to your page
Its tooo large how can i smallen it???
hello, it is so beautiful but my english is not very good and i don’t understand…could i have the french translation please ?
thank you so much
Aude
Hi! Love the picture tutorial, but I’m having issues. I just got started and I got through the first 4 rounds fine, but when I went to work the next two rows, the cup never formed. It just looks like a potholder. I cannot figure out what I’m doing wrong. I just started crocheting so I know it’s just me not knowing how to proceed. I taught myself as well and I’ve realized figuring out how to read patterns is half the battle. Thanks so much!!!
Thank you for all the patterns you share. I’m making my christmas gifts this year. Money is tight and some times by the time I pay for the pattern I can’t get the yarn I would like to use. You have been a very wonderful place to get the patterns. Again thank you.
[…] to subscribe to the RSS feed for updates on this topic.Powered by WP Greet Box WordPress Plugin Photo courtesy of Good Knits! Are you like me and simply adore a cute, comfy slipper for the cold months? Well if you’re […]
Thank you for this tutorial and all the time you put into posting. These are so cute and easy to make. I made tons of homemade gifts this year and decided to make something for myself. These are perfect!
[…] post of a work in progress for my crochet slippers. So here we go. I found a great blog post called good knits that features a really nice pair of crochet Mary Jane slippers. This tutorial gives directions for […]
AMAZING !!!!
I must do it and i will !!
but i didn’t really get the FIRST step :/
” 8 DC into a circle ” can u explain more ? u didn’t say ” make a slip knot and chain 8 ” how can i make a DC without chain first ? at least show us a pictures :( , the steps i did ” chain 8 then join with a slip stitch then doing the DC ” but it’s so diffrent than yours *sigh*
PLEEEEASE axplain this one and thank soo much :)
Hi! I use a magic loop. At the top of the pattern page, you will find a link to some thoughts on the magic loop method and just chaining. http://goodknits.com/blog/2012/03/14/crochet-chain-circle-vs-magic-loop/ There, you can also find links to videos/directions for the magic loop, if you would like to try the technique.
Howaah, i surprised when i saw ur replay :o
thank u for the quick answer ;D
Hmmm … But i didn’t understand what u mean in this
” Work 2 rounds even (NO INCREASING) ”
Can u explain it more, again ?! ^^”
*i’ll probably annoy u ‘cuz i’m still learning, sorry*
One dc in each dc around for those two rows
uhmm .. u mean one DC under the V form for 2 rows ?
It means to work 2 rounds of 1 DC into each stitch. You don’t increase or anything.
Hi. First of all I want to thank you for the wonderful tutorial, it is one of the easiest and best I’ve found so far. :-)
& second, I was wondering what size needle or what would I have to do to fit a size 5? Please help.
Thanks once again. :D
Thank you so much for posting this pattern! I have made a few pair already, and I’m making more for anyone and everyone who wants them! Simple, quick, easy! Adjustments are simple, too. Thanks again
I love this pattern , but , there is one question about , how much yarn do i need ? thanks a lot
[…] these crochet […]
[…] Here is the pattern. […]
Thank you so much for this pattern! i made a pair for myself (in mismatching colors because i ran out of the original color i started with- still turned out pretty adorable though) and they’re amazing in my drafty house this winter. The pictures really really helped me with the pattern, which I didn’t find too difficult to read. I love how wonderfully versatile your pattern can be. :) Thanks again!!!
I have made almost one pair of these in a size that would fit a 7 or so inch foot — for about a 5 year old. Also made the pattern’s size which fits me. A couple of questions came up as I was making them and I can only remember one so far which is about the strap. Is there an easy way of making the strap apart from the slipper and attaching it separately? I have looked at tutorials online but I’m finding the whole “joining yarn” extremely confusing. This pattern is quite nice though so thank for you it! I hope I will become good enough to elaborate on it and make something new, too. I have only been crocheting since Dec 31 and these are my first slippers (besides trying the Bernat family slipper pattern that I made a mess of, lol.)
Hi there!
An idea for an alternative strap is to crochet to where the strap is going to be and instead of doing the loop stitch like the pattern, just chain a number of stitches that will reach across your foot (times 2, because you need it to come back), then slipstitch in all chains back to the slipper. Complete the row as usual and when you are done, you can fold the strap in half and sew it down.
I hope that helps!
Lisa
hermosas, ya las hice en varios colores y las regale a mis amigas quedan preciosas
gracias , el detalle del boton es muy lindo
Hi I’m also stuck after round 4.
Is it 1dc in each st. For 2 more rows?
If so when I started the now 7th row (23 sts) I end up with 5 extra sts.
Instead of the 9 you leave open. So 14 total would be open.
Where did I go wrong there ?
Thank you
Just made these as a gift. Love it!! Thanks for the pattern!!
Hi I’m stuck where you said most people get stuck! I reattach my yarn but im confused on where to sc into down the side! Please help! Thank you so much!
beautiful pattern thanks sooo much! btw looooove the buttons you were using! :)
Does the ch2 count as a double crochet?